

Replace the Dyson V11 battery by removing the lower screw, sliding out the pack, and installing a compatible replacement.
If your Dyson V11 no longer holds a charge like it used to, you are not alone. Battery wear is one of the most common issues with cordless vacuums, and the good news is that the Dyson V11 battery is designed to be replaced without a full repair shop visit. In this guide, I’ll walk you through how to replace Dyson V11 battery the right way, what to check before you buy a new one, and how to avoid the mistakes that can shorten battery life again.

Why You Might Need to Replace the Dyson V11 Battery
A Dyson V11 battery is a lithium-ion pack, and like any rechargeable battery, it loses capacity over time. That does not always mean the vacuum is broken. Often, the machine is still fine, but the battery can no longer store enough power for a normal cleaning session.
From experience, the first signs are usually small. The vacuum might run for less time than before, shut off early, or need charging more often. In some cases, you may also see blinking lights, reduced suction, or the vacuum stopping in the middle of a job.
Common reasons to replace the Dyson V11 battery include:
• Short runtime, even after a full charge
• Battery not charging at all
• Flashing warning lights
• The vacuum turns off under load
• Charging time feels normal, but power drops fast
• The battery is old and has gone through many cycles
Dyson batteries are built for regular use, but no lithium-ion battery lasts forever. If your vacuum is several years old and the runtime keeps dropping, replacement is usually the most practical fix.
What You Need Before You Replace the Battery
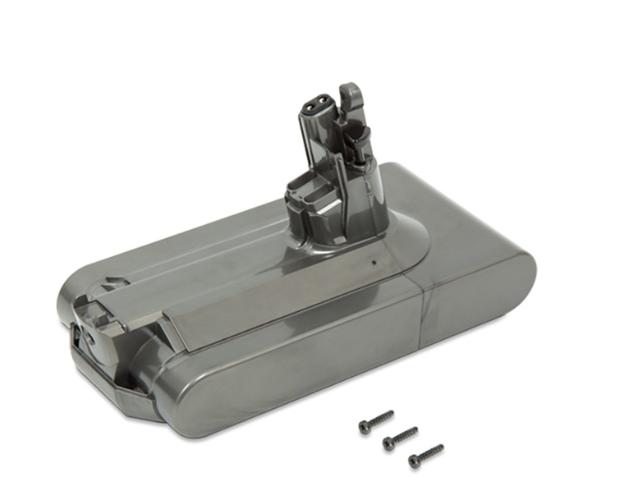
Before you start, make sure you have the right replacement battery and a few basic tools. The Dyson V11 battery replacement process is simple, but choosing the wrong part can lead to poor fit, weak performance, or charging problems.
You will need:
• A compatible Dyson V11 battery
• A Phillips screwdriver
• A clean, flat work area
• The vacuum turned off and unplugged from the charger
• Optional: a soft cloth to protect the machine while you work
Not every Dyson battery labeled “V11” is identical. Some V11 models use different battery shapes or capacities, so check the exact model name on your vacuum. Matching the part number is better than guessing from the product title alone.
When I have helped people with this repair, the most common mistake was buying a “compatible” battery without checking the connector shape or model support. That small oversight can turn a 10-minute job into a return and re-order.
How to Replace Dyson V11 Battery Step by Step
The Dyson V11 battery is held in place with screws, so this is one of the easier vacuum repairs you can do at home. If you take your time and keep the screws organized, the swap is straightforward.
Step 1: Turn off the vacuum and remove any attachments
Start by switching the vacuum off and disconnecting it from the charger. Remove the wand, cleaner head, or any other attachments so the machine is easier to handle.
This also helps you inspect the body for dirt, damage, or loose fittings. A clean machine makes the rest of the process smoother.
Step 2: Locate the battery screws
On most Dyson V11 models, the battery is attached near the handle and lower body. You will usually find one or more screws securing it in place.
Some units have a screw at the bottom and additional screws on the side or rear. Before removing anything, look closely so you know which screws belong to the battery and which do not.
Step 3: Remove the screws carefully
Use the Phillips screwdriver to remove the screws holding the battery in place. Keep steady pressure so you do not strip the screw heads.
Place the screws somewhere safe. I like to use a small cup or tray, because losing one tiny screw can slow the whole job down more than the repair itself.
Step 4: Slide the battery out
Once the screws are out, gently slide the battery away from the vacuum body. It should come free without force.
If it feels stuck, check whether a hidden screw is still in place. Do not pry hard with a tool, since that can crack the plastic housing.
Step 5: Align the new battery
Take the new Dyson V11 battery and line it up with the mounting points and connector area. It should sit flush without forcing it.
A proper fit is important. If the battery does not align naturally, stop and compare it with the old one to confirm it is the right model.
Step 6: Reinstall the screws
Put the screws back in and tighten them until they are snug. Do not overtighten, because that can damage the plastic threads.
The goal is secure, not crushed. A firm fit keeps the battery stable during use and charging.
Step 7: Charge and test the vacuum
After the new battery is installed, place the vacuum on the charger and let it charge fully before the first serious use. Then test it on a normal cleaning task.
Watch for these signs:
• The vacuum powers on normally
• Runtime is improved
• Charging works as expected
• No warning lights appear
If the vacuum still acts oddly, the issue may be the charger, filter, blockages, or the battery itself if it is not fully compatible.
How to Choose the Right Dyson V11 Replacement Battery
Choosing the right battery matters as much as installing it correctly. A poor-quality pack can cause weak runtime, charging errors, or a shorter lifespan than expected.
Look for these features:
• Exact compatibility with Dyson V11 models
• Good cell quality and proper voltage
• Clear model support details
• Safety protections for overcharge, overheating, and short circuit
• A warranty or return policy
Many users focus only on capacity, like 3000mAh or 4000mAh. Bigger numbers can sound better, but quality matters more than marketing. A well-made battery with honest specs is usually the safer long-term choice.
Also, check whether the battery is OEM or third-party. OEM batteries are often the safest bet for fit and performance, while reputable third-party options can offer good value if they are well reviewed and clearly made for your model.
Signs the Battery Replacement Worked
After replacing the Dyson V11 battery, you should notice a few clear improvements. The vacuum should run longer, charge normally, and stay stable during use.
Good signs include:
• Longer runtime on a full charge
• No sudden shutdowns
• Stable suction during cleaning
• No battery warning lights
• Normal charging behavior
If performance is only slightly better, the battery may still be fine, but another issue may be limiting the vacuum. A clogged filter, dirty cyclone, blocked airway, or worn brush bar can all reduce performance and feel like battery trouble.
Mistakes to Avoid During Dyson V11 Battery Replacement
A simple repair can go wrong when people rush. Over the years, the same errors come up again and again, and most are easy to avoid.
Avoid these mistakes:
• Buying the wrong battery model
• Forgetting to unplug the vacuum first
• Stripping the screws by using the wrong screwdriver size
• Forcing the battery out of the housing
• Overtightening the screws during reassembly
• Skipping the first full charge after installation
One practical lesson I have seen often is this: if a part does not fit easily, stop and reassess. Vacuums are like puzzle pieces, not crowbars. A careful hand saves time, money, and frustration.
Battery Care Tips to Make the New One Last Longer
A new battery is an investment, so it makes sense to protect it. Lithium-ion batteries last longer when they are used and charged with a little care.
Helpful habits include:
• Store the vacuum in a cool, dry place
• Avoid leaving the vacuum in hot cars or near heaters
• Charge it fully, but do not leave it stressed in extreme heat
• Clean the filter regularly
• Empty the bin before it gets packed tight
• Use the correct charger for the Dyson V11
If you clean often, try to avoid running the battery all the way down every single time. Modern lithium-ion packs do not need that old “full drain” habit. Gentle, regular charging is usually better for long-term battery health.
Safety Notes Before You Replace Dyson V11 Battery
Although this is a simple repair, battery handling deserves respect. Lithium-ion cells can overheat or become damaged if they are punctured, crushed, or exposed to water.
Keep these safety basics in mind:
• Do not use a swollen or leaking battery
• Do not open the battery pack itself
• Do not expose the pack to heat or flames
• Disconnect power before removing screws
• Recycle the old battery properly
If the battery looks bloated, smells odd, or gets unusually hot, stop using it right away. In that case, replacement is not just about performance. It is also about safety.
Frequently Asked Questions of How to Replace Dyson V11 Battery
How long does it take to replace a Dyson V11 battery?
Most people can replace the Dyson V11 battery in about 10 to 20 minutes. The job is quick if you have the right screwdriver and the correct battery on hand.
Do I need a professional to replace the Dyson V11 battery?
No, most users can do it at home. The battery is held in place with screws, so the process is simple if you work carefully and use the proper part.
Why is my Dyson V11 battery draining so fast?
Fast drain usually happens because the battery has aged, the filter is dirty, or the vacuum has a blockage. A worn battery is the most common cause when runtime has dropped sharply over time.
Can I use a third-party battery in my Dyson V11?
Yes, but only if it is truly compatible with your exact V11 model and comes from a reputable seller. Low-quality batteries may fit poorly, charge badly, or wear out faster than expected.
How do I know if my Dyson V11 battery is bad?
Common signs include short runtime, failure to charge, blinking lights, or the vacuum shutting off early. If the charger and filter are fine, the battery is often the problem.
Do I need to calibrate a new Dyson V11 battery?
Most replacement batteries work normally after a full charge. A full first charge is a good idea, but Dyson V11 batteries usually do not need a complicated calibration process.
Conclusion
Replacing a Dyson V11 battery is one of the easiest ways to bring your vacuum back to life. With the right compatible battery, a screwdriver, and a careful approach, you can restore runtime and avoid buying a whole new machine.
The key is to choose the correct part, install it gently, and keep the new battery healthy with good charging and cleaning habits. If your Dyson V11 has been fading lately, this repair may be exactly what it needs.
If this guide helped, take a moment to check your model number, compare battery options, and get your vacuum running strong again.

