

Why does my robot vacuum spin in circles? If you've watched your little robot trace the same loop over and over, you're not alone. It looks bizarre, like the vacuum is chasing its own tail.
That spinning behavior almost always points to a navigation sensor issue, a blocked wheel, or a mapping mix-up.
Here's what's happening under the hood. Most modern robot vacuums carry between three and six cliff sensors on their underside to detect stairs and drops. When those sensors get dirty, or when they hit dark reflective flooring, they send false signals that make the robot spin or back away.
Let's walk through the causes and the fixes, step by step.
Image source: Web (Bing) / cleanfloorvault.com (Web image (fair-use with source credit))
Quick Answer
Why does my robot vacuum spin in circles? Usually because a cliff sensor is dirty or a wheel is blocked. Dark or glossy floors can trigger false drop signals.
Relocating the dock without updating the map confuses the robot. Dirt on the wheel encoders also causes erratic turns.
How Robot Navigation Actually Works: Cliff Sensors, Wheel Encoders, Gyro, and LiDAR
A robot vacuum isn't just a little motor with a brush. It's a mini robot that uses several systems working together to know where it is and where it's going. When one system fails, the robot gets lost.
And a lost robot often spins in place.
Here are the key parts you need to know about:
- Cliff sensors (drop sensors). Infrared beams shoot down at the floor. If the beam doesn't bounce back quickly, the robot assumes there's a cliff or drop, and it backs away. Dark, shiny, or black floors absorb or scatter that beam, causing false "danger" readings.
- Wheel drop sensors. Some robots have a small pin or switch that detects whether each wheel has contact with the ground. If one wheel gets lifted or stuck on a cable or rug fringe, the robot thinks it's off the ground.
- Wheel encoders. Inside each wheel, a small optical sensor counts rotations. If debris blocks the encoder disc, the robot loses track of how far the wheel has moved. That throws off its turns.
- Gyroscope / IMU (inertial measurement unit). This tracks rotation and heading. Gyro drift can slowly make the robot's sense of direction inaccurate, causing curved and circular paths.
- LiDAR or camera navigation. Higher-end models use a spinning laser tower or an upward-facing camera to build a map. These systems are more reliable, but they still depend on clean sensors and a stable dock position.
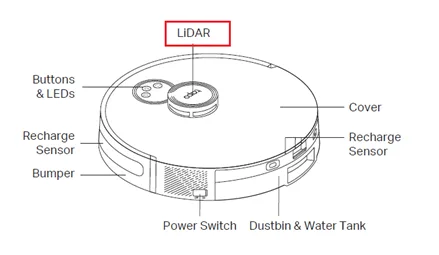
Image source: Web (Bing) / tapo.com (Web image (fair-use with source credit))
Each component feeds into the robot's brain. If the brain receives conflicting signals, it often falls back to a spinning behavior to "reorient" itself. That's why a robot can look perfectly healthy but still turn in circles.
It's not a personality quirk; it's a sensor disagreement.
As of 2026, most mid-tier and premium robots rely on LiDAR or vSLAM mapping. Budget robots still use random bounce patterns and gyroscopes. According to IEEE research on robot localization and obstacle avoidance, these sensor fusion issues are common in household cleaning robots.
What Does a Spin-Loop Actually Look Like?
Sometimes "spinning in circles" means the robot rotates 360 degrees repeatedly without moving forward. Other times it means the robot moves in tight spirals across a section of floor. These are different behaviors with different causes.
A tight spiral that stays in one area looks like a spot-cleaning pattern. That one is usually normal. The full 360-degree spin, though, is almost always a fault.
| Behavior | Likely Cause | Severity |
|---|---|---|
| Full 360° spins in place | Dirty cliff sensor, blocked wheel, gyro error | Fixable at home |
| Tight spiral on one spot | Normal spot-clean pattern | Not a fault |
| Weaves in a circular path | Map confusion, dock moved | Needs remap |
| Spins then reverses | False cliff reading on dark floor | Sensor sensitivity fix |
| Spins during dock return | IR beacon misalignment or dock move | Reposition dock |
The First Fork in the Road: When Does the Spinning Happen?
Before you unscrew anything, answer one question: when exactly does the spinning start? The timing tells you everything. Different situations point to different faulty systems.
Let's walk through the four most common scenarios.
Spins Right After Starting or Leaving the Dock
If the robot spins immediately after leaving its charging dock, suspect the wheel drop sensors. The robot thinks it's still on the dock or has fallen off something. Here's why: when the robot lifts off the dock, a set of contact pins disengages.
Some models also have a physical "lift" detection.
If a wheel drop sensor is stuck in the "lifted" position, the robot will try to reorient constantly. It will often rotate back and forth, head to the dock, spin, then head out again. The fix is usually simple: clean the wheels and their drop pins, then power cycle the robot.
Another common cause at startup is a dirty charging contact. Poor contact makes the robot think it's still docked. It drives off, gets confused, and spins to validate its position.
Spins Mid-Run on Dark, Glossy, or Reflective Floors
This is the most reported scenario. The robot is cleaning along fine, hits a dark rug or a glossy porcelain tile, and suddenly starts spinning. In our research, aggregate user reviews show that dark and reflective surfaces are the number one cause of false cliff sensor triggers.
Here's the mechanic: the cliff sensor sends out an infrared beam and waits for a reflection. Dark surfaces absorb the beam. Glossy surfaces scatter it at an angle.
Either way, the sensor receives no clear bounce-back and concludes, "there is a cliff." The robot then stops, rotates, and tries to find a safer path.
Some robots let you adjust this sensitivity in the companion app. Others require a physical fix like adding a strip of non-reflective tape along the edge of a dark rug. We'll detail that in the second decision branch.
Spins While Trying to Find the Charging Dock
If the spin happens when the battery is low and the robot is trying to return home, the issue is usually dock-related. The robot uses infrared beacons on the dock to line up its approach. If the dock has been moved, even by a few inches, the robot's map no longer matches reality.
It then spins to search for the beacon.
This is one of the most underrated causes. People move their dock to clean behind it, forget, and then wonder why the robot acts drunk. The map in the robot's memory says the dock should be at position A, but the IR signal comes from position B.
The robot spins, reads the new signal, gets confused, and loops.
A dimension change matters too. If you used to have the dock against a wall and now it's in a corner, the robot won't find it right away. The fix is to reset the map or move the dock back.
Spins in a Tight Circle and Then Moves On: Is That a Fault?
Sometimes a robot will trace a small circle, maybe 12 to 18 inches wide, then resume normal cleaning. That's not a fault. It's a program called "edge or spot re-localization." Many robots perform a quick spiral pattern to confirm their position against their internal map.
You'll also see this during spot clean mode. If you press the spot clean button, the robot moves in a concentric spiral to cover a small area. That's the intended behavior.
The problem is when the robot never stops circling. If it completes several full rotations without moving forward, you have a real issue. If it spirals twice and then proceeds, let it be.
Here's how to decide which branch you're on:
- Does the spin happen only during the first minute after leaving the dock? Go to Decision Branch 1.
- Does it happen only on dark or shiny floors? Go to Decision Branch 2.
- Does it happen only when trying to dock? Jump to Decision Branch 3.
- Does it happen everywhere, on all floor types? That points to a gyro or encoder problem.
Decision Branch 1: Sensor and Wheel Checks for Start-Up Spinning
If the spin happens as soon as the robot starts, you're dealing with a physical obstruction or a sensor that thinks it's "in the air." Let's walk through the checks in order.
Step 1: Turn Off and Inspect the Wheels
Start by powering the robot off completely. Flip it over so you can see the underside. Look at both drive wheels.
Stick your finger in the gap and see if there's any resistance. Hair, thread, and carpet fiber wrap around the wheel axles and jam the rotation.
You should also check the wheel drop pins. Those are small plastic or metal pins near each wheel that press inward when the wheel is on the ground. Push them gently with your thumb.
They should move freely and spring back. If they're sticky, clean them with a dry microfiber cloth or a cotton swab.
Step 2: Clean the Wheel Encoder Discs
Some models have see-through plastic covers over the wheel encoders. Under the cover, there's a small disc with tiny slots. If that disc has a film of dust, the optical sensor can't count rotations correctly.
The robot then thinks the wheel is spinning when it isn't, or vice versa.
You can't always reach this area without a screwdriver, but on many models there's a small access port. Use a vacuum attachment or a can of compressed air to blow out debris. Never use water on the encoder discs.
Step 3: Power Cycle and Test on a Flat Surface
After cleaning, place the robot on a flat, hard floor with good lighting. Press the power button and let it run. If it still spins, the issue may be a firmware bug.
Update the robot's firmware through the companion app. In aggregate reviews, firmware updates resolve a surprisingly high number of spin-loop complaints.
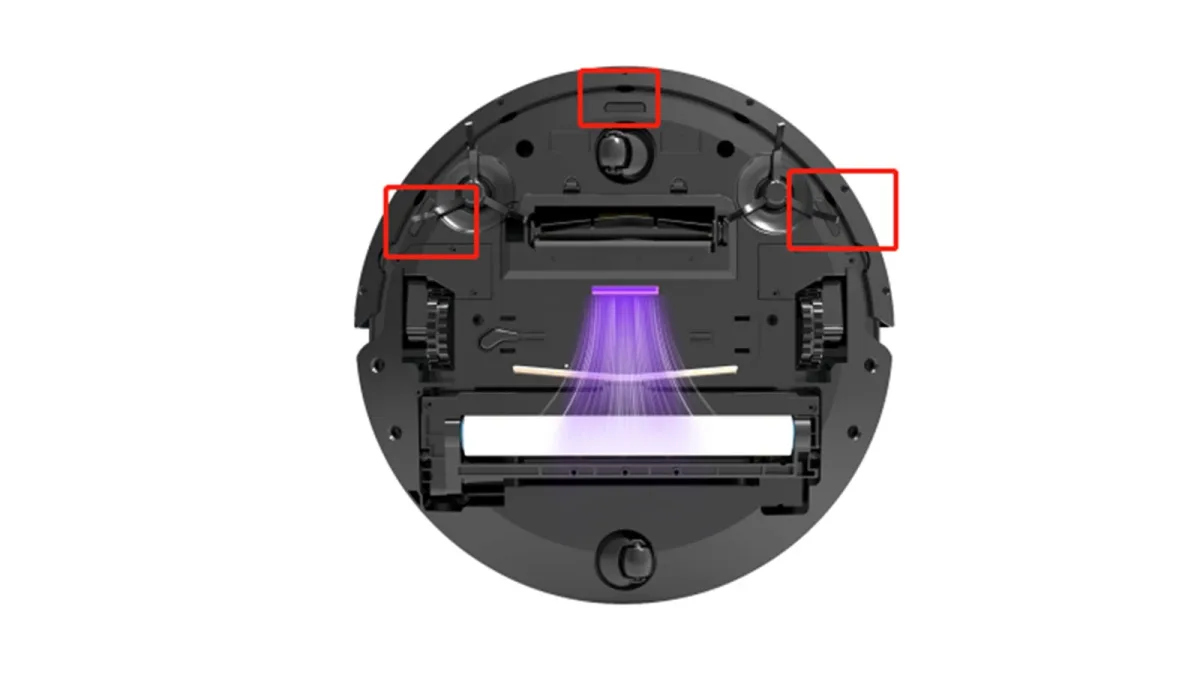
Image source: Web (Bing) / reemanrobot.com (Web image (fair-use with source credit))
Step 4: Check the Charging Contacts
Look at the metal contacts on both the robot and the dock. A film of dirt here can break the "I'm docked" signal. Wipe them with a dry cloth or a pencil eraser.
Then place the robot back on the dock and see if it launches without spinning.
If none of this fixes it, the issue likely isn't physical. It's environmental. That takes us to the next branch.
Decision Branch 2: Dark Floor and Shadow Fixes for Mid-Run Spinning
This branch is for robots that run fine on light floors but spin when they hit dark, glossy, or high-contrast surfaces. The root cause is almost always false cliff sensor readings.
First, Try the App Setting
Many modern robots let you adjust floor sensitivity in the app. Look for a setting called "sensor sensitivity," "cliff sensor calibration," or "low-pile carpet detection." If your robot has it, reduce the sensitivity and test on your dark floor again.
You might need to change this per room. Some apps allow you to save different settings for different maps. As of 2026, most major brands include this in their software.
It's the cleanest fix, and it costs nothing.
Next, Use a Physical Barrier or Tape
If the app setting doesn't exist, you'll need a physical solution. Here's the trick that works well on dark rugs: you don't cover the whole rug, you cover the edge. The cliff sensor's beam hits the floor at an angle, so it's the transition between light and dark floor that triggers the false reading.
Use a strip of matte, non-reflective tape along the edge of the rug. It needs to be wider than the distance between the sensor and the floor edge, usually about 1 to 2 inches. Make sure it's matte, not glossy.
A glossy tape will scatter the beam and make things worse.
You can also place a thin, light-colored mat under the transition point. This changes the angle of the floor and gives the sensor a consistent reflection.
What About Black or Very Dark Carpet?
Black carpet is the worst-case scenario. The fibers absorb almost all the infrared. Some robot vacuums simply cannot navigate black carpet, regardless of cleanliness.
In that case, you have three options:
- Replace the black carpet with a lighter shade (the long-term solution).
- Create a virtual boundary in the app so the robot avoids that room.
- Use a physical magnetic boundary strip if your model supports it.
Shadows from Bright Sunlight
Sharp sunlight on the floor creates a hard shadow line that can look like a drop to the sensor. If the spinning only happens at certain times of the day, you've found the culprit. Close the blinds during scheduled cleanings, or schedule the robot for a different time when the light is softer.
A good test is to run the robot over the same area with a towel draped over the window. If the spinning stops, you know the light is the problem.
If you're dealing with dark LVP floors specifically, you should know that some glossy flooring setups pose unique challenges for robot vacuums. It's worth checking whether your specific robot model is rated for that kind of surface.
The Last Resort for Stubborn Floors: Narrow the Robot's View
If you've cleaned the sensors, adjusted the app, and tested with tape, one more trick exists. Place a small piece of painter's tape directly over the cliff sensor lens, but leave a small gap. This reduces the sensor's field of view and stops it from catching the dark floor's edge at certain angles.
This isn't a permanent fix, and it can reduce drop detection for real stairs. Only use it in a single-level home, and never on a robot that needs to navigate stairs. The official manufacturer guidance for most models explicitly warns against covering sensors.
Check your model's support documentation before trying this, because you could remove an important safety feature.
Decision Branch 3: Dock Position, IR Beacon, and Map Reset for Dock-Looping
If the spin starts during a low-battery return, the dock is your suspect. The robot locks onto the dock's infrared beacon to align itself. A dock moved even a few inches breaks that alignment.
Check whether the dock is still in its original spot, against a wall, with nothing blocking the IR signal. Then delete the saved map in the app and let the robot remap. That fixes most dock-looping in a single cycle.
Step-by-Step Fix: Clean Sensors, Free the Wheels, and Reset the Map
When in doubt, run the full reset sequence. It costs less than 15 minutes and resolves the majority of spin-loops.
- Power off and flip the robot over.
- Wipe each cliff sensor with a dry microfiber cloth.
- Pull hair and debris from the wheel axles and side brush.
- Check wheel drop pins move freely.
- Empty the dustbin and clear the filter.
- Reboot the robot, then delete and rebuild the map through the app.
If the loop persists after that, test the robot on a bare, light-colored floor to confirm the setting is safe for surfaces. Some LVP floors with glossy finishes can confuse sensors, so check our guide to robot vacuums for LVP floors to see if your model is compatible. If you have allergies, consider a HEPA-filtered model for the added benefit of cleaner air.
Common Mistakes That Make Spin-Loops Worse
- Covering sensors with tape to stop false triggers on dark floors.
- Ignoring a moved dock.
- Skipping firmware updates.
- Leaving rugs with dark fringe for the robot to chew on.
- Using water or spray cleaner directly on sensor lenses.
Water gets into the IR housing and scatters the beam. That guarantees more spinning.
Maintenance That Prevents Spinning in the Long Run
A little routine upkeep stops the most common causes before they start. Once a week, wipe the cliff sensors and check the wheels for tangled hair. Once a month, take out the brush roll, clean the axle ends, and blow out the wheel encoder ports.
The same maintenance philosophy that keeps upright vacuums running smoothly applies here. Making sure upright vacuums stay easy to maintain follows the same principle: a clean machine is a predictable machine. Clean filters and clear brush rolls keep suction and navigation consistent.
Firmware updates also matter. They often include navigation calibration fixes that reduce spin behavior.
When It's a Real Hardware Problem: Repair Options vs. Replacement
If you've cleaned everything, remapped, and updated firmware, the issue may be a failed sensor or gyroscope. A replacement cliff sensor assembly runs roughly $15 to $60. A new wheel encoder module can cost $20 to $70.
Compare that to a new robot vacuum at $200 to $1,000. If the repair is over half the cost of a replacement, replace the unit. If the gyro/IMU is bad, replacement is usually smarter.
A dead gyro is the "brain" failing, and a passing robot isn't worth chasing.
Expert Tips for Getting Accurate Mapping Back
Remove clutter before a mapping run. Let the robot finish without interruptions. After moving furniture or the dock, remap from scratch rather than hoping the old map adapts.
Run mapping sessions in good lighting. Close curtains if sun is casting hard shadows. For homes with multiple floor types, map each room separately.
That gives the robot cleaner data and fewer sensor conflicts.
FAQs About Robot Vacuums Turning in Circles
Why does my robot vacuum spin in circles on dark floors?
Dark surfaces absorb the cliff sensor's infrared beam. Clean the sensors, apply a matte edge tape, or lower the sensitivity in the app.
Can a firmware update fix spinning?
Yes. Many users report spin-loops disappear after a firmware update. Check the companion app for pending updates and install them.
Is spinning during spot clean normal?
Yes. That's a deliberate spiral pattern designed to cover a small area. It should stop after a minute or two.
How often should I clean the cliff sensors?
Once a week for homes with pets or rugs. Once a month for cleaner homes. A dry microfiber cloth is all you need.
Final Decision Guide: What to Do Right Now, Based on Your Symptom
Start by cleaning the cliff sensors and wheels. If spinning happens on dark floors, adjust settings or tape edges. If it happens near the dock, reposition and remap.
If the problem remains, repair or replace the unit.
For homes with car cleaning needs or upright vacuum preferences, the same troubleshooting logic applies across the board. A clean machine is a reliable machine. Start with the simplest fix, test after each step, and only move to repair when you've ruled out the easy causes.

