

You can replace a Dyson V10 battery with basic tools, a new battery, and careful handling.
If your Dyson V10 is losing power fast, shutting off early, or refusing to hold a charge, the battery is often the first thing to check. I’ve seen this issue show up after years of regular use, and in many cases, a battery swap brings the vacuum back to life without the cost of buying a whole new machine. In this guide, I’ll walk you through how to replace Dyson V10 battery safely, what to buy, what to avoid, and how to make the new battery last longer.
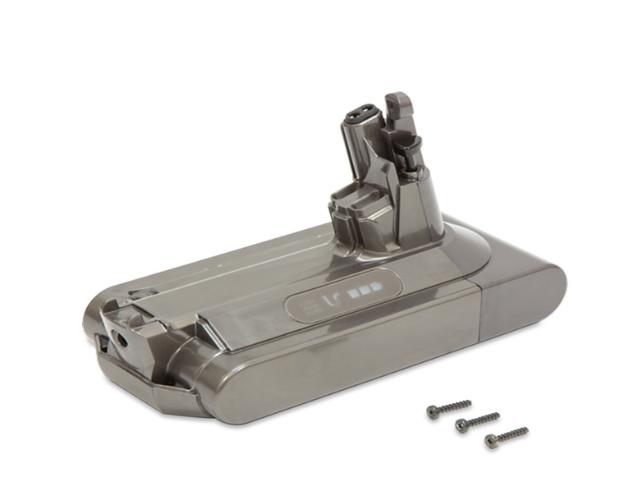
Why a Dyson V10 Battery Needs Replacing
The Dyson V10 uses a lithium ion battery, and like all rechargeable batteries, it wears down over time. After enough charge cycles, the battery can no longer store energy the way it once did. That usually shows up as shorter runtime, weaker suction, or sudden shutdowns.
A few common signs point to battery trouble:
- The vacuum runs for only a few minutes
- It stops even after being fully charged
- The light flashes in a strange pattern
- The battery feels unusually warm
- The machine works only while plugged in, if at all
From my experience, people often think the motor is failing when the real problem is the battery. That is why learning how to replace Dyson V10 battery can save time, money, and stress.
What You Need Before You Start
Before you replace the battery, gather everything first. That makes the job smoother and lowers the chance of dropping a screw or damaging a connector.
You will usually need:
- A compatible Dyson V10 replacement battery
- A Phillips screwdriver
- A clean table or work surface
- A soft cloth or towel
- A small container for screws
If you are buying a replacement, make sure it is designed for the Dyson V10 series. Dyson lists the V10 as compatible with several model names, such as Absolute, Animal, Motorhead, and some related variants, but battery shape and connector fit still matter. Always compare the part number and battery design before ordering.
How to Replace Dyson V10 Battery Step by Step
The process is simple, but slow and careful work matters. I always tell people to treat this like changing a bike tire, not rushing a race. A steady hand keeps the vacuum safe.
Step 1: Turn off the vacuum and remove the charger
Make sure the vacuum is powered off. Then unplug it from the charger if it is connected. This helps prevent accidental power issues while you work.
Step 2: Remove the dust bin if needed for easier access
On some V10 setups, removing the dust bin gives you more room to reach the battery screws. You do not always need to take it off, but it can make the job feel less cramped.
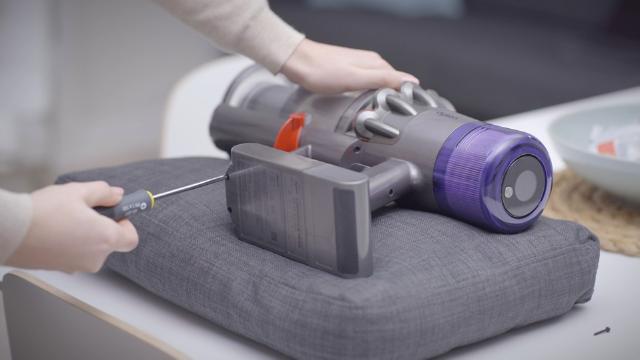
Step 3: Unscrew the battery
Locate the screws that hold the battery in place. The Dyson V10 battery is usually attached with multiple screws, including one near the handle and others along the battery body.
Use the screwdriver to remove them carefully:
- Keep downward pressure on the screwdriver
- Turn slowly to avoid stripping the screw heads
- Place the screws in your container right away
Step 4: Slide the old battery out
Once the screws are out, gently pull the battery away from the vacuum body. If it feels stuck, do not force it. Check for hidden screws or tight alignment before trying again.
Step 5: Align the new battery
Take the new battery and line it up the same way as the old one. The fit should be clean and natural. If the battery does not sit flush, stop and recheck the model compatibility.
Step 6: Secure the replacement battery
Put the screws back in one by one. Tighten them until snug, but do not over tighten. I have seen damaged screw holes happen from trying to make the vacuum “extra secure,” and that only creates a bigger problem later.
Step 7: Charge the vacuum fully
After installation, place the vacuum on the charger and let it charge completely before using it. This first full charge helps the battery calibrate and gives you a better baseline for runtime.

How to Choose the Right Dyson V10 Replacement Battery
Not every replacement battery is the same. Some are great, some are low quality, and some are not worth the trouble. Choosing wisely matters because the battery affects both runtime and safety.
Here is what to look for:
- Compatibility with Dyson V10 models
- Voltage that matches the original battery
- Good build quality and secure connectors
- Clear warranty terms
- Strong customer feedback from verified buyers
A good replacement battery should match the original voltage and fit snugly without wobble. Be cautious with products that promise unrealistic runtime or “super high capacity” claims without clear specs. In lithium ion products, honest labeling matters a lot.
Safety Tips During Battery Replacement
Battery replacement is usually straightforward, but safety still comes first. Lithium ion batteries can be safe when used correctly, but damaged cells or poor quality parts can create problems.
Keep these safety tips in mind:
- Do not puncture or bend the battery
- Do not use a swollen or leaking battery
- Keep metal tools away from exposed contacts
- Do not install a battery that does not match the V10 design
- Dispose of the old battery through proper recycling
In the field, I have found that most issues happen when people rush. A slow, clean install is safer than forcing parts to fit.
How Long a Dyson V10 Battery Should Last
Battery life depends on use, charging habits, and storage conditions. In general, a Dyson V10 battery may last several years before it starts showing noticeable wear. Heavy daily use will shorten that timeline, while gentler use can extend it.
You can help the battery last longer by:
- Charging it in a cool, dry place
- Avoiding extreme heat
- Not leaving it empty for long periods
- Cleaning filter and airflow parts regularly
- Using the correct charger
A clogged filter or blocked airflow can make the vacuum work harder, which may make the battery seem worse than it really is. That is why battery care and machine care go hand in hand.
Common Mistakes to Avoid
I’ve seen a few repeat mistakes that make this job harder than it should be. The good news is that they are easy to avoid.
Common mistakes include:
- Buying the wrong battery model
- Stripping the screws during removal
- Forgetting to fully charge the new battery before testing
- Assuming every runtime issue is battery related
- Using the vacuum with a faulty charger
If the vacuum still has problems after a battery replacement, the issue may be the charger, filter, brush bar, or motor path. A battery swap fixes many problems, but not every problem.
When to Replace the Battery Instead of Repairing It
Sometimes replacement is the smartest choice. If the battery is old, weak, or no longer holding a charge, repairing it is usually not practical. For most homeowners, replacement is faster, safer, and cheaper than trying to rebuild a battery pack.
Replacement makes sense when:
- Runtime has dropped sharply
- The vacuum shuts off randomly
- The battery will not charge fully
- The battery shows physical swelling
- The battery is outside its useful life
In my experience, once a battery begins failing often, replacement is usually the best long term fix. It restores performance and removes a lot of guesswork.
Cost and Value: Is Replacing the Dyson V10 Battery Worth It?
For many people, yes. A new battery costs far less than a new vacuum, and the Dyson V10 is still a strong cleaner when it is running well. If the rest of the machine is in good shape, battery replacement is often the most practical option.
Think of it like replacing the battery in a laptop or phone. The body and parts may still be solid, but the power source is what keeps everything useful. If the vacuum otherwise works well, a battery replacement is usually a smart investment.
Frequently Asked Questions of How to Replace Dyson V10 Battery
How do I know if my Dyson V10 battery needs replacing?
If your vacuum runs only a few minutes, shuts off early, or will not hold a charge, the battery is likely worn out. A sudden drop in runtime is one of the clearest signs.
Can I replace the Dyson V10 battery myself?
Yes, most people can do it at home with a screwdriver and a compatible replacement battery. The job is usually simple if you take your time and keep track of the screws.
Does a new battery restore full suction on a Dyson V10?
A new battery can restore normal runtime and help the vacuum perform properly again, but it will not fix every suction problem. If suction is still weak, check the filter, bin, and brush bar too.
How long does it take to replace a Dyson V10 battery?
Most battery replacements take about 10 to 20 minutes. If it is your first time, allow a little extra time so you can work carefully.
Is it safe to use a third party Dyson V10 battery?
It can be safe if the battery is well made and truly compatible with the V10. Choose a reputable option with clear specs and avoid products with vague labels or no warranty.
Conclusion
Replacing a Dyson V10 battery is one of the easiest ways to bring your vacuum back to strong, steady performance. With the right replacement, a screwdriver, and a careful hand, you can often fix short runtime and power loss in one simple project.
If your V10 has been giving you trouble, start by checking the battery, confirm compatibility, and follow the steps above without rushing. A thoughtful repair can save money and extend the life of a good vacuum. If this guide helped, explore more maintenance tips and leave a comment with your own Dyson V10 experience.

