

Installing a central vacuum system might seem like a big DIY project, but it’s achievable with careful planning and the right tools. A central vacuum offers powerful cleaning and convenience, making it a worthwhile addition to your home. This guide will walk you through the process, from understanding the components to the final installation steps.
Understanding Central Vacuum Components
Before you begin, it’s crucial to know the main parts of a central vacuum system. Each component plays a vital role in the system’s overall function. Understanding these parts will help you during the installation and troubleshooting.
The power unit, often called the central vacuum motor or brain, is the heart of the system. It houses the motor that creates suction and a collection bin for dirt and debris. This unit is typically installed in a garage, basement, or utility room, away from living areas.
The system also includes inlet valves strategically placed throughout your home. These are the points where you connect your vacuum hose. They are wired to the power unit and allow suction to reach different rooms.
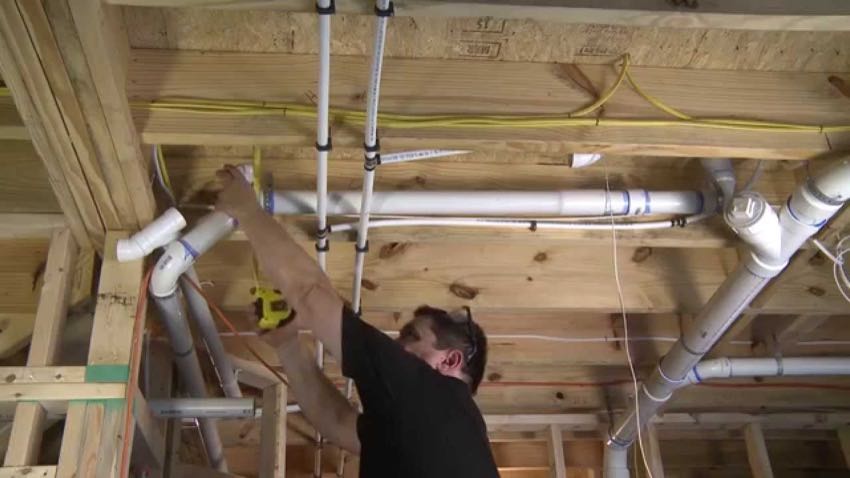
Piping is the network of PVC pipes that runs through your walls, ceilings, and floors, connecting the inlet valves to the power unit. This hidden infrastructure is what allows debris to be transported from where you clean to the central collection bin. Finally, you’ll need a vacuum hose and various cleaning attachments to actually use the system.
Planning Your Central Vacuum Installation
Proper planning is the most critical step for a successful central vacuum installation. Skipping this phase can lead to costly mistakes and a poorly functioning system. Consider the layout of your home and where you’ll need the most cleaning power.
Determining Inlet Valve Locations
Think about the rooms you clean most often. Typically, one inlet valve can cover an area of about 700-1000 square feet, depending on the home’s layout and the system’s power. Place inlets in central locations within rooms or hallways to maximize hose reach.
Avoid placing them too close to corners or behind doors where the hose might get snagged.
For example, in a large living room, one inlet might be sufficient. However, a long, narrow hallway might benefit from an inlet at each end. Consider the length of your vacuum hose; most standard hoses are 30-35 feet long. Ensure the hose can comfortably reach all areas from the valve without being stretched too taut.
Mapping The Piping Route
The next step is to map out the route for your PVC piping. The goal is to create the shortest, most direct path from each inlet valve to the power unit. Minimize the number of turns and avoid sharp angles, as these can reduce suction power.
Straight runs are always preferable.
You’ll need to run pipes through wall cavities, attics, or crawl spaces. This often requires drilling holes through studs and joists. Always check for existing wiring, plumbing, and HVAC ducts before drilling. Using a stud finder and boroscope can help you identify obstructions within walls.
Choosing The Power Unit Location
The power unit needs a permanent location with access to an electrical outlet and a suitable exhaust vent. Garages, basements, and utility rooms are common choices. Ensure the location is dry and well-ventilated. The unit can be mounted on a wall or placed on the floor.
Consider the noise level of the power unit. While most are designed to be quiet, installing it further away from bedrooms and main living areas is always a good idea. Also, ensure there’s enough space around the unit for maintenance and emptying the collection bin.

Tools And Materials You’ll Need
Gathering all the necessary tools and materials before you start will save you time and frustration. Having everything on hand ensures a smooth workflow.
Essential Tools:
- Drill and drill bits: For making holes for pipes and mounting the power unit.
- PVC pipe cutter: For clean, precise cuts of the PVC pipes.
- PVC primer and cement: To securely join PVC pipe sections.
- Measuring tape: For accurate pipe lengths and placement.
- Level: To ensure pipes and valves are installed straight.
- Screwdriver set: For mounting inlet valves and the power unit.
- Wire strippers and connectors: For electrical connections.
- Safety glasses and gloves: For personal protection.
- Stud finder: To locate wall studs and avoid obstructions.
Materials:
- Central vacuum pipes: Typically 2-inch diameter PVC pipes.
- PVC fittings: Elbows, couplings, tees, and reducers as needed for your pipe runs.
- Inlet valves: The number depends on your home’s size and layout.
- Low-voltage wire: For connecting inlet valves to the power unit.
- Power unit: The central vacuum motor and collection system.
- Mounting hardware: Screws, brackets for the power unit.
- Exhaust vent: For the power unit.
- Optional: Utility brush, drywall saw, caulk.
Step-by-step Installation Guide
Now that you have your plan and materials, you can begin the installation. Take your time with each step to ensure accuracy and a professional finish.
1. Installing The Power Unit
Mount the power unit securely in its chosen location. Follow the manufacturer’s instructions for mounting, ensuring it’s level and stable. Connect the exhaust vent to the unit and route it to the outside of your home. This is crucial for expelling dust and air.
2. Running The Pvc Piping
This is the most labor-intensive part. Start by drilling holes in your subfloor or through wall studs to create pathways for the pipes. Run the 2-inch PVC pipes from the planned inlet valve locations towards the power unit. Use PVC primer and cement to join sections and fittings, ensuring a tight seal.
When connecting pipes, always allow for expansion and contraction. Don’t glue every single joint tightly if you’re running long runs; some flexibility is needed. Ensure all pipes are secured to framing with appropriate hangers or straps to prevent sagging.
3. Installing Inlet Valves
Once the main pipe runs are in place, cut holes in the drywall at the marked locations for your inlet valves. Typically, you’ll cut a rectangular opening for the valve body. Feed the low-voltage wire through the wall to the valve location.
Attach the inlet valve to the PVC pipe using a coupling. Connect the low-voltage wires to the terminals on the back of the valve. Secure the valve to the drywall using the provided screws, ensuring it sits flush against the wall.
Repeat this for all inlet valve locations.
4. Connecting Wires To The Power Unit
Run the low-voltage wires from each inlet valve back to the power unit location. Connect these wires to the appropriate terminals on the power unit, following the manufacturer’s wiring diagram. Typically, one wire connects to a common terminal, and the other connects to a terminal for each inlet.
This low-voltage system allows the power unit to turn on automatically when an inlet valve is activated.
5. Connecting The Main Pipe To The Power Unit
Finally, connect the main PVC pipe run from your home’s network to the inlet port of the power unit. Use a suitable reducer fitting if necessary. Ensure this connection is airtight, as it’s the main suction pathway.
6. Testing The System
Before closing up any walls or making permanent finishes, test the system. Turn on the power to the unit. Go to each inlet valve and plug in your vacuum hose. You should feel strong suction at each inlet. Listen for any air leaks in the piping system.
System Performance And Maintenance
A well-installed central vacuum system can significantly improve your home’s air quality. Unlike portable vacuums, central systems vent dust and allergens outside your home or into a sealed collection bin, reducing recirculation. Studies have shown that central vacuum systems can vent up to 5 times more air volume than portable vacuums, leading to a cleaner living environment.
Regular maintenance is key to keeping your system running efficiently. This includes emptying the collection bin when it’s about two-thirds full. The frequency depends on your usage and the type of debris you vacuum. Clean or replace the filter according

