

How do you clean robot vacuum sensors without turning a small chore into an expensive mistake? It's a question that pops up when your robot starts bumping into walls or refusing to approach the stairs. The good news: the fix is usually simple, and you probably have the right tools at home already.
Our research shows most robot vacuums carry between six and twelve sensors around the body. As of 2026, nearly every manufacturer points to the same starting point: a dry microfiber wipe first, a light alcohol swab only for sticky residue. Let's walk through the exact steps, sensor by sensor.
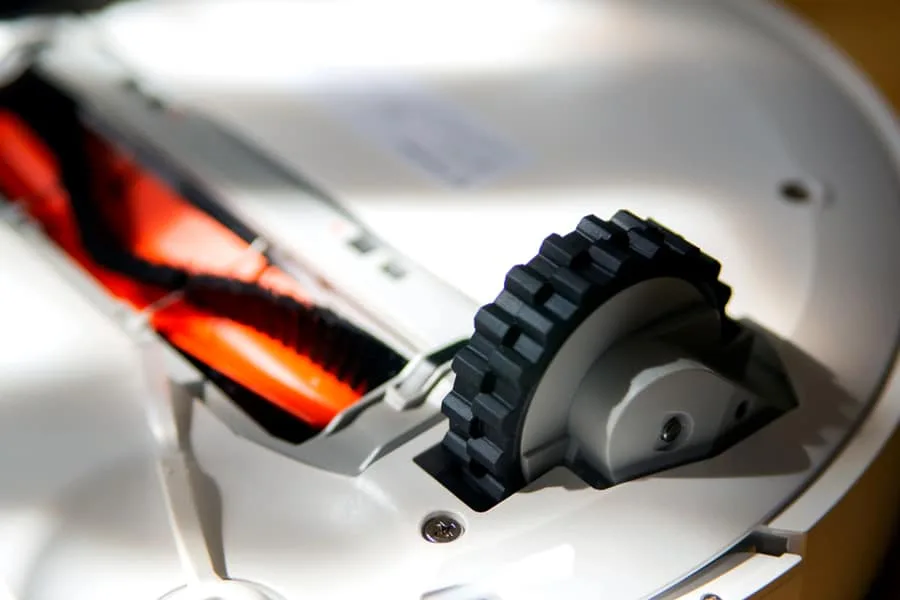
Image source: Web (Bing) / applianceteacher.com (Web image (fair-use with source credit))
First, Let's Identify Which Sensors Need Cleaning
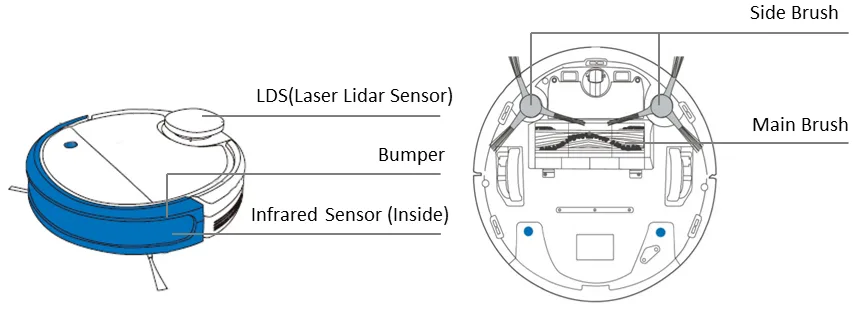
Image source: Web (Bing) / fastest99.blogspot.com (Web image (fair-use with source credit))
Your robot doesn't have one sensor. It has a small army of them. Each one handles a different job and gets dirty in its own way.
Knowing which sensor is acting up shortens the whole process.
- Cliff sensors (drop sensors) sit on the underside. They detect sudden drops like stairs. Dust makes the robot stop or reverse at thresholds.
- Wall sensors live on the side or bumper. They use infrared to keep a steady gap from baseboards. Dirty wall sensors cause bumping and erratic wall tracking.
- LiDAR turret spins on top and maps the room. A grimy window leads to map loss or a "sensor blocked" error.
- Camera lenses (VSLAM) sit on the front or top. They recognize landmarks. Smudges make navigation wobbly.
- Bumper sensors handle collision detection. Hair and grit can jam them.
Once you know which sensor is likely at fault, you can skip the guesswork. If the robot hesitates at a dark rug or a threshold, it's usually cliff sensors. If it rams furniture, it's wall or bumper sensors.
If the map goes fuzzy mid-run, LiDAR is the first suspect.
Quick Answer: The 10-Minute Clean Most Robots Need
Turn off the robot and remove the dustbin. Wipe every sensor with a dry microfiber cloth. Use a 70% isopropyl alcohol swab for sticky residue.
Let it dry for two minutes. That's the whole routine.
Beyond that quick pass, you need to match the tool to the task. Here's what to have ready before you flip the robot over:
| Tool | What it's for | Notes |
|---|---|---|
| Dry microfiber cloth | Default first pass on all sensors | Prevents scratches |
| Cotton swab | Tight sensor apertures | Use gentle pressure only |
| 70% isopropyl alcohol | Sticky residue and fingerprints | Let it dry fully |
| Compressed air | Loose dust in narrow gaps | Keep the can upright |
| Soft-bristle brush | LiDAR turret exterior | Avoid the laser window itself |
Grab those tools before you start. That avoids repeated trips mid-clean. If you're weighing hard-floor robot picks, many newer models make sensor access easier, but the cleaning routine stays the same.
How Robot Vacuum Sensors Actually Work (And Why They Fail)
Most robot vacuums rely on infrared light. The sensor shoots a beam and measures how quickly it bounces back. Dust scatters that beam, so the robot thinks there's no floor beneath it.
It then plays it safe and stops.
LiDAR works differently. A spinning laser builds a map of your home. A light coating of dust blurs that laser, which leads to drift, phantom walls, and missed rooms.
Moisture is the real enemy here. Most sensor lenses sit in shallow plastic housings, and water can seep into the emitter. That's why dry cleaning comes first.
Official support guides from iRobot and Roborock both start with a dry cloth and reserve alcohol for stubborn spots.
Our research also found that pet hair is the second-biggest culprit. It wraps around bumper sensors and blocks the small openings around cliff sensors. If you run an allergen-friendly machine, you're already used to pulling hair off brushes, and sensor checks should be part of that same routine.
The Main Cleaning Methods, Compared by Sensor Type
No single method works for every sensor. The right choice depends on what's on the lens and where the lens lives.
| Method | Best for | Why it wins | Skip if |
|---|---|---|---|
| Dry microfiber cloth | Loose dust, everyday grime | Safe, quick, zero moisture risk | Sensor has sticky film |
| Cotton swab with alcohol | Grease, fingerprints, sticky residue | Cuts through stubborn buildup | Sensor surface is scratched |
| Compressed air | Hair and debris in tight openings | Reaches gaps fingers can't | Air could push dust deeper |
| Dry cotton swab | Recessed infrared lenses | Precise control, no liquid | Sensor needs degreasing |
Here's a simple if/then guide. If the robot stops at stairs, focus on cliff sensors. If it bumps into walls, clean the side sensors and bumper.
If mapping fails, wipe the LiDAR turret. That logic covers nearly every sensor-related glitch.
Step-by-Step: How to Clean Cliff Sensors
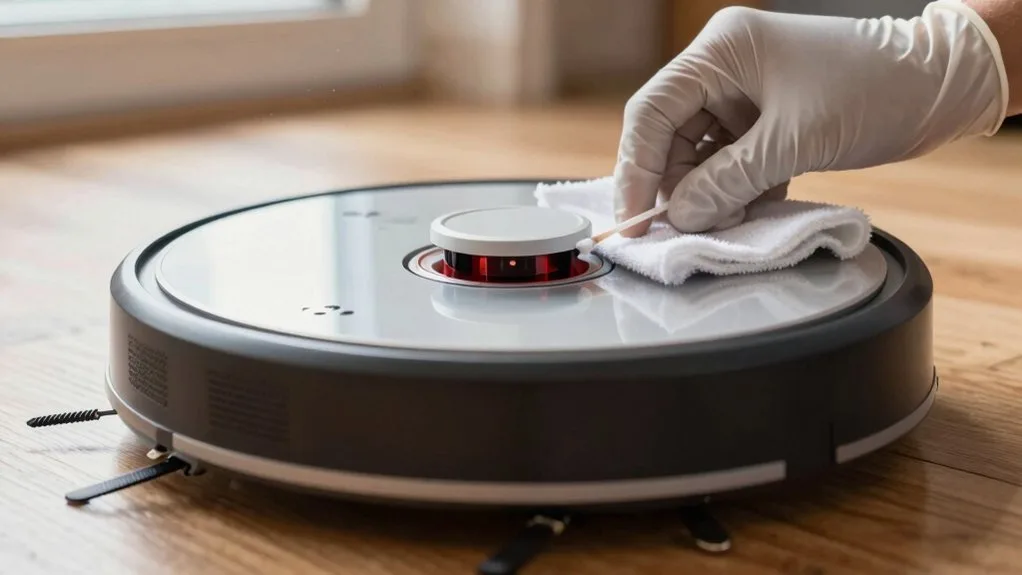
Image source: Web (Bing) / vacuumtips.com (Web image (fair-use with source credit))
Cliff sensors are the easiest to clean because they sit on the flat underside. You just need to get the robot upside down.
- Power off the robot. Remove the battery if your model has a removable one.
- Turn the robot upside down. Set it on a towel so you don't scratch the top.
- Locate the cliff sensors. Look for three to six small square or round lenses along the bottom edge.
- Inspect the lenses. Check for dust, pet hair, or a sticky film.
- Wipe with a dry microfiber cloth. Use a gentle circular motion.
- Use alcohol for sticky spots. Dip a cotton swab in 70% isopropyl alcohol and swipe the lens. No pressure.
- Let everything dry for one to two minutes.
- Test the sensors. Place a piece of white paper under the robot. If it still stops over the paper, the sensor may need a deeper look.
- Run a short navigation test. Let it travel across a dark rug or a step edge.
Never use water, paper towels, or sharp tools. Water can seep into the housing. Paper towels can scratch the lens.
Sharp objects can push debris deeper into the aperture.
If the cliff sensor error keeps showing up after a good clean, check your owner's manual for calibration steps. Some models need a sensor reset after heavy buildup. If that doesn't work, the sensor itself may be faulty.
A regular upkeep timeline helps you catch this early. Add a quick sensor wipe to your monthly vacuum maintenance rhythm, and you'll skip most of these headaches altogether.
Step-by-Step: How to Clean the LiDAR Turret and Camera Lenses
The LiDAR turret is the spinning bump on top. It builds a map of your room with a laser. A dirty window causes missed spots, phantom walls, and "sensor blocked" errors.
Camera-based models use VSLAM instead, which relies on a front or top lens. Both are easier to clean than cliff sensors because you don't need to flip the robot over.
- Turn the robot off and remove it from the dock.
- Locate the turret or camera lens.
- Wipe the outer surface with a dry microfiber cloth.
- Use compressed air for the narrow gap around the turret. Keep the can upright and use short bursts.
- For smudges, use a cotton swab dampened with 70% isopropyl alcohol. Wipe the lens surface gently.
- Let all parts air-dry for two minutes.
- Reboot the robot and run a test clean.
If the glass looks scratched, don't try to polish it. Scratches scatter the laser, and no amount of cleaning will fix that. It's time to start thinking about a replacement part.
What to Do If the Error Persists After Cleaning
If the error message hasn't vanished after a full wipe, don't assume the sensor is broken. The troubleshooting tree has a few more branches to test first.
Start a clean cycle and watch where the robot stops. That location often hides the real clue.
Check for invisible debris. Hair and carpet fibers can wrap around wheel modules and create false sensor readings. Remove the dustbin and inspect the side brush housing. Clean any drop sensors near the wheels if your model has them.
Reboot the robot. Power it down completely. Wait sixty seconds, then turn it back on. Many navigation errors clear after a fresh boot.
Reset the sensor in the app. Some robots, including recent Roborock and Dreame models, offer a sensor calibration or reset tool in their companion app. Check the manufacturer's support pages for your model. Run that, then test again.
Update the firmware. Buggy navigation sometimes looks like a hardware problem. Check for pending updates before you order any parts.
If none of that works, look for visible damage to the lens. A cracked sensor won't respond to cleaning. That moves you into the replacement zone.
Common Mistakes That Can Ruin Your Robot's Sensors
We've seen plenty of well-intentioned cleanups cause more damage than the dust ever could. Avoid these errors:
- Using water. Sensors have sealed housings, but they're not waterproof. Moisture can creep in around the emitter and short the circuit board.
- Reaching for wet wipes. Water residue leaves a film that attracts even more dust.
- Using paper towels. Their fibers scratch optical lenses easily, scattering light permanently.
- Applying aggressive pressure. Pushing hard with a cotton swab can shove debris deeper or dislodge the sensor from its mount.
- Cleaning while docked. The robot stays in standby mode, and sensors may still be active. Always power the unit down first.
Light pressure and the right tools solve nearly every sensor issue. If sensor problems keep nagging you, some owners decide a different vacuum type is less trouble. But even the most basic robot needs a bit of care to avoid these problems.
How Often Should You Clean Sensors? (Plus a Maintenance Schedule)
There's no universal schedule, but manufacturer documentation points to a clear range. The short answer is every two to four weeks, depending on your home.
| Household type | Cleaning interval | What to watch for |
|---|---|---|
| Standard, low dust | Every 4 weeks | Light film on cliff sensors |
| Pets indoors | Every 2 weeks | Hair around bumper sensors and LiDAR |
| High dust or arid climate | Every 2 weeks | Fine grit on all sensors |
| New home or renovation | Weekly | Heavy construction dust |
Cliff sensors on the underside pick up the most debris. The LiDAR turret often stays cleaner, but pet hair can still wrap around its base. Set a phone reminder to sync sensor wipes with your dustbin empties.
If your home has thick carpets, check wall sensors more often. Carpet fibers rub against the robot's side and leave a thin coating on the infrared window.
Consistency beats the depth of a deep clean. A quick two-minute wipe every other week prevents the error codes that lead to longer troubleshooting later. That same habit applies to other machines, where routine upkeep determines long-term reliability.
When to Call It: Sensor Replacement vs. Repair
Most sensor problems vanish after a proper cleaning. Some don't. If an error persists through several cleanings, it's time to decide between replacement and repair.
Check for physical damage first. Scratches, cracks, or a chipped lens indicate a hardware issue. Angle the robot toward bright light to spot small fractures. If the glass is cracked, the sensor needs a new part.
Check warranty status. Most robot vacuums come with a one-year warranty covering sensor failure. Before opening anything, contact the manufacturer. They may replace the unit or send a new sensor module under warranty.
Compare repair cost to replacement cost. A replacement LiDAR module can run forty to eighty dollars plus labor. If your robot cost less than two hundred dollars, a new unit often makes more sense. Manufacturer support pages like iRobot's official support site can clarify pricing and procedures.
Know when to stop. If you've cleaned the sensors, reset the app, and updated the firmware, but the error remains, the fault likely sits on the sensor board itself. At that point, it's not a cleaning problem anymore. It's a hardware discussion.
Keep your owner's manual handy. It contains the exact sensor layout and warranty details. And always contact the manufacturer before attempting any non-approved repair.
If you're evaluating whether a robot vacuum fits your home at all, weighing your options before purchasing helps you pick something you'll actually maintain.
Quick Decision Guide for Messy Homes, Pet Owners, and Multi-Floor Users
Not every home needs the same cleaning schedule. Your sensor maintenance should match how the robot actually works and what it picks up.
| Household situation | Suggested sensor care | Why it matters |
|---|---|---|
| Single person, low dust | Monthly wipe | Prevents gradual film buildup |
| Pets that shed | Bi-weekly wipe | Hair clogs bumper and cliff apertures fast |
| Kids and tracked-in dirt | Bi-weekly wipe | Grit acts like sandpaper on optical lenses |
| Multi-floor homes | Check after every move | Different floor types affect sensor debris |
| Renovation or construction | Weekly wipe | Fine dust settles everywhere, including sensors |
| Hard floors only | Monthly dry wipe | Less fiber debris but still dust-prone |
For pet owners, the extra care pays off quickly. Hair wraps around the LiDAR turret base on many popular models, causing false rotation errors. A quick two-minute check each week prevents that.
Multi-floor users should focus on cliff sensors. A robot that cleans upstairs carpet and downstairs tile carries fiber dust between levels. Wiping the underside after each floor swap keeps navigation honest.
If your robot struggles with surfaces like luxury vinyl plank, a clean sensor suite makes all the difference. Dust-fooled cliff sensors can cause stop-and-go behavior that looks like a mapping failure. You can read more about matching a robot to hard floor types to understand the sensor demands better.
Frequently Asked Questions
Can I use water instead of isopropyl alcohol?
No. Tap water leaves mineral deposits that attract more dust. It also carries a higher risk of seeping into sensor housings.
Use 70% isopropyl alcohol only for sticky residue, and let it dry completely.
How do I know which sensor is actually dirty?
Watch where the robot misbehaves. Stops at stairs mean cliff sensors. Bumping into walls points to wall or bumper sensors.
Mapping errors usually trace back to the LiDAR turret or camera lens. Check those zones first.
Why does my robot vacuum still bump into walls after cleaning?
If the sensors are clean, the bumper mechanism itself may be stuck. Press around the bumper to check for hair or debris. If the bumper moves freely, check the app for a sensor calibration tool.
Firmware updates can also fix navigation quirks.
Is compressed air safe for sensor cleaning?
Yes, but use short bursts and keep the can upright. Tilted cans release liquid propellant that can harm sensor boards. Hold the nozzle a few inches away from the sensor aperture.
How long should I wait after cleaning before running the robot?
Two minutes is enough for alcohol to evaporate. If you used any liquid near the LiDAR turret or camera, wait an extra minute. Moisture inside the housing is the most common cause of post-cleaning sensor failure.
Do I need to remove the battery before cleaning sensors?
Only if your model has a removable battery and you plan a deep clean. For a standard surface wipe, powering off is sufficient. Always disconnect the robot from its charging dock before touching sensors.

