

Adding Central Vacuum Outlets To An Existing Home
Many homeowners love the idea of a central vacuum system for its powerful suction and convenience. But if you didn’t install one when your house was built, you might wonder if it’s possible to add central vacuum outlets later. The good news is, yes, you absolutely can add a central vacuum system to an existing home, even if it wasn’t designed for one from the start. While it requires more effort than installing during construction, it’s a feasible project that can significantly improve your home’s cleanliness and air quality.
The process involves running vacuum pipes through walls, floors, and ceilings to connect the inlets in each room to a central power unit, usually located in a garage, basement, or utility room. This might sound daunting, but with careful planning and execution, it’s a project that many homeowners undertake. We’ll explore what’s involved, the potential challenges, and why it’s often worth the effort.
Understanding The Central Vacuum System
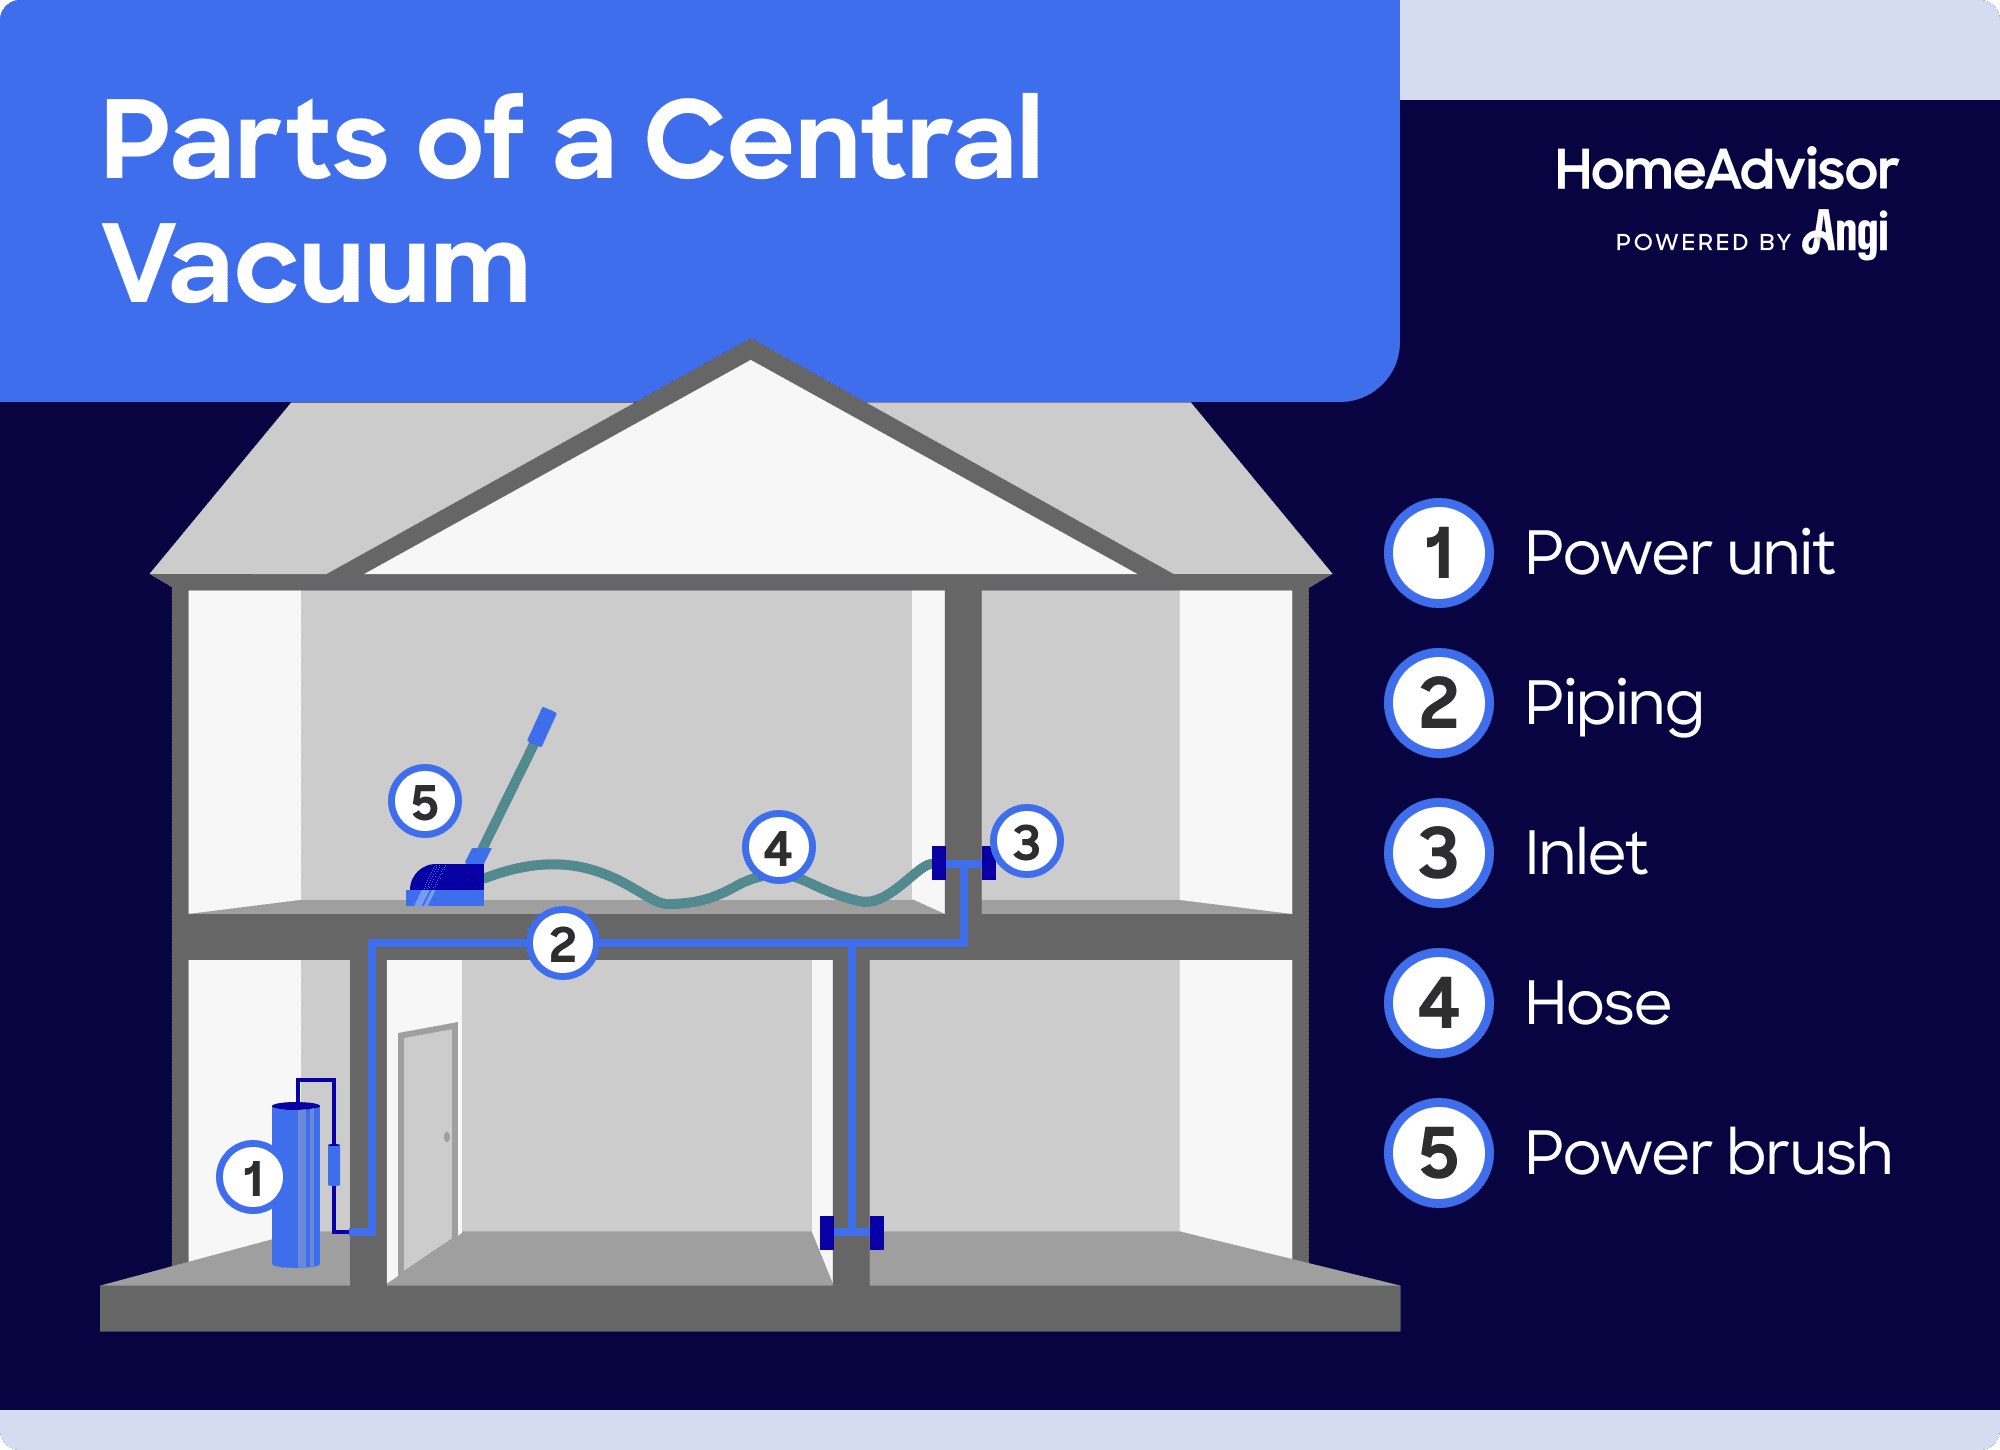
A central vacuum system is fundamentally different from a portable vacuum cleaner. Instead of a bulky unit you drag around, it consists of a main power unit and a network of pipes installed within the walls of your home. This network connects to inlet valves (outlets) located in various rooms. When you want to vacuum, you simply plug a hose into the nearest inlet. The dirt, dust, and debris are then sucked through the pipes directly to the central unit, where they are collected in a canister or bag.
This design offers several advantages:
- Superior Suction Power: Central vacuum units are typically larger and more powerful than portable vacuums, providing deeper cleaning.
- Improved Air Quality: Because the dirt and allergens are collected in a sealed unit, usually located outside the main living areas, they are not recirculated back into the air you breathe. This is a significant benefit for allergy and asthma sufferers.
- Quiet Operation: The noisy motor is located away from living spaces, making the system much quieter to use in the rooms where you are cleaning.
- Convenience: No heavy equipment to carry, and often longer hoses that reach further, making cleaning less of a chore.
The Process Of Retrofitting A Central Vacuum System
Adding a central vacuum system to an existing home, often called retrofitting, involves several key steps. The most challenging part is installing the conduit pipes that carry the debris from the inlets to the central unit.
1. Planning And Design
Before any work begins, a thorough plan is essential. This involves:
- Mapping Inlet Locations: Decide where you want outlets in each room. Common placements are near doorways or in central areas of larger rooms. Consider the reach of standard vacuum hoses (usually 30-35 feet).
- Determining the Power Unit Location: Choose a spot for the main unit that is accessible for maintenance and emptying, and ideally located to minimize the length of pipe runs. Garages, basements, and large closets are popular choices.
- Designing the Pipe Route: This is the most critical step. You need to figure out the best path for the pipes to run from the chosen inlets to the power unit. This often involves going through:
- Attics: If accessible, attics can provide a relatively easy route for pipes.
- Basements/Crawl Spaces: These areas are also prime candidates for running pipes, especially if they are unfinished.
- Wall Cavities: This is where it gets more involved. Installers may need to cut small openings in drywall to snake pipes through. In some cases, older homes with plaster and lath walls can be more difficult to work with.
- Ventilation: Consider if your chosen power unit location needs venting to the outside, as some models require this to expel fine dust.
2. Installing The Piping Network
Once the plan is in place, the physical installation begins.
- Cutting Openings: Small holes are cut in the drywall or plaster at the planned inlet locations and along the pipe routes.
- Running the Pipes: PVC pipes, typically 2 inches in diameter, are used. These are glued together to create a continuous, sealed system. Installers will carefully snake these pipes through wall cavities, attics, or basements.
- Installing Inlet Valves: The vacuum outlets are mounted to the wall and connected to the pipe network. Low-voltage wires are also run from each inlet to the power unit location for the on/off switch functionality.
- Connecting to the Power Unit: All the pipes converge at the location of the central power unit, where they are connected.
3. Installing The Power Unit And Accessories
- Mounting the Unit: The main power unit is securely mounted in its designated location.
- Electrical Connections: The unit is wired to your home’s electrical system.
- Exhaust Venting (if required): If the unit needs external venting, this is completed.
- Adding Accessories: Finally, the vacuum hose, wands, and cleaning attachments are connected, and the system is ready for testing.
Challenges And Considerations For Retrofitting
While retrofitting is possible, it’s not without its challenges.
Wall And Ceiling Access
The biggest hurdle is often accessing the spaces where pipes need to run.
- Finished Walls: In a home with finished walls and ceilings, installers will need to cut into the drywall. This means patching and repainting will be necessary after the pipes are in place, adding to the overall cost and disruption.
- Older Homes: Homes with plaster and lath walls can be more difficult and messy to work with. The material can be brittle, and the process might require more extensive repairs.
- Minimal Disruption Techniques: Professional installers often use techniques to minimize damage. This might include running pipes through closets, along baseboards (if aesthetically acceptable), or using existing chases in the walls.
Cost Of Installation
Retrofitting a central vacuum system is generally more expensive than installing one during new construction. This is due to the labor involved in cutting into finished walls and navigating existing structures.
A rough estimate for retrofitting a system in a typical 2,000-3,000 sq ft home can range from $1,500 to $4,000 or more, depending on the complexity of the installation, the number of inlets, and the quality of the system chosen. This includes the power unit, piping, inlets, and labor.
Diy Vs. Professional Installation
While some handy homeowners might consider a DIY installation, it’s a complex job. Running pipes correctly, ensuring airtight seals, and making proper electrical connections are crucial for the system’s performance and longevity. Professional installation is highly recommended to ensure the system is installed safely and effectively, minimizing damage to your home. Professionals also have specialized tools and experience to find the most efficient pipe routes.

Benefits That Make Retrofitting Worthwhile
Despite the challenges, many homeowners find that retrofitting a central vacuum system is a worthwhile investment.
Healthier Home Environment
The ability to remove allergens from the living space is a major draw. For families with allergies, asthma, or pets, a central vacuum can make a significant difference in indoor air quality. Studies have shown that central vacuum systems vent 100% of vacuumed dust and particles outside the home, unlike portable vacuums which can recirculate fine particles.
Increased Home Value
A central vacuum system is considered a desirable upgrade that can increase your home’s resale value. It’s a feature that appeals to many potential buyers looking for convenience and a cleaner living environment.
Long-term Cost Savings
While the initial installation cost is higher, central vacuum systems are known for their durability and longevity. They often last much longer than portable vacuums, which may need replacement every few years. This can lead to cost savings over time.
Key Components Of A Central Vacuum System
Understanding the parts of the system can help in planning and appreciating its functionality.
The Power Unit
This is the heart of the system, containing the motor and the dirt collection receptacle (bag or

