

If you're asking "How do you replace a shop vacuum filter?", you're probably staring at a vac that has lost its pull. The filter is the first thing to check, and swapping it out takes minutes, not hours.
As of 2026, most wet/dry vacuums use one of three filter styles: a pleated cartridge, a foam sleeve, or a sealed HEPA unit. The HEPA standard requires 99.97 percent capture at 0.3 microns, so choosing the right replacement matters just as much as installing it correctly. Knowing the style you own gets you halfway to a clean tank and strong suction again.
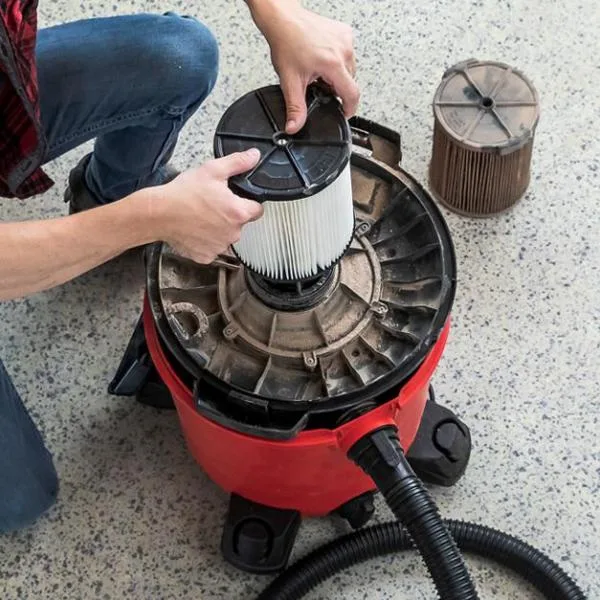
Image source: Web (Bing) / storage.googleapis.com (Web image (fair-use with source credit))
Quick Answer: How to Replace a Shop Vac Filter in 60 Seconds
Unplug the vacuum. Remove the motor head. Lift the old filter off the plastic cage.
Slide the new filter on. Reattach the retainer. Put the motor head back.
That's the whole job in one breath.
First, Figure Out Which Filter You Actually Have
Take the motor head off and look inside. The filter style decides every step that follows.
- Pleated cartridge filter. This is the ridged cylinder of pleated paper or polyester around a plastic cage. It's the most common setup on larger wet/dry vacuums.
- Foam pre-filter or sleeve. A soft, squishy tube, usually dark grey or black. Some vacuums use it alone, and some put it over a cartridge for extra protection.
- Sealed HEPA unit. A rigid cylinder or flat panel with a rubber gasket. You'll see these on dust-control vacuums built for fine drywall or concrete dust.
Here's the simple rule. If it's pleated, it's a cartridge. If it's spongy, it's foam.
If it's sealed with a gasket and you can't open it easily, it's HEPA.
A photo of the assembly would show the filter sitting over a plastic cage, with a retainer threaded or snapped on top. That retainer is what you'll twist or pull off first.
If the vac still pulls weak after a fresh filter, the problem might be a collapsed hose rather than the filter itself.
The Main Decision: Cartridge, Foam Sleeve, or HEPA?
Each filter style fits a different job. This table sums up which one you need.
| Filter type | Best for | Typical life | Cleanable? |
|---|---|---|---|
| Pleated cartridge | Dry dust, general garage and workshop cleanup | 3 to 6 months | Rinse gently, replace if torn |
| Foam sleeve | Wet spills, light dry debris, or as a pre-filter | 6 to 12 months | Yes, wash with soap and water |
| Sealed HEPA unit | Fine dust like drywall or concrete | 6 to 12 months | Most are replace-only |
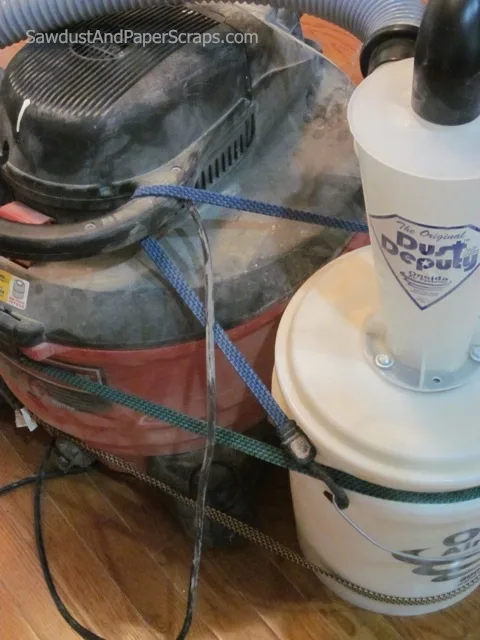
Image source: Web (Bing) / amazon.com.au (Web image (fair-use with source credit))
The most common mistake is swapping a cartridge for a foam sleeve without checking the tank diameter first. The sizes look close. A filter that's too small lets dust bypass the media and head straight for the motor.
For job sites with silica dust, OSHA guidance often requires HEPA-grade filtration. That's not the time to save money with a standard cardboard cartridge.
Step-by-Step: Replacing a Cartridge Filter on a Standard Wet/Dry Vac
Most wet/dry vacs use the same basic design. A motor head latches onto the tank, and the filter sits over a plastic cage inside.
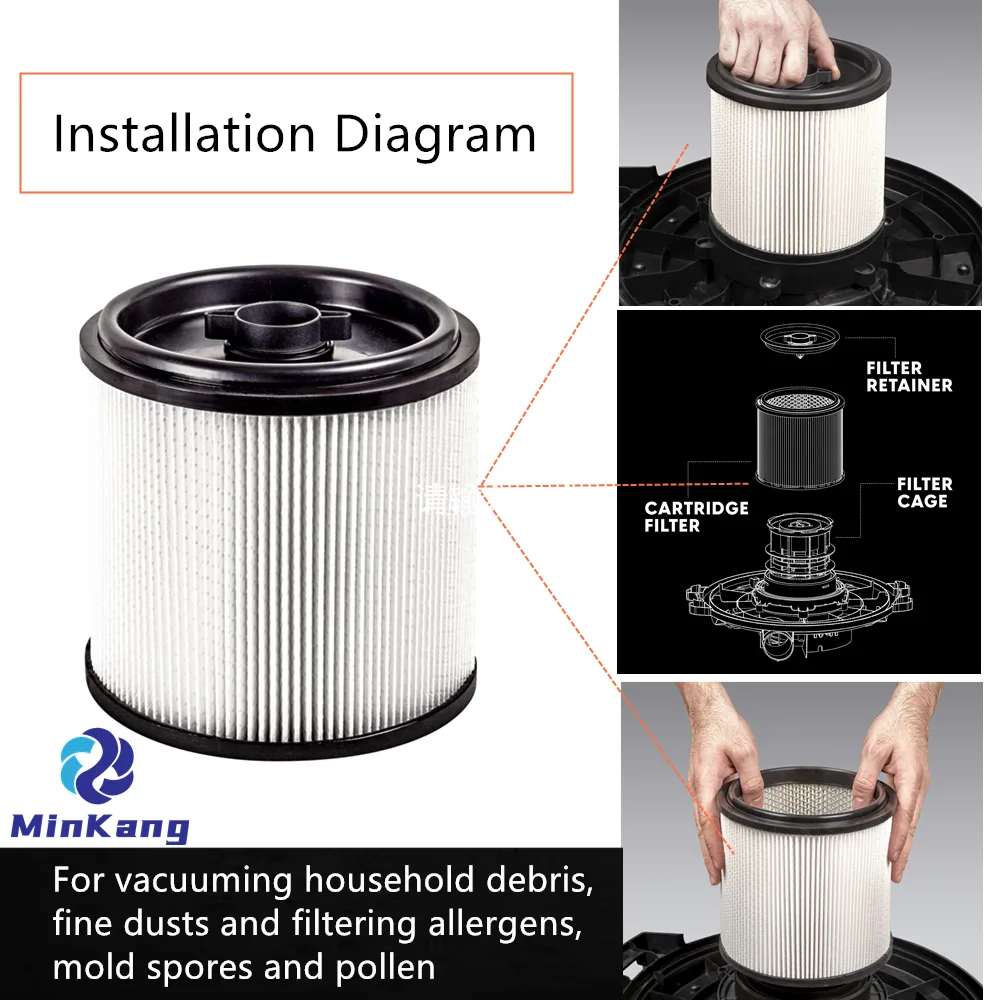
Image source: Bing (Web (fair-use with source credit))
- Unplug the vacuum. No exceptions. You're working near the motor.
- Remove the motor head. Release the latches or clips holding it to the tank.
- Turn the motor head over. The cartridge wraps around the plastic cage, and the retainer sits on top.
- Twist or lift the retainer off. Some pull straight up. Some turn a quarter-turn.
- Slide the old cartridge off the cage. Tap it gently against a trash bag to knock off loose dust.
- Inspect the cage and gasket. A crack or a flattened rubber seal will make a new filter useless.
- Slide the new cartridge over the cage. Make sure the bottom edge seats fully.
- Press the retainer back on. Reattach the motor head, and you're done.
Cartridge filters usually run between $10 and $40, depending on the micron rating and the brand. For exact fit, check Shop-Vac's official compatibility charts before buying.
An air leak here lets dust bypass the media. You'll end up chasing a sudden loss of suction long after you swapped the filter.
Step-by-Step: Replacing a Foam Pre-Filter or Sleeve
Foam sleeves sit either alone over the cage or as a pre-filter over a cartridge. They're common on smaller wet/dry vacs because they handle water without breaking down.
- Unplug the vacuum and remove the motor head.
- Pull the foam sleeve off the cage. If there's a cartridge underneath, slide that off too.
- Wash the sleeve in soapy water. Keep rinsing until the water runs clear.
- Squeeze, don't wring. Wringing tears the foam and leaves it misshapen.
- Dry it completely. Plan on 24 hours. A damp sleeve in a garage will smell like a swamp within a week.
- Slide the dry sleeve back over the cage. Add the retainer, then reassemble the motor head.
Many user reviews report that a washed foam sleeve lasts through several cleanings. A torn one can't. If you see a split or a crushed section, spend the $5 to $15 on a new one.
This is basically rinsing out filter media on a smaller machine, minus the murky pool water.
Step-by-Step: Swapping a HEPA Filter Without Breaking the Seal
HEPA filters show up on dust-control shop vacs, often for drywall or concrete work. The swap itself is quick, but the gasket deserves your attention.
- Unplug the vacuum and remove the motor head.
- Find the HEPA unit. It usually sits on the motor head or over the cage, sealed with a rubber gasket.
- Twist or unclip it. Some models use a bayonet mount. Others pull straight off.
- Lift it off slowly. If the gasket snags, rock the filter gently to break the seal.
- Wipe the sealing surface. A damp cloth removes dust that could break the next seal.
- Press the new filter in. Make sure the gasket sits evenly all the way around.
- Lock it in place. Listen for the click or turn it until it bottoms out.
Most consumer HEPA filters are not washable. Manufacturer documentation on most models says to replace them. Plan on a $20 to $50 replacement.
One misstep here creates a fine-dust bypass. You won't see it until the motor whines or the exhaust smells like burnt dust.
Should You Clean or Replace? Washable vs Disposable Filters
Some filters bounce back after a rinse. Others fall apart. Here's the quick distinction.
| Filter type | Washable? | Typical lifespan | Best move |
|---|---|---|---|
| Foam sleeve | Yes, soap and water | 6 to 12 months | Wash and reuse |
| Pleated cartridge | Sometimes, gentle rinse | 3 to 6 months | Replace if torn or worn |
| HEPA filter | Rarely | 6 to 12 months | Replace only |
The foam sleeve wins on cost. It catches the big stuff that would clog a cartridge, and it handles wet pickup without falling apart.
A pleated cartridge is a middle ground. You can rinse it softly, but pleated paper loses its shape over time. Once you see flattened pleats, it's done.
HEPA filters aren't worth the risk. Replacement is cheap insurance against a motor full of silica.
Forcing a wash on a disposable filter usually ends with the same suction loss you were trying to fix.
Common Mistakes That Kill Suction — or the Motor
The filter is the first suspect, but it's rarely the only actor.
- Using a paper cartridge for wet spills. Paper turns to mush. Use a foam sleeve or remove the filter entirely for wet pickup.
- Forgetting the float valve. If the float sticks, the motor loses suction even with a clean filter.
- Reusing a damp filter for dry jobs. Moisture clogs the pores instantly.
- Blowing a HEPA filter with compressed air. You'll punch holes in the media. All that trapped dust ends up in the air you breathe.
- Overtightening the retainer. A cracked cage or a crushed gasket creates a leak you can't fix.
Each of these mimics a bad filter. If a fresh replacement doesn't restore suction, check for a clogged hose or a stuck float before tearing anything apart.
When to Replace vs. When to Just Clean the Filter
Good rule of thumb: if the media holds its shape and shows no tears, clean it. If anything looks thin, cracked, or crushed, replace it.
| Condition | Action |
|---|---|
| Light dust, no visible wear | Rinse foam or gently tap out cartridge |
| Torn pleats, flattened media | Replace |
| Wet paper filter | Replace immediately |
| Musty smell after washing | Replace, mold has set in |
| Good filter but weak suction | Check hose, float, seals, and tank cracks |
Dry times matter too. A washed foam sleeve needs a full 24 hours at room temperature. A damp sleeve locked in a tank grows mildew fast.
If the filter looks fine and suction is still poor, move on. Our research shows the real leak is often a cracked tank or a loose motor head latch, not the filter itself.
Real-Case Scenarios: Garage Dust, Drywall, and Wet Spills
Garage dust and woodworking. A pleated cartridge works best here. Expect to clean it every few weeks and replace it every three to four months. Sawdust is abrasive, so check the pleats for early wear.
Drywall and concrete work. Use a HEPA filter. Drywall dust is fine enough to blow right through a standard cartridge. After one big job, budget for a replacement.
Fine particles cling to the media and destroy suction.
Wet spills and flooding. A foam sleeve is the only real choice. It shrugs off water and rinses clean in minutes. Just dry it fully before you store it.
For sticky situations where a filter fails mid-task, a quick hose check can save you from an unnecessary trip to the store.
Pro Tips to Make Any Filter Last Longer
Tap the filter out after every heavy job. A quick knock on the trash can removes the thick layer that kills suction first.
Use a pre-filter or a cyclone separator. A cyclone separator sits between the hose and the tank and spins debris into a bucket before it reaches the filter. User reviews consistently report far longer intervals between cleanings.
Keep the tank empty. A full tank lets dust recirculate and slam into the filter repeatedly. Wipe the inside with a damp rag when you swap filters.
Store the vac with the filter off. That lets the media dry fully and stops odors from building up in the dark.
If you use the vacuum daily, buy a second cartridge. Rotating them halves the drying wait and keeps you working while one sits out.
Safety First: Wet Pickup, Dry Dust, and Filter Warnings
Know what you're sucking up before you start. Never vacuum flammable liquids like gasoline, solvents, or lacquer thinner. The motor sparks, and those sparks can ignite the vapor.
For wet spills, remove the paper cartridge entirely. Use a foam sleeve or the vac's dedicated wet pickup mode. A soaked paper filter turns to mush and pulls straight into the motor.
For drywall, concrete, or any fine dust, wear a dust mask when you change the filter. That dust hangs in the air long after the vacuum stops. Per OSHA guidance, silica dust exposure is a real hazard, so filters that catch it should be handled gently.
Always unplug before servicing. You're reaching into the motor area, and the float switch can be touchy.
If the filter is wet and the vacuum has been sitting, check for mold before reinstalling. A musty smell means the foam needs a bleach rinse or an outright replacement.
FAQs
How often should I replace a shop vacuum filter?
Most manufacturers recommend every 3 to 6 months for regular home use. Professionals who run the vacuum daily should plan on every 6 to 12 months. Replace it sooner if you see tears, flattened pleats, or a suction drop that won't go away.
Can I clean and reuse a pleated cartridge filter?
Sometimes, yes. Gently rinse it with water and let it dry completely for 24 hours. If the pleats stay damaged or the paper feels soft, replace it.
Washing won't restore a worn filter to full performance.
Why does my shop vacuum lose suction even with a new filter?
Check three things in order: a clogged hose, a stuck float valve, and a cracked tank. A full tank is the most common culprit. The float blocks airflow when the tank fills, so empty it first before ordering another filter.
Is it safe to run a shop vacuum without a filter?
No. Debris enters the motor and quickly destroys the fan and bearings. Even a quick pickup without a filter is risky.
If you're in a pinch, use a foam sleeve, which beats running bare.
What is the difference between a foam sleeve and a cartridge filter?
A foam sleeve catches larger debris and handles wet pickup without breaking down. A cartridge filter catches finer dust for dry jobs. Many vacuums use both together, with the foam over the cartridge to protect it and extend its life.
Final Decision Guide: Which Filter Replacement Is Right for Your Shop Vac?
If you mostly clean garage dust and light woodworking waste, pick a pleated cartridge. It's the standard workhorse and handles sawdust, dirt, and general debris well.
If you vacuum wet spills, flooding, or any kind of liquid mess, choose a foam sleeve. It rinses clean and doesn't disintegrate in water.
If you do drywall, concrete, or any job that creates fine silica dust, go straight to a sealed HEPA filter. That upgrade protects your lungs and keeps fine dust from blowing back into the room.
Still unsure about fit? Look at the model number printed on the tank, then check the manufacturer's compatibility chart. Most brands publish exact part numbers so you can match the filter to the cage in seconds.
A clean filter in the right style brings back the pull you remember from day one. Ten minutes of care keeps a reliable vac running for years, and that's the whole trick.

