

You replace an upright vacuum hose by unplugging the vacuum, removing the damaged hose, and installing a matching replacement.
If your vacuum has lost suction, makes strange noises, or the hose has cracked, you are not alone. Replacing an upright vacuum hose is one of those repairs that looks harder than it really is, and in many cases it can bring the whole machine back to life. I’ve found that this job is usually more about patience and the right part than special tools, so I’ll walk you through it in a clear, practical way.
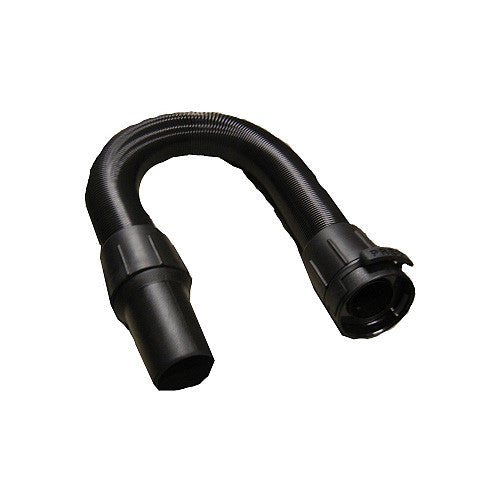
Why an upright vacuum hose matters
The hose is the path that carries dirt, dust, and air through the vacuum. If it splits, clogs, or pulls loose, the whole airflow system suffers. That can mean weak suction at the floor head, poor pickup at the wand, or a vacuum that sounds like it is working harder than it should.
A damaged hose can also make the vacuum less efficient and put extra stress on the motor. In my experience, many people think their vacuum is “dying” when the real problem is just a worn hose or a loose connection. Replacing the hose is often a simple fix that saves money and time.

Signs you need to replace the upright vacuum hose
Before you replace the hose, it helps to confirm that the hose is the real problem. A clog can mimic a tear, and a loose fitting can act like a broken seal. A quick inspection usually tells the story.
Common signs include:
- Weak suction even after emptying the bin or changing the bag
- Visible cracks, holes, or splits in the hose
- Suction that comes and goes when you move the hose
- A rattling or whistling sound from the hose area
- Dirt leaking from the hose connection points
- A hose that feels brittle, stiff, or stretched out
A simple test can help. Turn on the vacuum and cover the hose opening with your hand. If suction is still poor, check for blockages or leaks before replacing the part. If you feel air escaping through a crack, the hose is likely done.
Tools and supplies you may need
Most upright vacuum hose replacements do not require advanced tools. Still, having everything ready makes the job smoother.
You may need:
- A replacement hose that matches your vacuum model
- Screwdriver, usually Phillips or flathead
- Pliers for stubborn clamps or connectors
- Flashlight to see inside tight areas
- Clean cloth or paper towels
- Scissors or utility knife, only if your model uses a cut-to-fit hose
I always recommend checking the model number before buying anything. Even vacuums from the same brand can use different hose shapes, lengths, and connector styles. A wrong part can waste time fast.
How to replace an upright vacuum hose step by step
Replacing an upright vacuum hose is usually straightforward if you take it one piece at a time. Work slowly and keep track of screws and clips as you remove them. The process below fits most upright vacuums, though some models may have slight differences.
1. Unplug the vacuum
This sounds obvious, but it matters. Always unplug the machine before opening any part of it. Safety should come first, even for a small repair.
2. Locate the hose connection points
Most upright vacuums have the hose connected near the base, the handle, or both. Some hoses run from the lower body to a wand or upper handle section. Look closely at where the hose bends and where it locks in place.
3. Remove the outer cover or access panel
Some vacuums hide the hose under a plastic cover or side panel. Use the right screwdriver to remove the screws. Keep them in a small bowl or cup so they do not vanish into the carpet like magic.
4. Disconnect the old hose
Gently release clips, tabs, or retaining rings. If the hose is stuck, do not yank it hard. A little twisting motion usually helps, and a flashlight can reveal a clip you missed.
5. Check for clogs and debris
Before installing the new hose, inspect the vacuum path for dust, lint, or small objects. This is a good time to clean the nozzle, wand, and internal airflow path. A new hose will not help much if a sock is still lodged inside the machine.
6. Match the new hose to the old one
Compare the replacement hose with the old one before installing it. Make sure the length, bends, connector ends, and mounting points are the same. If your vacuum uses a hose with an elbow or swivel joint, confirm that the replacement includes it.
7. Install the new hose
Fit the replacement hose into the same path as the old one. Snap or screw the ends into place just as the original was installed. Make sure the hose is not twisted, pinched, or stretched too tightly.
8. Reattach the cover or panel
Once the hose is secure, put the cover back on and tighten the screws. Do not overtighten them, since plastic threads can strip easily. A snug fit is usually enough.
9. Test the vacuum
Plug the vacuum back in and run it for a few seconds. Check suction at the hose, wand, and floor head. If the airflow feels strong and steady, the repair was successful.
How to find the right replacement hose
The right hose is the difference between a clean fix and a headache. Brand, model, and version all matter. Even one small design change can make a hose incompatible.
Here is how to get the correct one:
- Check the vacuum model number on the label, often on the back or bottom
- Look up the parts diagram for your exact model
- Compare photos of the old hose with the replacement listing
- Match the connector shape, bends, and length
- Confirm whether the hose is for the upper section, lower section, or both
If you are unsure, take the old hose with you to a parts store or compare it side by side online. I have made the mistake of ordering a “close enough” hose before, and it almost fit, which is usually the worst kind of fit. Almost is not enough here.
Common mistakes to avoid
A lot of hose replacements go wrong for simple reasons. The good news is that most of these mistakes are easy to avoid once you know them.
Watch out for these problems:
- Buying the wrong hose for the model
- Forgetting to unplug the vacuum
- Forcing clips or tabs and breaking the housing
- Ignoring clogs inside the vacuum path
- Installing the hose with a twist or pinch
- Reusing brittle seals or cracked gaskets
- Overtightening screws into plastic parts
One of the biggest lessons I have learned is to work gently. Vacuum parts are usually lighter and more fragile than they look. A slow hand saves more repairs later.
When to repair versus replace the whole vacuum
Sometimes replacing the hose is the smart move. Other times, the vacuum may have deeper problems that make a full replacement more practical. It helps to step back and look at the whole machine.
Repair the hose if:
- The vacuum still works well overall
- The motor sounds normal
- The hose is the main damaged part
- Replacement parts are easy to find
- The repair costs far less than a new vacuum
Replace the vacuum if:
- The motor is failing or overheating
- Multiple major parts are broken
- The cost of parts is close to a new unit
- The vacuum is very old and inefficient
- You cannot find compatible parts
A hose repair is often one of the most cost-effective fixes. But if the vacuum has been patched several times already, it may be time to move on.
How to keep the new hose in good shape
A new hose should last a long time if you treat it well. The hose usually fails from bending too hard, pulling, or clogging. A few habits can make a big difference.
Helpful tips:
- Avoid stretching the hose beyond its normal range
- Do not yank the vacuum by the hose
- Clear clogs quickly before they build pressure
- Store the vacuum where the hose will not get crushed
- Check for hair, dust, and debris buildup regularly
- Keep the hose off sharp furniture edges
Think of the hose like a bendy straw. If you pinch it, twist it, or pull it too hard, it will wear out faster. Gentle use is the simplest maintenance there is.
Why replacing the hose can improve vacuum performance
A fresh hose can do more than stop leaks. It can restore airflow, improve pickup, and make the vacuum feel stronger overall. That is because a sealed air path helps the motor do its job correctly.
Benefits of replacement include:
- Better suction
- Less strain on the motor
- Improved dirt pickup
- Quieter operation in some cases
- Fewer dust leaks and odors
- Longer vacuum life
From a practical point of view, this is one of the easiest repairs with the biggest payoff. If the rest of the vacuum is in good shape, replacing the hose can feel like giving the machine a second wind.
Frequently Asked Questions
How do you know if an upright vacuum hose is broken?
A broken hose usually shows visible cracks, holes, or splits. You may also notice weak suction, air escaping, or suction that changes when you bend the hose.
Can you tape a vacuum hose instead of replacing it?
You can use tape for a very small temporary fix, but it usually does not last. Vacuum hoses flex a lot, so a proper replacement is the better long-term solution.
Do all upright vacuums use the same hose?
No, upright vacuums use different hose shapes, lengths, and connector styles. Always match the replacement hose to your exact model number.
How long does it take to replace an upright vacuum hose?
Most replacements take about 15 to 45 minutes. The time depends on how the vacuum is built and whether the screws or clips are easy to reach.
Why does my vacuum still have poor suction after replacing the hose?
The problem may be a clog, dirty filters, a full bag or bin, or a worn belt. If the new hose is installed correctly, check the rest of the airflow system next.
Conclusion
Replacing an upright vacuum hose is usually a simple, worthwhile repair that can bring back suction and extend the life of your machine. Once you know how to match the part, remove the old hose carefully, and install the new one without pinching it, the job becomes very manageable.
If your vacuum is acting weak or leaking air, do not rush to replace the whole unit. Start with the hose, inspect the airflow path, and make the fix with care. If this guide helped, take a few minutes to check your vacuum now, or save this article for the next time the hose starts to wear out.

