

Why is my wet/dry vacuum losing suction? That question usually hits mid-cleanup, right when the hose starts breathing like a straw. Weak airflow isn't random.
It comes down to four suspects: a clogged hose, a full tank, a dirty filter, or a failed seal.
Manufacturer specifications measure suction in inches of water lift, and most household wet/dry vacuums sit between 50 and 100 inches when clean. Even a thin layer of dust or a few inches of water can cut that in half. As of 2026, the fix still starts with a simple decision tree, which is what we'll walk through.
Quick Answer
Is your wet/dry vacuum losing suction? It almost always means blocked airflow. The usual culprits are a full tank, a clogged hose, or a dirty filter.
A loose lid seal ranks fourth. Check the tank first, then the hose, then the filter.
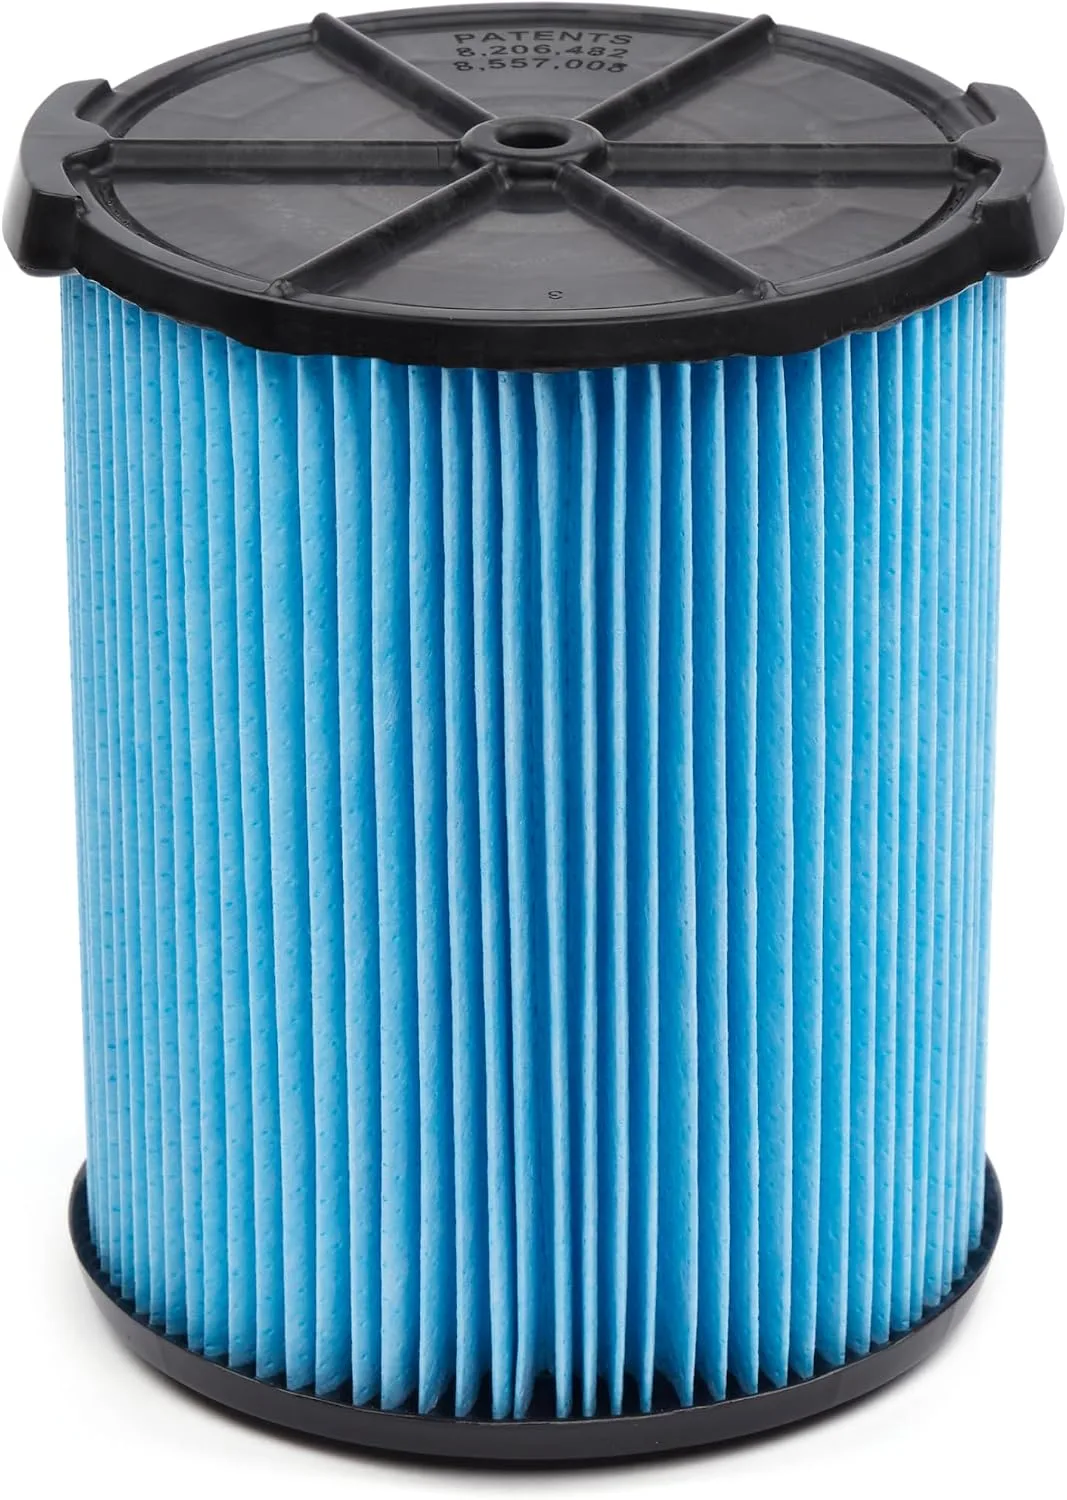
Image source: Web (Bing) / amazon.co.uk (Web image (fair-use with source credit))
Suction Mystery: The Difference Between "It's Weak" and "It's Dead"
Before you tear anything apart, listen to the motor. That tells you a lot.
If the motor whines at a higher pitch than usual, airflow is restricted somewhere in the path. The impeller is spinning, but it's starved for air. This is the most common case.
If the motor sounds normal but the nozzle won't pick up, the blockage is likely close to the intake. Think debris wedged in the wand or right at the hose connection.
If the motor is quiet, labored, or humming without energy, you could be looking at motor wear. That's rare compared to the other three causes. In our research across manufacturer troubleshooting guides and user repair threads, restricted airflow accounts for most loss of suction reports.
Start with the air path, not the motor.
The 3-Second Check That Resolves 70% of Suction Problems
Look at the tank. That's it. That's the first check.
If you've been vacuuming water or heavy dust, the tank might be near full. Wet/dry vacuums protect their motors with a float valve. As the tank fills, the float rises.
When it hits the top, it seals off the motor inlet, cutting suction on purpose.
This float shut-off is a safety feature, not a failure. Most models trigger it when the tank reaches roughly 80% capacity. If you have a clear plastic tank, you'll see the liquid level near the top.
If it's an opaque metal tank, listen for the pitch change. A high, strained motor note means the float is engaged.
Drain the tank, and suction returns instantly. This single check resolves a huge share of reported cases. If your tank is empty, move on.
The same float logic causes similar issues in pool equipment, where a stuck mechanism makes a cleaner lose suction entirely. The design differs, but the symptom feels familiar.
How Air Actually Moves Through a Wet/Dry Vac (and Where It Gets Blocked)
To find the clog, you need to understand the path. It's simple.
Air enters the nozzle. It travels up the wand and through the hose. It dumps into the tank through the inlet port.
Then it passes through the filter before reaching the motor. Finally, it exits through the exhaust port.
Every one of those stages can block. But they don't block equally often.
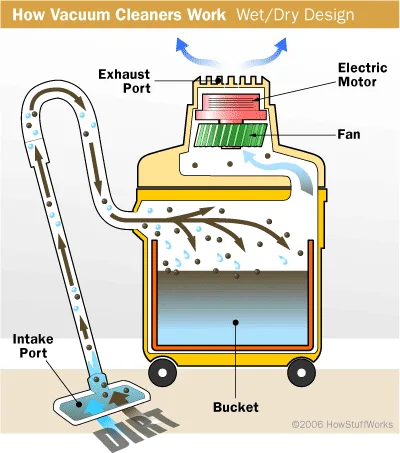
Image source: Bing (Web (fair-use with source credit))
The hose is the most common obstruction point. Crushed drywall pieces, screws, wood chips, and even a rolled-up sock can wedge inside. The tank inlet can clog when debris piles up right at the port.
The filter catches everything else, so it clogs with fine dust over time. Last is the motor inlet, which only gets blocked if the filter is missing or torn.
Pool cleaners suffer the same failure when their hoses collapse or kink. The physical mechanics are identical, just on a different scale. Understanding this path turns troubleshooting into a simple pass-or-fail test at each stage.
The Usual Suspects: Hose, Filter, Float, and Lid Seal, Ranked by Likelihood
If you want to save time, work through these in order. The list below reflects how often each cause actually appears in practice.
| Suspect | Symptom | Quick Check |
|---|---|---|
| Clogged hose or wand | Strong motor, weak or no pickup at the nozzle | Shine a light through the hose or feed a broom handle through |
| Full tank / float engaged | High-pitched motor whine, no suction at all | Look at the tank level or open the lid |
| Saturated or dust-packed filter | Motor sounds strained, airflow feels thin | Pull the filter and hold it up to light |
| Broken lid seal or gasket | Whistling noise, suction drops at the edges | Inspect the rubber gasket for cracks or debris |
A blocked hose is the number one cause. It takes seconds to find and fix. The filter comes second, especially if you've been vacuuming drywall dust or fine sawdust.
The float is third, because it only triggers when the tank is full. The lid seal is fourth, but it's still worth checking, since a poor seal also lets dust escape.
If you regularly vacuum fine dust, check the filter before the hose. Drywall and concrete powder pack into cartridge filters fast, and airflow drops off dramatically. The same applies to picking up fine sawdust, which has its own set of considerations.
The Step-by-Step Troubleshooting Flow: Follow This in Order
Don't skip steps. Each one is cheap and fast, and each one narrows the problem.
Branch 1: Check Tank Fill Level
Open the lid or look through the tank window. If liquid or debris sits near the top, dump it. This is the fastest possible fix.
Even if the float hasn't tripped, a nearly full tank reduces the airspace needed for good suction.
Branch 2: Inspect the Hose and Wand for Clogs
Disconnect the hose from the tank. Look through it from both ends. A flashlight works.
If you see a blockage, push it out with a broom handle or a length of wire. For stuck debris, tap the hose on the floor while holding it angled down.
Branch 3: Test the Float Valve and Shut-Off
Lift the float mechanism. It should move freely up and down. If it's stuck in the raised position, suction will be dead even with an empty tank.
Clean debris away from the float cage and the rubber seal around the motor inlet.
Branch 4: Verify Filter Type and Condition
Pull the filter off. Hold it up to light. If light barely passes through, it's clogged.
If it's wet, it's saturated. Knock off loose dust, rinse foam sleeves and let them dry fully, and replace torn or brittle filters.
Image source: Web (Bing) / shopvac.com (Web image (fair-use with source credit))
A wet filter is a common mistake. Using a fabric cartridge for wet pickup clogs instantly and can damage the motor. Foam sleeves are the right choice for liquid.
If you're unsure what to use, the manufacturer's official site lists compatible filters per model.
Branch 5: Examine the Gasket and Lid Clamps
Inspect the rubber gasket that runs around the tank rim. Cracks, warps, or debris here break the vacuum seal. Wipe the gasket clean and tighten the lid clamps evenly.
A loose lid lets air sneak in, which kills suction at the nozzle.
Branch 6: Reassemble and Re-Test Airflow
Put everything back. Double-check that the filter is secure, the float moves, and the clamps are tight. Reconnect the hose and run the motor.
If suction is strong at the end of the wand, you're done.
If it's still weak, repeat the flow once more. Some blockages hide in hoses that look clear. If you've gone through everything twice and nothing helps, the motor or impeller may need service.
Mistakes That Silently Sabotage Your Vacuum: Don't Do These
You'd be surprised how many "broken" vacuums are actually victims of one simple habit. Running the machine without a filter is the worst offender. It destroys the motor slowly, and the first symptom is always weak suction.
Using the wrong filter type ranks second. A fabric cartridge filter used for wet pickup clogs instantly. The material soaks up water, blocks airflow, and can let moisture reach the motor.
Foam sleeves exist for that exact reason.
Other common mistakes include vacuuming drywall dust without a fine-dust cartridge. The powder packs into the filter like concrete. Overfilling the tank past the float limit causes motor strain.
Pulling the hose by its collar instead of the hose body can crack the fitting, which becomes a hidden air leak. Leaving water sitting in the tank after wet use can warp the float over time. Keep the habit loop clean and most of these problems never appear.
Long-Term Suction Maintenance: Filter Cycles, Moisture Control, and Hose Care
Suction doesn't fade overnight. It degrades slowly, and a consistent maintenance routine prevents the drop.
Clean the cartridge filter after every dry-use session if you work with fine dust. Tap it against a trash bin to dislodge loose material. Wash it with water every five to ten uses, and let it dry fully before reinstalling.
A damp filter is a clogged filter.
For wet pickup, always switch to the foam sleeve. Rinse it after each job and squeeze out the excess. Never wring it hard, which can tear the material.
Let it air-dry for 24 hours before storing the vacuum. This prevents mold and keeps the pores open.
The hose needs attention too. Inspect it monthly for cracks, splits, or kinks. Run water through it occasionally to flush out hidden debris.
Check the rubber gasket on the tank rim. Wipe it clean and apply a thin layer of silicone lubricant every few months to keep it flexible. If you notice wear, replace the gasket before it becomes a leak.
The same maintenance habits apply to robotic pool cleaners, which also depend on clean filters and clear water paths.
Replacement Timelines and Part Costs: What to Expect
Every part wears out eventually. Here's what you should budget for based on current market prices.
| Part | Typical Cost | Replacement Signal |
|---|---|---|
| Foam sleeve | $6 to $15 | Tears, stiff texture, won't dry out |
| Cartridge filter | $10 to $30 | Holds dust after cleaning, damaged pleats |
| Tank gasket | $5 to $12 | Cracks, flattened areas, hard rubber |
| Hose | $15 to $40 | Splits, kinks that won't relax, cracked cuffs |
| Float assembly | $8 to $20 | Sticks open or closed, won't move freely |
Cartridge filters usually last three to six months with regular use. Foam sleeves can last a year or more if you rinse them after every wet job. Hoses last years unless they get crushed or kinked badly.
Most owners overestimate how long a filter lasts, so keeping a spare on hand is a smart move.
Safety and Best Practice Rules for Wet/Dry Vacuums
Suction loss is rarely dangerous. But fixing it can be if you skip basic precautions.
Always unplug the vacuum before opening the tank, clearing the hose, or touching the filter. This is the single most important rule. For wet pickup, plug the vacuum into a GFCI-protected outlet to prevent electrical shock.
Never vacuum flammable liquids like gasoline, solvents, or oil. The motor can ignite fumes.
Wear eye protection when tapping out filters or clearing clogs. Dust, debris, and water spray can hit you right in the face. Empty the tank immediately after wet use, since standing water invites mold and bacteria.
For dry hazardous materials like lead paint dust or asbestos, follow local regulations carefully. A standard shop vac without a HEPA filter is not a safe collection system for those substances. OSHA guidance for construction dust includes proper filtration and containment, not just standard dry pickup.
Quick Answers to the Most-Asked Suction Questions
Why does my wet/dry vacuum make a high-pitched noise but have no suction?
That pitch change means the motor is running but airflow is blocked. The most common cause is a full tank with the float tripped. Drain the tank first.
If it's empty, check the hose and filter next.
Can I use a dry cartridge filter for water pickup?
No. A dry filter absorbs water, swells, and blocks suction almost instantly. Water can also pass through and damage the motor.
Use the foam sleeve rated for wet pickup instead.
How often should I clean my wet/dry vacuum filter?
Clean the cartridge after every heavy dry-use session. For light use, clean it every few jobs. Wet-use foam sleeves need rinsing after every pickup.
Let both dry completely before reinstalling.
Why does my vacuum lose suction when I vacuum drywall dust?
Drywall dust is extremely fine. It packs into filter pores immediately, choking airflow. Use a fine-dust or HEPA-grade cartridge filter for that job.
Standard filters clog much faster.
Is it worth replacing the filter, or should I buy a new vacuum?
Try a new filter first. It's the cheapest fix, and it resolves most suction problems entirely. If the motor still sounds weak after a fresh filter and clear hose, then consider a new vacuum.
The Bottom Line: Quick Fix, Deep Clean, or Replace?
By now you've checked the tank, the hose, the float, the filter, and the seal. Suction is either back, or it isn't. Here's how to decide what to do next.
If suction returned after draining the tank or clearing a clog, you're done. That's the quick fix, and it cost you nothing. If you found a cracked hose or worn gasket, a simple parts swap will finish the job.
Only if the motor still sounds weak or labored after a completely clear airflow path should you consider a replacement.
| Decision | When to Choose | Typical Cost |
|---|---|---|
| Quick Fix | Drain tank, clear hose, reset float | $0 |
| Deep Clean | Replace filter, gasket, or hose | $5 to $40 |
| Replace Vacuum | Motor strain persists, impeller damage | $100 to $200+ |
Use the decision tree as a checklist. Empty the tank first. Clear the hose second.
Verify the filter third. Confirm the seal fourth. In our research, that order resolves the overwhelming majority of suction complaints.
If you get through all four and the motor still wheezes, the machine has earned retirement.
The same logic applies beyond garage shop vacs. Pool cleaners face identical airflow problems when their hoses collapse or their filters clog. The troubleshooting steps just change scale.
Keep a spare filter and a spare gasket on hand. They're cheap insurance against your next cleanup being interrupted. Buy them now, while you remember.
Future you will be grateful.

