

When summer winds down, your above-ground pool needs some TLC to survive the colder months. Properly learning how to protect an above ground pool in winter is key to avoiding costly repairs and ensuring a smooth re-opening come spring. Neglecting this seasonal task can lead to serious damage from ice and frost.
This guide breaks down the essential steps, helping you secure your pool against the elements. We'll cover everything from water chemistry to equipment prep, ensuring your investment stays in great shape through winter. For optimal pool structure integrity as recommended by pool engineering guidelines, maintaining a specific water level is crucial.
Quick Answer
Protect your above-ground pool by cleaning it, balancing water chemistry, draining equipment, and covering it securely. In cold climates, keep water above the skimmer. Always follow manufacturer specifications for chemicals and equipment.
The Big Question: Cold Climate vs. Mild Climate Winterizing
The most significant factor dictating how you'll protect your above-ground pool is your local climate. The extent of freezing temperatures and the duration they persist will determine the thoroughness of your winterization process. Ignoring these climate-specific needs can lead to damage that’s expensive and time-consuming to fix.
Cold Climate Considerations
If your area experiences consistent freezing temperatures for weeks or even months, your winterization needs to be robust. The primary concern here is the expansion of water as it freezes, which can exert immense pressure on your pool's structure, plumbing, and equipment. Manufacturer specifications for pool longevity often emphasize protection against such pressures.
You’ll need to take extra precautions to prevent ice from damaging your skimmer, return lines, and the pool walls themselves. This often involves thorough draining of plumbing and using specialized winterizing plugs.
Mild Climate Flexibility
In milder climates where hard freezes are rare or brief, you might have more flexibility. While it's still wise to protect your pool from debris and potential minor freezing, you may not need to go to the same extreme as in colder regions. Some steps, like completely blowing out all the lines, might be less critical, but it's still a good practice to safeguard your equipment and water quality.
Even a few nights below freezing can cause issues if the water chemistry is off or equipment isn't properly prepped.
Step 1: Pre-Winter Pool Cleaning and Balancing
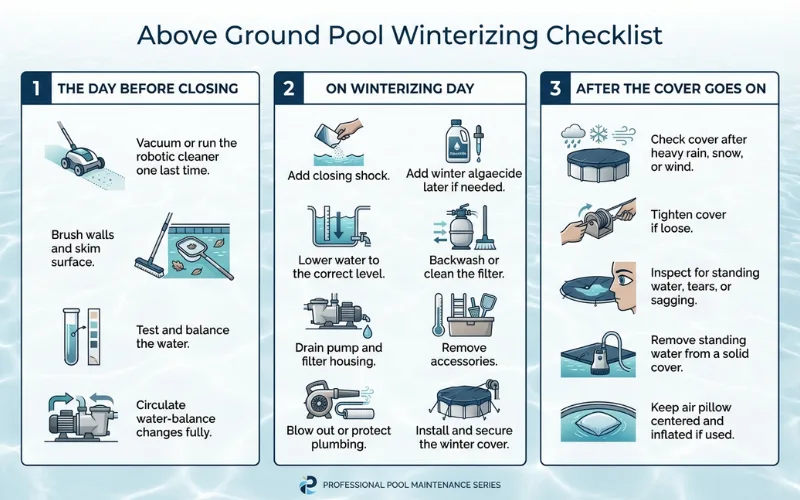
Before you even think about covering your pool, it needs to be impeccably clean, and its water chemistry must be perfectly balanced. This preparation phase is critical for preventing algae blooms, staining, and other water quality issues that can persist and worsen over the winter. Think of it as giving your pool a clean bill of health before putting it to bed.
Surface Skimming and Vacuuming
Start by removing all visible debris from the water's surface and the pool floor. Leaves, twigs, bugs, and any other floating or settled gunk can decompose, staining your pool liner and consuming sanitizers.
- Skim: Use a leaf rake to scoop out floating debris.
- Vacuum: Thoroughly vacuum the pool floor, paying attention to any corners or crevices where debris might accumulate.
Brushing Walls and Floors
After skimming and vacuuming, use a pool brush to scrub the walls and floor. This dislodges any dirt, algae, or film that might be clinging to the surfaces. These particles can then be skimmed or vacuumed out.
This step is particularly important if you've noticed any slick spots or discolored areas, which could indicate the beginnings of algae.
Water Chemistry: The Crucial Prep
Balanced water chemistry is non-negotiable for winterization. Unbalanced water can lead to corrosion of metal components or staining of the pool liner throughout the off-season.
- Test your water: Use a reliable pool test kit to check the levels of pH, alkalinity, and sanitizer (like chlorine).
- Adjust pH: Aim for a pH level between 7.2 and 7.6. This range is optimal for sanitizer effectiveness and protects pool surfaces from damage.
- Balance Alkalinity: Ensure total alkalinity is within the recommended range (typically 80-120 ppm) to help stabilize pH.
- Shock the pool: A few days before you plan to cover your pool, give it a thorough "shock" treatment with your chosen sanitizer. This kills off any existing algae, bacteria, and contaminants. Follow product instructions carefully, and allow the sanitizer levels to drop to a normal operating range (typically 1-4 ppm for chlorine) before adding your winterizing chemicals and cover.
Step 2: Preparing Your Pool Equipment
Your pool's pump, filter, and any other equipment need specific attention to prevent damage from freezing temperatures. The goal is to remove all water from these components, as water expands when it freezes, and this expansion can crack housings, pipes, and internal parts.
Draining and Protecting the Pump and Filter
This is a critical step, especially in colder climates.
- Pump: Turn off the power to the pump at the breaker. Locate and remove the drain plug(s) on the pump housing to allow all water to escape. You might also need to remove the pump lid and drain the wet end.
- Filter: Depending on your filter type (sand, cartridge, or DE), you'll need to drain it completely. For sand filters, remove the drain plug at the bottom of the tank. For cartridge filters, remove the cartridge, clean it thoroughly, and drain the filter housing.
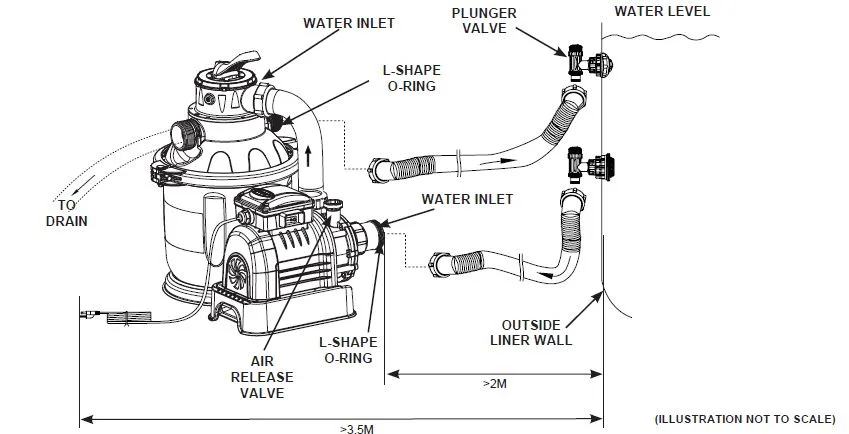
- Storage: If possible, store the pump indoors or in a sheltered area to protect it from the elements. If it must remain outdoors, ensure it is thoroughly drained and protected from moisture.
Skimmer and Return Line Winterization
The skimmer and return lines are particularly vulnerable to ice damage because they connect directly to the outside.
- Skimmer: Remove the skimmer basket and weir. You will then install a skimmer faceplate or a winterizing plug (like a "Gizzmo") to seal off the opening. These devices are designed to absorb ice expansion.
- Return Lines: For return lines, the objective is to remove all water. This is usually done by "blowing out" the lines using a powerful blower (like a shop vac set to blow or a dedicated pool blower). Once the lines are confirmed to be empty of water, they must be plugged with threaded winterizing plugs to prevent water from re-entering. This process is vital in climates that experience deep freezes.
Step 3: Water Level Management and Cover Selection
Deciding on the right water level and choosing the appropriate cover are key components of effective winter pool protection. Leaving the water at its normal operating level, or slightly lower, is generally recommended, especially in regions prone to freezing.
Why Not Drain Completely?
Completely draining an above-ground pool, particularly in winter, can cause more problems than it solves. Pool engineering principles suggest that the water inside the pool provides a crucial counter-pressure against the earth. Without this water, especially in areas with frost heave, the pool walls can collapse inward or the structure can be pushed out of the ground by expanding soil moisture.
Therefore, for most above-ground pools, keeping the water at its standard operating level, or lowered just below the skimmer as discussed for cold climates, is the safest approach.
Choosing Your Winter Cover: Solid vs. Mesh
The type of winter cover you select will depend on your climate and the amount of debris you typically get. As of 2026, the two main categories remain solid and mesh covers.
- Solid Winter Covers:
- Pros: Excellent at blocking sunlight (preventing algae growth) and keeping out fine debris, dirt, and leaves. They create a physical barrier.
- Cons: They do not allow water to drain. You’ll need a cover pump to regularly remove accumulated rainwater or snowmelt. If not drained, the weight of the water can damage the cover or even the pool.
- Mesh Winter Covers:
- Pros: Allow water and melted snow to pass through, eliminating the need for a cover pump. They are generally lighter and easier to handle.
- Cons: They let sunlight through, which can encourage algae growth over the winter. They also allow smaller debris to enter the pool.
Your choice should align with how much maintenance you're willing to do during the off-season and the specific environmental conditions in your area.
Step 4: Installing Your Winter Cover
Once your pool is clean, the water balanced, and your equipment prepped, it's time to put on the winter cover. This is the final protective layer that shields your pool from falling leaves, dirt, and other debris throughout the off-season. A good cover installation prevents premature spring cleaning and protects your pool liner.
Securing the Cover Properly
A cover that is not secured properly is an invitation for disaster. Wind can catch an unsecured cover, tearing it or blowing it off entirely, leaving your pool exposed. Follow the manufacturer's instructions for your specific cover type, but generally, this involves using a cable or water tubes.
- Cable and Winch System: Many solid winter covers come with a cable that threads through grommets along the cover's edge. This cable is then tightened using a winch, pulling the cover snug against the pool wall. Ensure the cable is taut but not so tight that it stresses the cover.
- Water Tubes: For covers that don't use a cable system, heavy-duty water tubes are often used. These are placed on top of the cover's edge, resting on the pool deck or ground around the pool. As they fill with water, they create a secure seal, holding the cover down.
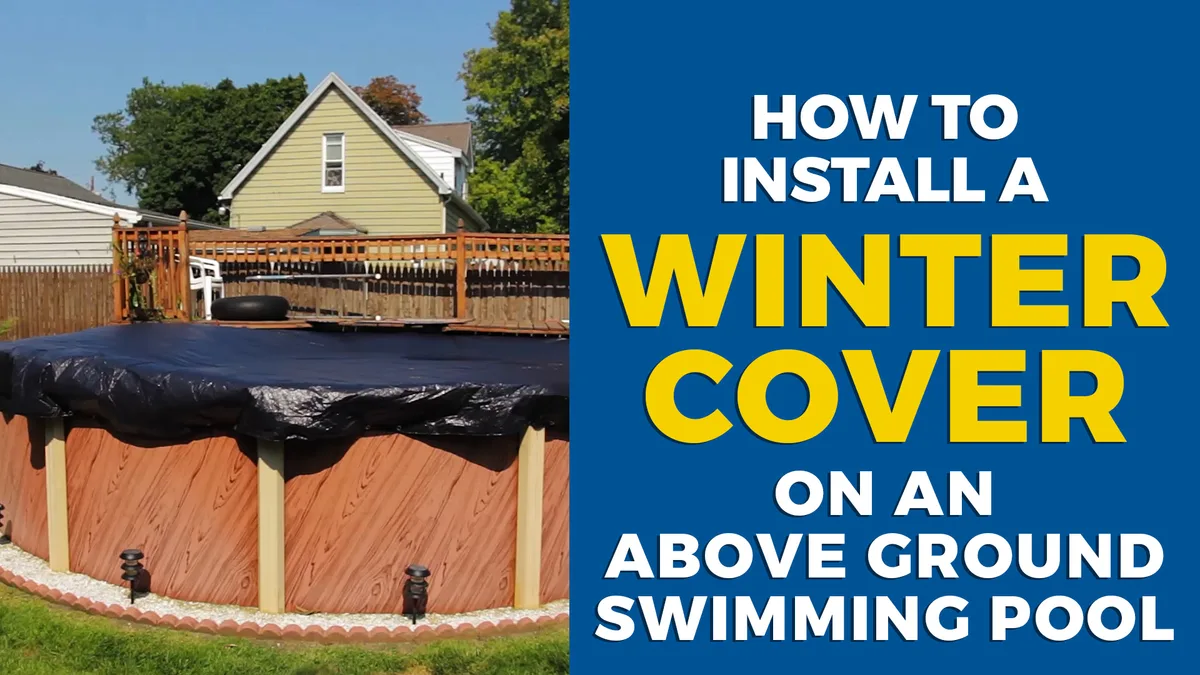
Using Water Tubes and Cables
When using water tubes, space them evenly around the pool’s perimeter, typically every 3-4 feet. Ensure they are filled adequately but not to bursting point, as water expands when it freezes. If your cover uses a cable and winch, periodically check the tension of the cable, especially after strong winds or temperature fluctuations.
A well-secured cover is your pool’s best defense against winter’s harsh elements.
Common Winterizing Mistakes to Avoid
Even with the best intentions, some common missteps can undermine your winterization efforts, leading to spring surprises. Being aware of these pitfalls can help you avoid them and ensure your pool weathers the cold months successfully. Many of these errors stem from rushing the process or underestimating the impact of freezing temperatures.
- Not Cleaning Thoroughly: Leaving debris in the pool before covering it is a major mistake. Decomposing leaves and organic matter can stain the liner and promote algae growth, making spring cleanup much harder.
- Improper Water Balance: Failing to test and balance the water chemistry before winter means you're essentially sealing in a problem. Unbalanced water can cause staining, etching, or corrosion throughout the off-season.
- Incomplete Draining of Equipment: Not draining pumps, filters, or plumbing lines fully is perhaps the most dangerous mistake in freezing climates. Water trapped in these components will freeze, expand, and can cause cracks or bursts, leading to expensive repairs.
- Over- or Under-Chlorinating: Shocking the pool correctly is important, but leaving chlorine levels too high can damage the cover or pool components. Conversely, not shocking at all can allow algae to take hold.
- Insecure Cover: A cover that isn't properly secured can blow off, exposing the pool to harsh weather, debris, and potential damage. This defeats the purpose of winterizing.
Expert Tips for a Smooth Spring Opening
While winterization is about protection, smart planning now makes opening your pool in the spring significantly easier and less costly. Think of these tips as smart investments in your future pool enjoyment. They're based on common user experiences and manufacturer recommendations for longevity.
- Consider Winterizing Chemicals: Beyond basic balancing, specialized winterizing chemicals can help keep your water clearer and prevent staining. These products typically include algaecides and stain preventatives. Always follow the dosage instructions precisely.
- Document Your Process: Take notes or photos during winterization. This will be invaluable when you need to repeat the process next year, especially if you've made any adjustments or learned new tricks.
- Check Your Cover Periodically: Even with a secure cover, it's a good idea to check on it occasionally during the winter, especially after heavy snow or wind. Remove excess snow to prevent undue stress on the cover and structure.
- Invest in Quality Winterizing Gear: While you can improvise some steps, having the right tools, like a powerful blower for lines and a good quality cover, makes a big difference. Manufacturer specifications for winter plugs and skimmer covers ensure a proper fit.
- Plan Your Spring Opening: Have your opening chemicals and equipment ready to go before you take the cover off. This minimizes the time the pool is exposed and vulnerable.
Frequently Asked Questions About Pool Winterization
How long does it typically take to winterize an above-ground pool?
The time needed can vary, but for most above-ground pools, a thorough winterization typically takes anywhere from 2 to 6 hours. This depends on your pool size, the complexity of your equipment, and your climate. Steps like cleaning and balancing water can take longer if the pool is particularly dirty or the chemistry is significantly off.
Can I use a regular tarp as a winter cover?
No, it's highly recommended not to use a regular tarp as a winter cover. Tarps are not designed for pool use; they are not durable enough to withstand winter conditions, they don't fit properly, and they can leak harmful chemicals into your pool water. Pool-specific winter covers are made from materials engineered to block sunlight and withstand freezing temperatures while providing a secure fit.
What happens if I don't winterize my pool?
If you don't winterize your pool, especially in a climate that experiences freezing temperatures, you risk significant damage. This can include cracked pump housings, burst pipes, damaged skimmers, and even structural damage to the pool walls. Additionally, algae and debris can accumulate, making your spring opening a much more labor-intensive and expensive ordeal.
Should I remove the pool water completely?
In most cases, you should not completely drain an above-ground pool for winter, particularly in cold climates. The water provides essential structural support against frost heave and ground pressure. Only in very specific situations, or if advised by a pool professional for a particular reason, would a full drain be considered, and it requires careful planning.
Manufacturer guidelines generally advise against full winter drainage.

