

Image source: Bing (Web (fair-use with source credit))
Deciding to take on an above-ground pool installation yourself is a big step, one that promises summer fun at potentially lower costs than hiring professionals. It's definitely achievable for many, but it demands careful planning, the right tools, and a good dose of patience.
In our research, we've found that success hinges on realistic expectations and understanding the physical demands. Most pool kit manufacturers, like those adhering to stringent ASTM F-2903 standards for above-ground pools, provide detailed manuals, but interpreting them correctly and executing each step is where the challenge lies.
Quick Answer
Yes, you can often install an above-ground pool yourself. It requires careful ground preparation and precise assembly. Successful DIY installation depends on your skill level, available tools, and adherence to manufacturer instructions.
Mistakes can lead to costly repairs or safety hazards.
The Big Question: Are You Up for a DIY Pool Install?
This isn't just about following instructions; it’s about assessing your own capabilities and resources. Installing an above-ground pool involves a significant amount of physical labor and a certain degree of mechanical aptitude. You’ll be moving heavy components, ensuring precise alignments, and dealing with water and potential leaks.
So, before you even think about ordering a kit, ask yourself a few honest questions. Do you have a good amount of free time, especially a weekend or two dedicated to this project? Are you comfortable with tasks like digging, leveling, and using basic tools?
If the answer to these is a solid "yes," then diving into a DIY installation might be a rewarding endeavor for you and your family.
What Goes Into an Above-Ground Pool Kit?
When you buy an above-ground pool, you're not just getting a big plastic tub. You're receiving a system designed for easy assembly, but it still requires thoughtful construction. Think of it as putting together a complex puzzle with its own set of rules.
Here’s a general breakdown of what most standard above-ground pool kits include:
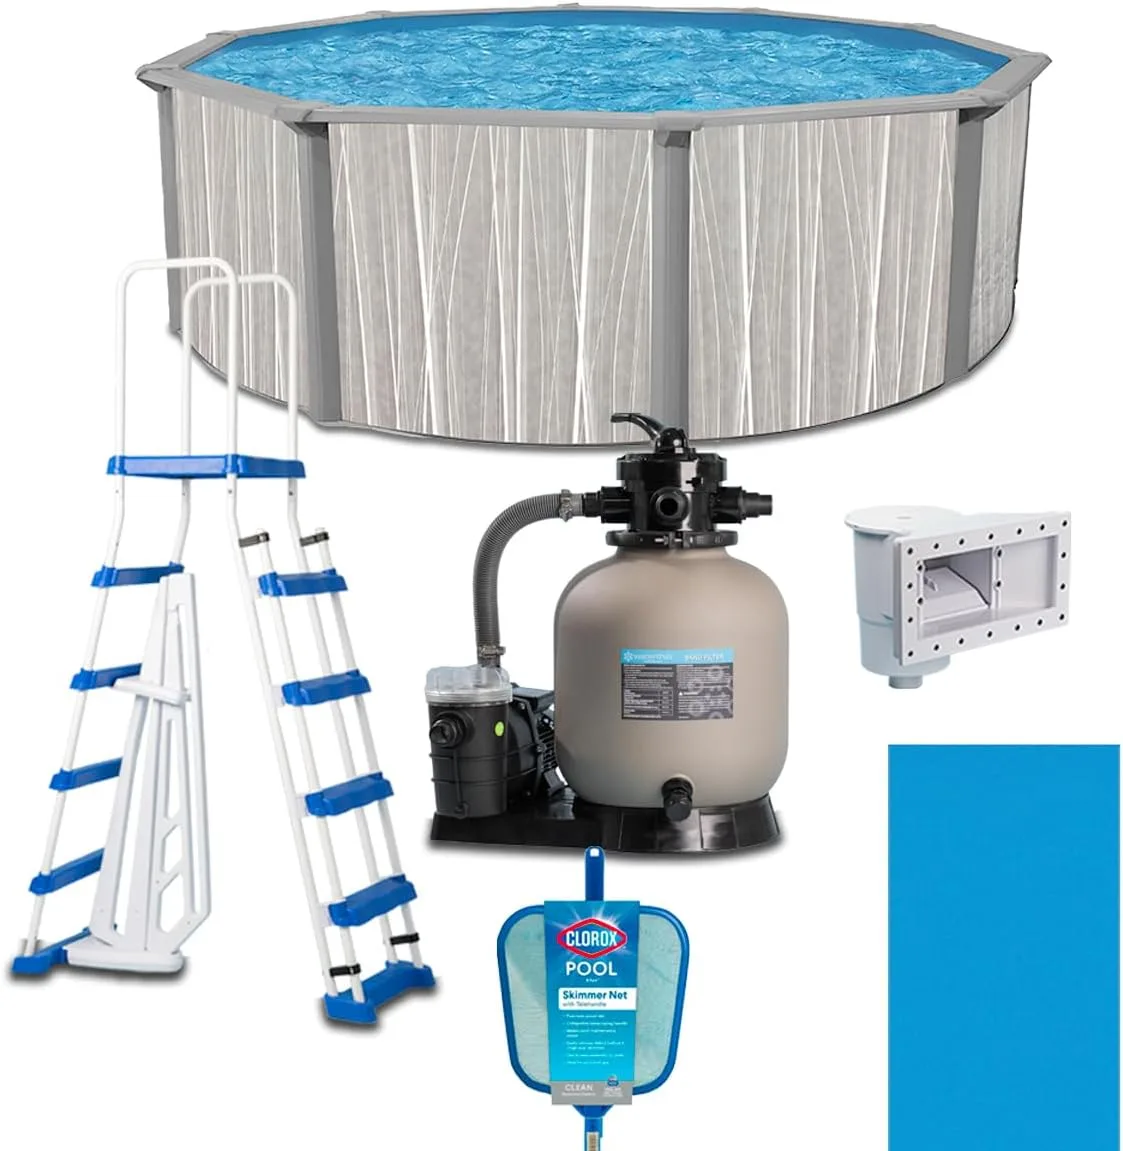
- The Pool Structure: This usually consists of durable metal or resin uprights and top rails that form the frame. The wall itself is typically a corrugated steel or a heavy-duty polymer.
- The Liner: This is the waterproof barrier that holds the water. Liners are usually made from vinyl and come in various patterns and thicknesses (measured in mils). A thicker liner, like a 25-gauge or 25-mil, generally offers better durability.
- Filtration System: Essential for keeping your water clean and clear. This includes a pump to circulate the water and a filter (often sand, cartridge, or DE, Diatomaceous Earth) to remove debris. Manufacturer specs often list the pump’s flow rate in gallons per hour (GPH).
- Skimmer and Return Fittings: These are the openings in the pool wall that allow water to enter the filtration system and be returned back into the pool.
- Ladder or Entry System: You'll need a way to get in and out of your pool safely. This can range from a simple ladder to a more elaborate step system.
While these are the core components, remember that some kits might offer extras or variations. Always check the specific product details for what’s included in the kit you’re considering.
Is It Worth the DIY Effort? Pros and Cons of Installing Your Own Pool
Deciding whether to DIY your pool install or hire professionals boils down to weighing the benefits against the potential challenges. It's a decision that impacts your budget, your schedule, and even your peace of mind.
Here’s a look at the advantages and disadvantages we've seen:
Pros of DIY Installation:
- Cost Savings: This is often the biggest draw. You can save a significant amount on labor costs by doing the work yourself. Professional installation fees can easily add thousands of dollars to the total price.
- Sense of Accomplishment: Successfully completing a project like this can be incredibly rewarding.
- Flexibility: You can work at your own pace, fitting the installation around your schedule, though this can also extend the timeline.
- Learning Opportunity: You’ll gain a better understanding of how your pool works, which can be helpful for future maintenance.
Cons of DIY Installation:
- Physical Demands: It's hard work. Expect to do a lot of digging, lifting, and potentially awkward maneuvering of heavy parts, often in the heat.
- Time Commitment: While you save money, you'll spend considerable time on the project. What a professional might do in a day could take you a weekend or longer.
- Risk of Errors: If you're not careful or lack experience, mistakes can happen. Improper leveling, incorrect assembly, or faulty connections can lead to structural issues, leaks, or even safety hazards.
- Tool Requirements: You might need to rent or purchase specific tools you don't already own, adding to the overall cost.
- Warranty Concerns: Some manufacturers may void warranties if the pool isn't installed by a certified professional. Always check the warranty terms.
Ultimately, if you have the time, physical capability, and a knack for following detailed instructions, the savings can make DIY a great option. However, if any of those are in short supply, calling in the pros might be the wiser choice for a smoother, less stressful experience.
The Groundwork: Site Prep and Leveling Are Key
This is arguably the most critical phase of any above-ground pool installation, and it's where many DIY projects run into trouble. If the ground isn't perfectly level and stable, you're setting yourself up for problems down the line, from structural stress to leaks.
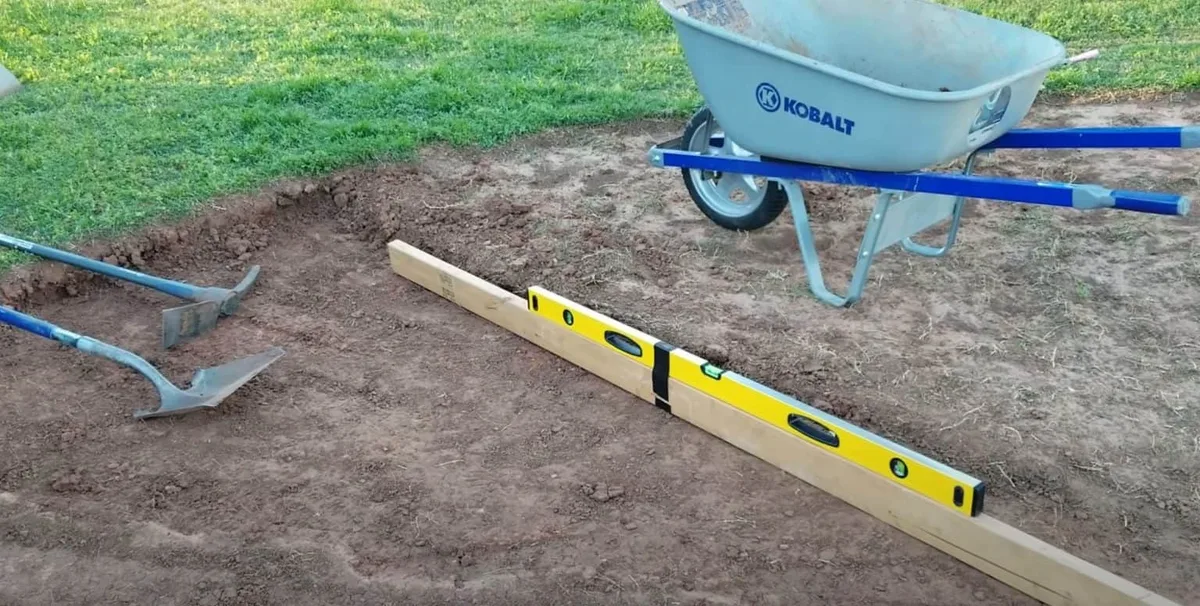
Image source: Bing (Web (fair-use with source credit))
Making Sure It's Flat
Your pool needs to sit on a perfectly flat surface. Even a slight slope can cause uneven pressure distribution on the pool walls and liner. This means the water will pool more on one side, stressing that section of the frame and potentially leading to premature wear or even collapse.
Here’s what our research confirms you need to do:
- Choose the Right Spot: Select a location that's at least 10 feet away from any structures (like fences or your house) and overhead electrical wires. The area should also be free of roots, rocks, and sharp objects.
- Mark Your Pool's Footprint: Use stakes and string or spray paint to outline the exact diameter or dimensions of your pool. Add an extra 2-3 feet around this perimeter to give yourself working room.
- Excavate (If Necessary): If your chosen spot has a slope, you'll need to excavate the high side and potentially add soil to the low side to achieve a level surface. This is a labor-intensive step.
- Leveling Tools: A good quality spirit level (4-foot or longer is ideal) is essential. You'll use this constantly to check your work. For larger areas, a transit level or laser level can be a worthwhile rental.
- Compaction: Once you've achieved a level surface, it needs to be compacted. You can rent a plate compactor for this, which will create a firm, stable base. This step is crucial to prevent settling later.
Dealing with Uneven Terrain
If your yard has a noticeable slope, tackling it can be the most daunting part of the preparation. You cannot simply place the pool on uneven ground and hope for the best. The pool walls are designed to hold water evenly; they are not engineered to support the weight of water pressing down on one side more than another.
For a significant slope, you'll likely need to excavate the high side down to the level of the lowest point, or even a bit lower to allow for a stable base. This often involves removing a substantial amount of soil. Some homeowners opt to build a retaining wall around the lower side, but this adds complexity and cost.
Aggregate reviews from DIYers consistently highlight that over-exaggerating the importance of a perfectly level base is impossible, it’s truly that vital for the pool’s longevity and safety.
Assembling Your Pool: Frame, Liner, and Fittings
Once your ground is perfectly prepped and stable, it's time to move onto the actual assembly of the pool structure itself. This is where you'll see your pool start to take shape, but it's also a phase where precision is key to avoid future issues.
The Pool's Skeleton: Building the Frame
Most above-ground pools use a metal frame made of upright posts and top rails that connect to the pool wall. The specific assembly method will vary by manufacturer, but the general process involves:
- Laying out Components: Carefully unpack and identify all the frame parts.
- Attaching Uprights: The upright posts are typically inserted into the base plates of the pool wall or connect to the bottom track.
- Connecting Top Rails: These slide or snap into place, connecting the uprights and creating the top perimeter of the pool.
- Securing Everything: Ensure all connections are tight and secure. Some kits might use bolts or clips for added stability.
It's vital to follow the manufacturer's manual precisely here. Don't try to force parts together; if something isn't fitting, double-check that you have the correct piece and it's oriented correctly.
Laying the Liner and Making It Smooth
The pool liner is what holds all the water, so its installation needs to be done carefully. It's usually a large, heavy vinyl sheet that you'll need to unfold and position within the frame.
- Unfold Carefully: Spread the liner out on a warm, sunny day if possible, as the vinyl becomes more pliable and easier to work with in the heat. Unfold it gently to avoid tears.
- Positioning: Drape the liner over the pool frame, ensuring the seams are centered and it hangs evenly over the sides.
- Securing the Top: The top edge of the liner typically tucks under the top rails or is secured by a bead that snaps into a track. Work your way around the pool, smoothing out the liner as you go.
- Removing Wrinkles: As you begin to fill the pool with water, you’ll need to address any wrinkles that appear on the bottom. Gently pull and smooth them towards the walls as the water level rises. Manufacturer instructions often suggest specific ways to handle stubborn wrinkles, sometimes using a soft brush or even a vacuum cleaner to help pull the liner tight.
Connecting the Plumbing: Pump, Filter, and Skimmer
This is where your pool becomes functional. You'll need to connect the filtration system to the pool wall, ensuring a watertight seal.
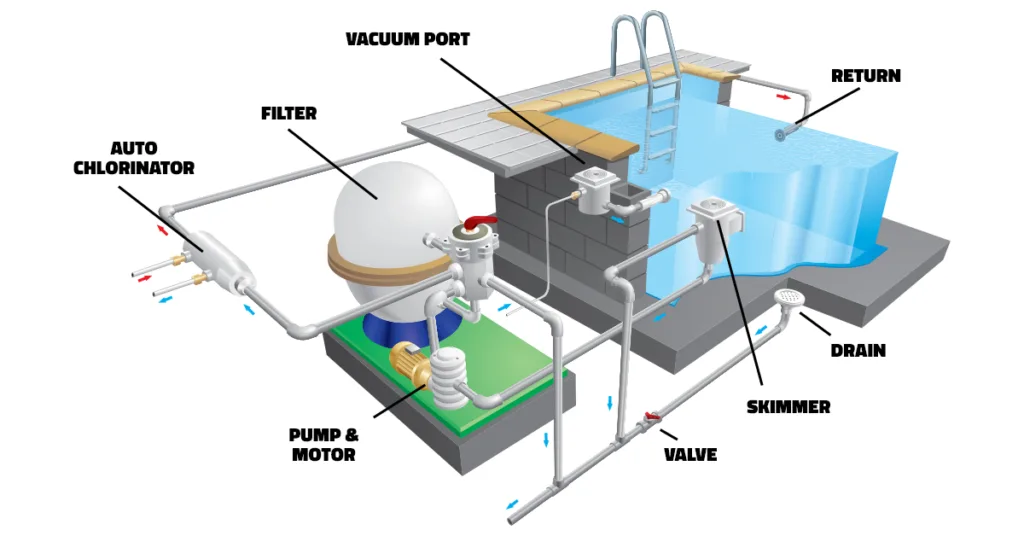
Image source: Bing (Web (fair-use with source credit))
- Skimmer and Return Installation: Most pools have pre-cut openings for the skimmer (where water enters the filter) and the return fitting (where filtered water goes back into the pool). You’ll typically install gaskets and seals on either side of the pool wall to create a watertight connection for these components.
- Attaching Hoses: Connect the hoses from the skimmer to the pump, and from the pump to the return fitting. Ensure hose clamps are tightened securely, but don't overtighten them, as this can damage the plastic fittings.
- Pump and Filter Setup: Position your pump and filter unit on a stable, level surface near the pool. Connect the hoses according to the manufacturer's diagram.
- Electrical Connections: If your pump requires an electrical connection, this is a critical safety step. Ensure it’s done according to local electrical codes and manufacturer guidelines. This often involves a GFCI (Ground Fault Circuit Interrupter) protected outlet. Many sources, including the National Electrical Code (NEC) in the US, detail specific requirements for pool electrical safety. If you’re not comfortable with electrical work, this is a definite step to hire an electrician for.
Crucial Safety Steps and What Could Go Wrong
Even with the best intentions, a DIY pool installation can go sideways if safety isn't prioritized. This isn't just about avoiding injury during setup; it's about ensuring the pool itself is a safe environment once filled.
Electrical Safety First
The pump and filter system almost always requires electricity. Improper electrical connections are a leading cause of electrocution incidents around pools. Always ensure your setup complies with local building codes and electrical safety standards, such as those outlined by the National Electrical Code (NEC) in the US.
- GFCI Protection: Your pump's power supply must be protected by a Ground Fault Circuit Interrupter (GFCI) outlet. These devices quickly shut off power if they detect an imbalance, preventing shocks.
- Proper Wiring: Use outdoor-rated extension cords and ensure all connections are watertight. Never use indoor cords or run cords through water.
- Professional Help: If you have any doubts about your electrical wiring skills, hire a qualified electrician. This is not an area to cut corners.
Avoiding Common Installation Mistakes
Beyond electrical hazards, several other errors can compromise your pool's integrity and safety. These often stem from rushing the process or not fully understanding the implications of each step.
- Inadequate Ground Leveling: As discussed, an unlevel base is a ticking time bomb for structural failure. Aggregate reviews consistently report this as the number one cause of DIY pool problems.
- Over or Under-Filling: Filling the pool too quickly can stress the liner and walls. Conversely, not filling it enough might leave it unstable. Follow manufacturer guidelines on fill rates and final water levels.
- Improper Liner Installation: Wrinkles that are left unaddressed can become weak points or tear over time. Pinching the liner during installation can also cause damage.
- Overtightened Fittings: While you want a secure seal, overtightening plastic fittings on the skimmer or return can crack them, leading to leaks.
- Skipping the Base Pad: Many manufacturers recommend a protective pad (like a felt or foam layer) under the liner to prevent punctures from small stones or roots. Skipping this step is a common, and often costly, mistake.
When DIY Isn't the Best Path: Knowing When to Call a Pro
While the allure of saving money is strong, there are clear signs that a DIY above-ground pool installation might not be the best route for you. It’s not a sign of weakness to recognize when a job is beyond your current capabilities or resources.
Consider calling in the professionals if:
- Your Yard Is Sloped Significantly: If your chosen spot requires more than just minor adjustments to level, the amount of digging, soil moving, and compacting can become a major undertaking. This is especially true if you're dealing with clay soil, which can be difficult to work with.
- You Lack the Necessary Tools: Beyond basic hand tools, you might need to rent equipment like a plate compactor, a large transit level, or even a small excavator for significant site prep. The cost and learning curve for these can outweigh the savings.
- Physical Limitations: If you have back issues, mobility problems, or simply don't have the stamina for sustained, strenuous physical labor, trying to install a pool yourself could lead to injury.
- Tight Timeline: If you need the pool up and running by a specific date and can't dedicate multiple full days to it, professional installation will be much faster.
- Complex Electrical Needs: For any electrical work beyond plugging a pump into a GFCI-protected outdoor outlet, it’s always wise to consult a licensed electrician. This includes if you plan to add features like pool lighting.
Hiring a professional ensures the job is done correctly, often with a warranty on their labor, and frees you from the stress and physical strain. It’s a trade-off between your time and money versus your effort and potential risk.
Quick Facts: What to Expect from DIY Pool Installation
When you're weighing the decision to install your own above-ground pool, having a few key pieces of information at hand can help clarify things. These are the tangible aspects of the project that directly impact your planning.
Here's a snapshot of what our research and industry insights reveal:
- Typical Installation Time: For a standard 15-24 foot round pool, expect it to take anywhere from 1 to 3 full days of dedicated work. This timeline assumes good weather and no major unexpected issues. Complex shapes or larger sizes can extend this significantly.
- Budget Considerations for DIY: While the pool kit itself is a primary cost, factor in potential expenses for:
- Ground leveling materials (gravel, sand)
- Tools you might need to buy or rent (levels, shovels, tamper, possibly a small excavator)
- A protective base pad (often optional but recommended)
- Electrical work if needed
- Water delivery (if you can't use a hose and have to pay for fill-ups)
- Skill Level Required: Generally, it’s considered an intermediate DIY project. It’s more involved than assembling flat-pack furniture but less complex than building a deck from scratch. Mechanical aptitude and the ability to follow instructions meticulously are key.
- Manufacturer Support: Most reputable above-ground pool manufacturers provide comprehensive installation manuals with diagrams. Many also offer customer support hotlines to answer questions during installation.
Understanding these points helps set realistic expectations for the scope of the project and its associated costs and time investment.
Your Pool Installation Decision Guide: Putting It All Together
So, after reviewing all these points, how do you make the final call? It really comes down to matching the project's demands with your personal circumstances.
- If your yard is nearly perfect (flat, clear, accessible) and you're handy with tools and have a free weekend or two: A DIY installation is very likely within your reach and can offer significant savings.
- If your yard needs substantial work, you're unsure about electrical connections, or you prefer not to undertake heavy physical labor: Hiring a professional installer is the more sensible and safer option. The extra cost upfront can prevent more expensive headaches down the road.
- If you're on the fence: Consider renting the necessary tools first and trying out a few of the more straightforward steps, like marking the area and starting to level. This can give you a better feel for the work involved before committing to the entire project.
Ultimately, the goal is to have a safe, enjoyable pool. Whether you tackle it yourself or hire help, thorough preparation and careful execution are the most important ingredients for summer fun.

