

Replacing a vacuum belt is a simple repair that can restore strong suction and smooth brush roll movement.
Today's Exclusive Deals
Limited-time Exclusive Deals. Check current discount on Amazon.
Check Price on Amazon As an Amazon Associate I earn from qualifying purchases.A worn belt can make a vacuum cleaner smell hot, lose cleaning power, or stop its brush roll. Learning how to replace a vacuum belt helps you fix the problem safely, save money, and extend the life of your machine. This guide explains the process in clear steps, with tips based on common vacuum designs and real repair mistakes.
What a Vacuum Belt Does
A vacuum belt is a flexible rubber or reinforced band that transfers power from the vacuum motor to the brush roll. When the motor spins, the belt turns the brush roll. The brush roll then lifts dirt, hair, and dust from carpets.
Most upright vacuums use a belt. Some canister vacuums, stick vacuums, and robotic models use a gear, direct-drive system, or electronic motor instead. Before learning how to replace a vacuum belt, check your owner’s manual to confirm that your model has a replaceable belt.
Today's Exclusive Deals
Limited-time Exclusive Deals. Check current discount on Amazon.
Check Price on Amazon As an Amazon Associate I earn from qualifying purchases.A belt is a wear item. It stretches over time, loses grip, and may crack from heat. A new belt must fit the exact vacuum model. A belt that is too loose will slip, while one that is too tight can strain the motor or brush roll.
Signs Your Vacuum Belt Needs Replacement
A vacuum belt may fail slowly or break without warning. Watch for changes in sound, smell, and cleaning performance.
Common signs include:
Today's Exclusive Deals
Limited-time Exclusive Deals. Check current discount on Amazon.
Check Price on Amazon As an Amazon Associate I earn from qualifying purchases.• The brush roll does not spin when the vacuum is running.
• The vacuum leaves hair and dirt behind on the carpet.
• You hear a squealing, slapping, or rubbing sound.
• You smell burning rubber after a few minutes of use.
• The belt looks cracked, shiny, stretched, or frayed.
• The brush roll spins freely by hand but does not move when powered.
• The vacuum works better on hard floors than on carpet.
A slipping belt often creates a hot rubber smell. Turn the vacuum off at once if you notice this odor. Continued use can damage the belt, brush roll, or motor.
In my repair experience, many people replace a belt when the real problem is a jammed brush roll. Pet hair and thread can wrap around the end caps and stop the roll. Always inspect the brush roll before deciding how to replace a vacuum belt.
Tools and Parts You Need
You usually need only a few basic items. Gather them before you open the vacuum.
• The correct replacement belt
• A Phillips or flathead screwdriver
• Scissors or a seam ripper
• A soft brush or dry cloth
• Work gloves, if the brush roll has sharp edges
• A flashlight for dark areas
Use a belt made for your vacuum’s exact brand and model. The model number is often printed on a label near the base, behind the dust cup, or underneath the machine. Universal belts may fit some older designs, but the correct model belt is safer and more reliable.
Unplug the vacuum before removing any cover. Do not depend only on the power switch. Disconnecting the plug prevents accidental startup while your hands are near the brush roll.
How to Replace a Vacuum Belt Step by Step
The basic process is similar for many upright vacuums. Still, cover shapes and belt paths vary. If your manual gives different instructions, follow the manual.
1. Unplug and prepare the vacuum
Unplug the vacuum and move it to a clear work area. Place a towel on the floor to protect the vacuum and collect dust.
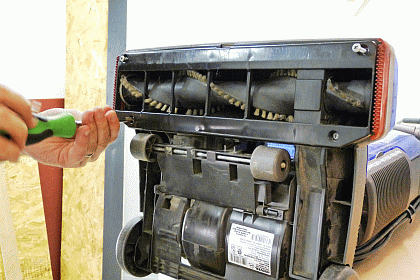
Lower the handle if the design allows it. Turn the vacuum over so you can see the bottom plate. Take a quick photo before removing parts. This simple step can help you remember where each screw and belt guard belongs.
2. Remove the bottom plate
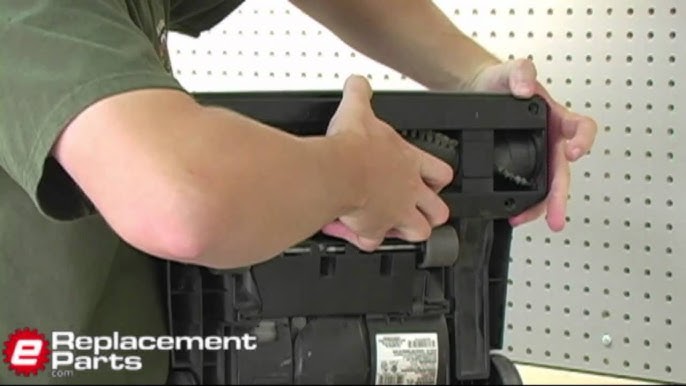
Look for screws or clips that hold the bottom plate in place. Remove the screws and keep them in a small cup. Some models use different screw lengths, so place each screw near its original hole or take notes.
Lift the plate gently. If it does not move, look for a hidden screw near the wheels or belt cover. Do not force the plate, since plastic tabs can break.
3. Remove the brush roll
The brush roll may sit in slots, end brackets, or a separate housing. Lift one side first, then remove the other side.
Cut away hair, string, and carpet fibers from the roll. Check the end caps and bearings. The roll should turn smoothly by hand. If it feels rough or stops, clean it before installing the new belt.
4. Remove the old belt
Slide the old belt off the motor shaft and brush roll. A broken belt may come off easily. A stretched belt may still sit around the shaft.
Use scissors if the belt is stuck. Avoid pulling hard on the motor shaft. A damaged shaft can lead to a much more costly repair.
5. Install the new belt
Place the new belt around the motor shaft first. Then fit the other end over the brush roll.
The belt may feel tight. That is normal for many upright vacuums. Stretch it gently and avoid twisting it. The belt should sit flat in the brush roll groove and align with the motor shaft.
If the new belt seems extremely tight, compare it with the old belt and check the model number again. Some belts are designed to stretch during installation, but excessive force may damage the vacuum.
6. Reinstall the brush roll
Set the brush roll back into its slots or brackets. Make sure the belt stays in the correct groove.
Turn the brush roll by hand several times. It should move with some resistance from the belt, but it should not bind. The brush bristles should sit evenly across the opening.
7. Replace the bottom plate
Put the bottom plate back in place. Reinstall every screw and tighten it firmly without stripping the plastic housing.
Check that the plate sits flush. A loose plate can rattle, let air escape, or rub against the brush roll.
8. Test the vacuum
Turn the vacuum upright and plug it in. Keep the brush roll away from loose cords, clothing, and fingers.
Run the vacuum for 10 to 20 seconds. Listen for smooth operation. Turn it off and check for a burning smell, unusual noise, or a brush roll that does not spin.
These steps cover how to replace a vacuum belt on many common upright models. However, some vacuums require a special belt tool or a different belt route. Never guess if the belt path is unclear.

How to Replace a Vacuum Belt on Different Vacuum Types
Vacuum designs are not all the same. Knowing the type of belt system can prevent damage.
Upright vacuums
Upright vacuums often use a flat belt or a rounded drive belt. The belt usually connects the motor shaft to the brush roll under the base plate.
Many upright models have a belt access door. If yours has one, you may not need to remove the full bottom plate. Use the access door instructions in the manual.
Canister vacuums
Many canister vacuums use suction only and do not have a powered brush roll. A power nozzle may contain its own belt and motor.
To replace a belt in a canister power head, remove the nozzle cover and brush roll housing. The steps are similar, but the belt may be smaller and the cover may use clips instead of screws.
Stick vacuums
Some stick vacuums use a compact belt. Others use a direct-drive brush roll with no belt. Do not open a battery-powered vacuum unless the manufacturer allows user service.
Remove the battery or charger before any inspection. If the brush head contains sealed electronics, professional service may be safer.
Robotic vacuums
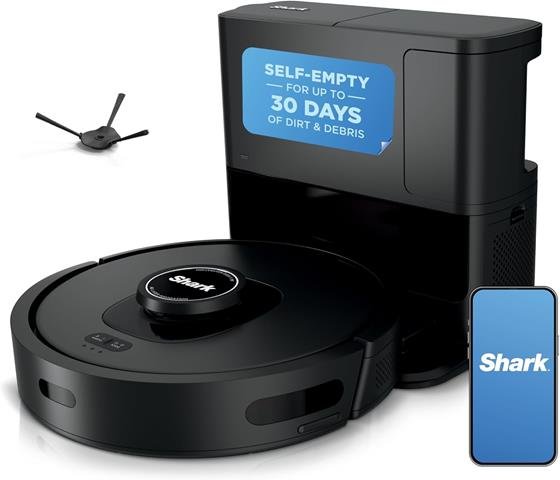
Most robot vacuums use gears or direct-drive systems rather than a traditional belt. A brush that stops may be blocked by hair or may have a failed motor.
Follow the model’s service instructions. A belt replacement guide for an upright vacuum will not always apply to a robot vacuum.

Common Mistakes to Avoid
Knowing how to replace a vacuum belt is useful, but small mistakes can cause repeat failure.
• Installing the wrong belt: Confirm the brand, model, and belt number before opening the vacuum.
• Ignoring the brush roll: Remove wrapped hair and thread before fitting the new belt.
• Forgetting the belt path: Take a photo before removing the old belt.
• Using too much force: A belt should stretch, but it should not require extreme pulling.
• Running the vacuum with the cover off: Loose parts can become dangerous when the motor runs.
• Reusing a damaged brush roll: Worn bearings can make a new belt fail quickly.
• Overtightening screws: Tight screws are good, but excessive force can crack plastic.
• Testing without cleaning the air path: A blocked filter or hose can still reduce suction after the repair.
One mistake I have seen often is fitting the belt around the wrong part of the brush roll. The belt must sit in the designed groove. If it rests against the bristles, it may rub, heat up, and break within minutes.

How to Check the Brush Roll and Motor Shaft
A belt replacement will not solve every brush problem. Inspect the parts that drive and support the belt.
The brush roll should spin smoothly. Remove hair from both ends and check for packed dust near the bearings. If the end caps are removable, clean beneath them carefully.
The motor shaft should be straight and clean. Remove old rubber residue with a dry cloth. Do not spray oil or lubricant into the motor area unless the manufacturer specifically recommends it. Oil can attract dust and damage electrical parts.
Check the height setting as well. A brush roll set too low can create heavy resistance on thick carpet. That extra drag may shorten belt life.

How Long a Vacuum Belt Usually Lasts
A vacuum belt may last several months to more than a year, depending on use, belt quality, carpet type, and maintenance. Homes with pets, thick rugs, or heavy daily cleaning may need more frequent belt checks.
There is no single replacement schedule for every vacuum. Inspect the belt when you clean the brush roll or notice a change in performance.
Replace the belt sooner if it becomes:
• Cracked
• Glazed or shiny
• Stretched
• Frayed
• Loose around the brush roll
• Contaminated with oil or chemical residue
A belt can look fine from the outside and still slip under load. If the brush roll stops on carpet but spins in the air, the belt may be stretched.

Safety Tips for Vacuum Belt Replacement
Electrical and mechanical safety matters during this repair.
• Unplug the vacuum before removing covers.
• Remove the battery from cordless models.
• Keep fingers away from the brush roll during testing.
• Wear eye protection if you cut a tightly wrapped belt.
• Do not use a damaged power cord.
• Keep screws and small parts away from children and pets.
• Stop if you see melted plastic, exposed wires, or smoke.
A burning smell that continues with a new belt may signal a motor, bearing, or electrical fault. In that case, unplug the vacuum and arrange professional service. Replacing the belt again will not fix a failing motor.
How to Make a New Vacuum Belt Last Longer
Good maintenance can reduce belt wear and improve cleaning results.
Clean the brush roll often, especially if you have pets or long hair in the home. Check the roll every few weeks and remove wrapped fibers before they reach the bearings.
Use the correct floor setting. On thick carpet, raise the vacuum height if the machine feels hard to push. Do not vacuum large objects, wet material, or sharp items that can damage the brush roll.
Clean or replace filters as the manual recommends. A blocked filter can make the vacuum work harder and may increase heat around the motor and belt area.
Store the vacuum in a dry place. Heat, moisture, and chemicals can weaken rubber parts over time.
Frequently Asked Questions About How to Replace a Vacuum Belt
How often should I replace a vacuum belt?
Replace a vacuum belt when it is cracked, stretched, frayed, or slipping. Many belts last six to twelve months, but heavy use and pet hair can shorten that time.
Can I replace a vacuum belt myself?
Yes, many upright vacuum belts are designed for user replacement. You usually need a screwdriver and the correct belt, but sealed or complex models may require professional service.
Why does my new vacuum belt keep breaking?
A new belt may break because the brush roll is jammed, the belt is the wrong size, or the motor shaft is damaged. Check for wrapped hair, correct belt alignment, and smooth brush roll movement.
Should a vacuum belt be loose?
A new belt is usually firm and may need gentle stretching during installation. It should not hang loose, but it also should not be so tight that the brush roll cannot turn.
Can I use a universal vacuum belt?
A universal belt may work with some models, but an exact replacement is usually the safer choice. Check the vacuum’s model number and the belt specifications before buying.
Why is my vacuum still not picking up after a belt replacement?
The vacuum may have a clogged hose, dirty filter, full dust container, damaged brush roll, or weak motor. Check the full air path instead of assuming the belt is the only problem.
Conclusion
Learning how to replace a vacuum belt can turn a noisy, weak vacuum into a useful cleaning tool again. Unplug the machine, install the correct belt, clean the brush roll, check the belt path, and test the vacuum carefully.
The repair is often simple, but do not ignore signs of motor damage or electrical trouble. Inspect your belt regularly, keep hair away from the brush roll, and use the vacuum settings that match your floor. If this guide helped, explore your vacuum manual for model-specific care tips or share your repair experience with other readers.

