

Roomba maps rooms by learning your layout with sensors, then stores that map in the app.
If you have ever watched a Roomba wander around like it is “thinking,” you are not far off. Mapping is the step that turns a random-cleaning robot into a smart one that understands your home, room by room. In this guide, I’ll walk you through how to map rooms with Roomba in a simple, practical way, based on real setup patterns, common mistakes, and the little details that make a big difference.

What Roomba room mapping actually means
Roomba room mapping is the process your robot vacuum uses to learn the shape of your home. It uses sensors, navigation software, and repeated movement to build a floor plan in the app. Once the map is saved, you can send the Roomba to specific rooms, set no-go zones, and clean on a schedule.
In plain terms, Roomba is not just cleaning. It is learning. That is why the first few runs matter so much. If the robot gets a clear view of your space, it usually creates a better map and more useful room zones.
Most newer Roomba models use smart mapping, while older ones may rely on simpler navigation. The exact method depends on the model, but the goal is the same: help the robot clean more efficiently and predictably.
Why mapping matters so much
Mapping is the difference between “clean the house” and “clean the kitchen.” That may sound small, but it changes everything about how useful your robot vacuum feels day to day.
Here is why I always recommend setting up mapping properly:
- It saves time because Roomba cleans in a smarter path.
- It helps reduce missed spots and repeat passes.
- It lets you clean one room without running the whole house.
- It supports custom schedules, no-go zones, and targeted cleaning.
- It improves efficiency in homes with multiple rooms or furniture changes.
When I first tested Roomba mapping in a busy home, the biggest win was control. Instead of guessing where the robot would go, I could finally tell it exactly what to do. That alone makes the setup worth the effort.
What you need before you start
Before you map rooms with Roomba, a little prep goes a long way. Think of it like clearing the stage before a performance. If the floor is cluttered, the robot has a harder job.
Make sure you have:
- A compatible Roomba model with smart mapping or app support
- The iRobot Home app installed and connected
- A charged battery or the charging dock nearby
- Clear floors with fewer loose cables, shoes, and toys
- Good Wi-Fi coverage in the rooms you want to map
I learned early on that a messy floor can confuse the robot more than people expect. Even small things like socks or charging cords can cause awkward detours and break up the map into strange sections.
How to map rooms with Roomba step by step
Mapping rooms with Roomba is usually straightforward, but it works best when you follow the setup in order. The exact menu names can vary by model, but the overall process stays very similar.
1. Set up the Roomba in the app
Start by connecting your Roomba to the app and your Wi-Fi network. Follow the pairing instructions carefully, since a weak connection can interrupt mapping or delay map updates.
If the app asks you to name the robot or select your home layout, take a moment to do that now. Clear naming makes it easier later when you create room labels and cleaning schedules.
2. Prepare the floor plan
Open doors to the rooms you want mapped. Remove clutter, lightweight rugs, and small obstacles if possible. The robot needs open paths to understand how spaces connect.
If your home has mirrors, glass walls, or very dark flooring, mapping may take a little longer. I have seen maps improve after a second or third run once the robot has more data.
3. Send Roomba on a full mapping run
Use the mapping or exploration option if your model has one. This lets Roomba travel through the home without focusing only on cleaning. It is like giving the robot a chance to “look around” and learn the space.
For models without a dedicated mapping mode, a regular cleaning run may still create the map. Let the robot finish the full cycle if possible, because stopping it early can leave the layout incomplete.
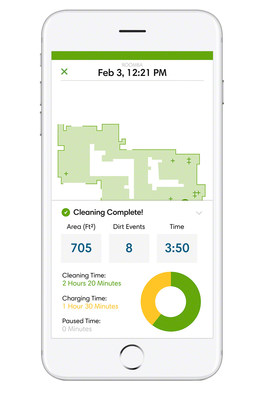
4. Review the map in the app
After the run, open the app and check the floor plan. Look for room outlines, hallways, and any odd splits. If a room looks too large or too small, you may need to adjust boundaries or merge areas.
This is one place where patience helps. The first map is often a draft, not the final version. In my experience, maps usually get better after the robot has run a few times under similar conditions.
5. Label each room
Once the map is ready, label the spaces by room name. Common labels include kitchen, living room, bedroom, hallway, and office. Keep the names simple so they are easy to use in schedules and voice commands.
This step is more useful than it seems. When the room labels are clean and accurate, you can say things like “clean the kitchen” instead of starting a full-home job.
6. Save no-go zones and clean zones
If your Roomba app supports it, add no-go zones around pet bowls, cables, or fragile decor. You can also set clean zones for areas that need more attention, like the entryway or under the dining table.
I often suggest starting with fewer restrictions, then adding more as you learn how the robot moves in your home. Too many rules at once can make the map feel crowded and harder to manage.
How to get the best map on the first try
A good first map usually comes down to preparation. Roomba is smart, but it still works best in a space that makes sense to its sensors.
Use these tips for better results:
- Clear small obstacles before the first mapping run
- Open interior doors so rooms connect naturally
- Keep the dock in a central, stable spot
- Make sure the robot starts from the same location each time
- Run mapping when lighting and floor conditions are consistent
- Avoid moving furniture during the first few runs
One mistake I made early on was changing too much between runs. I moved a chair, shut a door, and added a rug all in the same week. The map kept changing too, and it made troubleshooting harder than it needed to be.
Common problems when mapping rooms with Roomba
Even with a solid setup, mapping can sometimes go sideways. The good news is that most issues are easy to fix once you know what to look for.
Roomba misses part of a room
This usually happens when the floor is blocked, the battery runs low, or the robot is interrupted. Try clearing the path and running another full map cycle.
The map splits one room into two
This can happen with large open spaces, furniture groupings, or unusual floor changes. You can often merge rooms manually in the app after the run.
Roomba gets stuck during mapping
Loose cords, thick rugs, and clutter are the usual culprits. Remove the obstacle and rerun the mapping job from the dock.
The map looks crooked or incomplete
Sometimes the robot loses its sense of direction if it is picked up or moved too often. Keep the Roomba on the dock when not in use and avoid relocating it between runs.
Rooms are named incorrectly
That is usually just a labeling issue, not a mapping failure. Edit the room names in the app and save them again.
Best practices for smarter Roomba room mapping
If you want a map that stays useful long term, think beyond the first setup. A good Roomba map should work with your lifestyle, not fight it.
Here are the habits that help most:
- Keep the dock in the same place
- Run mapping after big furniture changes
- Update the app and firmware regularly
- Clean the wheels and sensors often
- Recheck the map if the robot starts acting confused
- Use room names that match how you actually live
This is one of those “small effort, big payoff” situations. A few minutes of maintenance can keep the map accurate for months.
Roomba mapping features that are worth using
Not every feature is necessary, but some are genuinely helpful. If your model includes them, they can make daily cleaning much easier.
Smart maps
Smart maps let Roomba remember your floor plan and clean more efficiently over time. They are especially useful in larger homes or homes with several rooms.
Room selection
This feature lets you clean only the kitchen, bedroom, or another specific area. It is one of the biggest reasons people love mapping in the first place.
Keep Out Zones
These are virtual barriers you place in the app. They are perfect for pet dishes, cords, floor fans, or delicate corners.
Cleaning preferences
Some apps let you choose cleaning power, number of passes, or room order. That gives you more control without touching the robot itself.
Real-life lessons from using Roomba mapping
After testing room mapping in different homes, I noticed one pattern over and over: the best maps were built slowly, not rushed. The robot usually did better when I let it complete a few full runs before fine-tuning anything.
I also learned that open doors matter more than people expect. If a door stays shut during mapping, Roomba may treat that room like it does not exist. That can be frustrating later when you want a room cleaned but it never made it into the map.
Another lesson was about consistency. When the dock stayed put and the furniture stayed mostly the same, the map held up much better. Roomba is good, but it still likes a stable environment.
How to maintain mapped rooms over time
A Roomba map is not something you set once and forget forever. Homes change. Furniture moves. Rugs shift. Pets create new obstacles.
To keep your map accurate:
- Re-map after major furniture changes
- Update room labels if the layout changes
- Check for blocked sensors or dirty wheels
- Review the app after unusual cleaning behavior
- Rebuild the map if the layout becomes unreliable
If you treat the map like a living tool, it will stay useful much longer. That is the mindset that works best in real homes, where nothing stays perfect for long.
Benefits and limitations of Roomba mapping
Like any smart home feature, room mapping has strengths and limits. Knowing both helps set the right expectations.
Benefits:
- More precise cleaning
- Better scheduling
- Room-by-room control
- Fewer wasted passes
- Easier no-go zone setup
Limitations:
- First maps may be imperfect
- Changes in furniture can affect accuracy
- Some models have fewer mapping tools than others
- Complex layouts may take extra runs to learn
The important thing is not expecting perfection on day one. Roomba mapping is usually good, but it improves through use and adjustment.
Frequently Asked Questions of How to Map Rooms with Roomba
How long does it take Roomba to map rooms?
It usually takes one full run to create an initial map, but a better version often comes after a few cleanings. Large homes or complex layouts may take longer.
Can Roomba map rooms with doors closed?
No, closed doors usually block the robot from learning those rooms. Open the doors during mapping if you want those spaces included in the map.
Why is my Roomba map not saving?
A weak Wi-Fi connection, app syncing issue, or interrupted run can prevent the map from saving. Try charging the robot fully, checking the connection, and running the mapping again.
Can I edit room boundaries after mapping?
Yes, most smart mapping Roomba models let you adjust room lines, merge spaces, or rename rooms in the app. This is a normal part of the setup process.
Does Roomba map work in the dark?
Yes, many Roomba models use sensors and navigation systems that do not depend on bright light. However, very dark floors, mirrors, and reflective surfaces can still affect accuracy.
Conclusion
Mapping rooms with Roomba is one of the easiest ways to make your robot vacuum feel truly smart. Once the map is set up well, you can clean specific rooms, save time, and avoid a lot of daily hassle. The best results usually come from a clean floor, a full mapping run, and a little patience while the robot learns your space.
If you are just getting started, begin with one simple layout, let Roomba build the map, and then refine it as needed. Small adjustments can make a big difference. Try the steps above, and if you have your own Roomba mapping tips or issues, leave a comment and keep the conversation going.

