

Cleaning Roomba brushes regularly keeps suction strong, reduces clogs, and helps your robot vacuum last longer.
If you have ever pulled a clump of hair from a Roomba brush and wondered how it got so messy so fast, you are not alone. I have cleaned enough Roomba side brushes, rubber extractors, and bristle rolls to know that a few minutes of care can make a big difference in cleaning power, battery use, and overall performance. In this guide, I will walk you through how to clean Roomba brushes the right way, what tools help, what mistakes to avoid, and how to keep your robot running like it should.
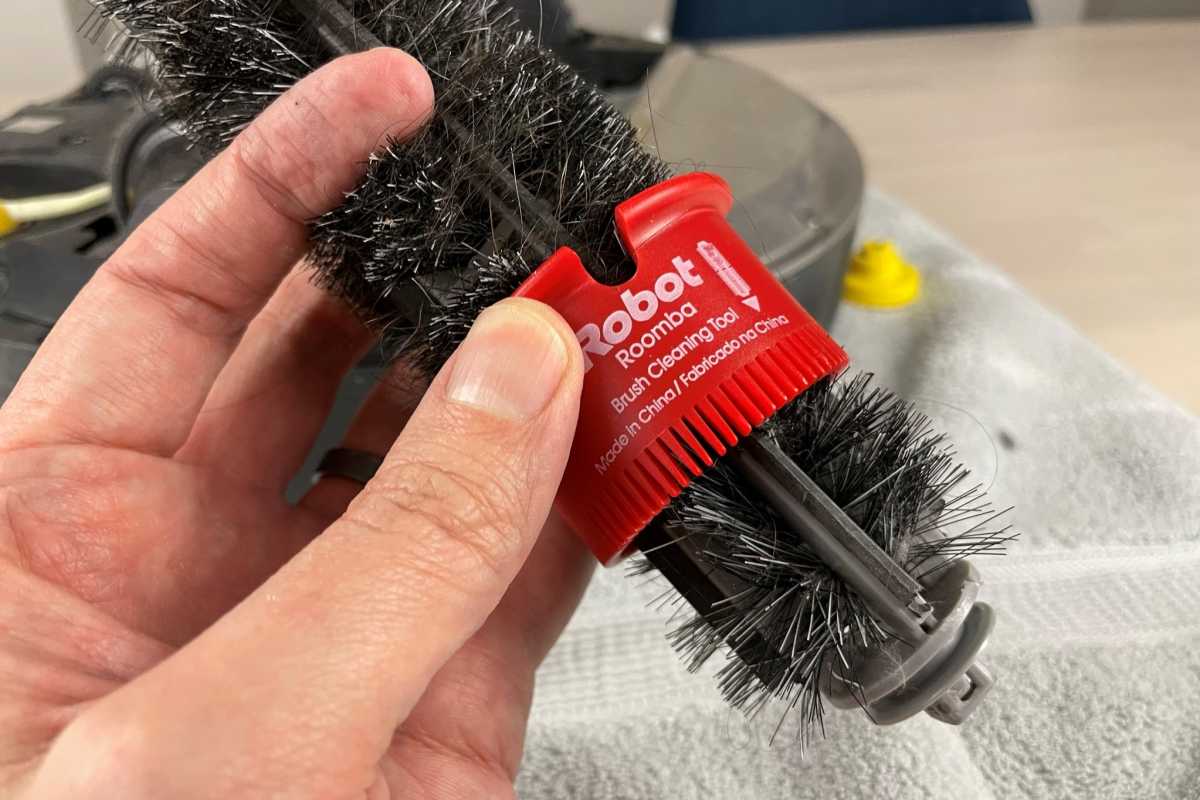
Why cleaning Roomba brushes matters
Roomba brushes do the heavy lifting. They lift dirt, sweep crumbs, grab pet hair, and pull debris out of carpets and corners. Over time, that same job makes them the first place hair, lint, and string build up.
When the brushes get clogged, your Roomba has to work harder. That can lead to weaker suction, louder operation, poor edge cleaning, and faster wear on the motor and brush parts. I have seen many Roombas that looked “broken” when the real problem was just packed brushes and dirty end caps.
Regular cleaning is simple maintenance, but it pays off in a big way:
- Better cleaning performance on hard floors and carpet
- Less strain on the vacuum motor
- Fewer brush jams and error messages
- Longer life for brush rollers and bearings
- Better pickup of pet hair and fine dust
What you need before you start
You do not need fancy tools to clean Roomba brushes. In most homes, a small kit is enough.
Here is what helps most:
- A clean microfiber cloth
- Scissors or a seam ripper for hair wraps
- A small brush or old toothbrush
- Warm water and mild dish soap for washable parts
- A dry towel
- A flat work surface with good light
If your model has rubber extractors, side brushes, or a full brush module, it helps to keep the manual nearby. Different Roomba models have slightly different brush designs, and that matters when you remove or wash parts.
How to clean Roomba brushes step by step
Cleaning Roomba brushes is easier when you do it in the same order every time. I like to work from the outside in. That way, I do not miss the hidden spots where dirt likes to hide.
1. Turn off the Roomba and remove the bin
Power the robot off first. Then remove the dustbin so debris does not spill back inside while you work.
If you have been running the Roomba often, tap the bin into the trash before opening anything else. That small step saves you from dust clouds and makes the rest of the job cleaner.
2. Remove the brush guard or brush frame
Most Roomba models have a brush guard or cover that pops off with a simple release tab. Lift it carefully and set the parts aside in the order you removed them.
Do not force anything. If the cover does not lift easily, check for trapped hair or a clip you may have missed.
3. Take out the main brushes
Pull out the brush rollers or extractors one at a time. On many models, one brush is marked by a square end and the other by a hex end, which helps you put them back in the right position.
This is where I usually find the biggest clumps. Hair often wraps around the ends first, then works its way into the middle like yarn around a spool.
4. Cut away hair and string
Use scissors carefully to slice through the wrapped hair. Do not cut the bristles or rubber fins.
A seam ripper can be even better for this because it slides under the wrap and lifts it free. That little tool has saved me a lot of time, especially with pet hair that tangles tight.
5. Clean the end caps and bearings
Brush ends collect dust and grit too. Wipe the end caps with a dry cloth or a slightly damp one if needed.
If your model has removable end caps, check for lint around the bearings. A brush that looks clean in the middle can still drag badly if the ends are packed with dust.
6. Wash washable parts only
Some Roomba brush parts can be washed, while others should stay dry. Rubber extractors and certain brush assemblies are often safe to rinse, but you should always check the model instructions first.
If washing is allowed:
- Use warm water
- Add a small amount of mild dish soap
- Rinse well
- Let parts dry fully before reassembly
Do not soak any motorized part, sensor, or component that is not designed for water. I have seen people shorten the life of a perfectly good Roomba by putting the wrong part under the tap.
7. Clean the brush chamber
While the brushes are out, clean the chamber they sit in. Use a microfiber cloth or small brush to remove dust, sand, pet hair, and crumbs.
Pay attention to corners, brush sockets, and guide rails. Dirt in these areas can keep the rollers from spinning freely.
8. Reinstall the brushes in the correct order
Put the brushes back in the same orientation they came out. Most models have guides that make this easy.
Spin them by hand before closing the cover. They should move freely without scraping or sticking. If they feel tight, remove them and check for hidden hair or misalignment.
9. Reattach the brush guard and test the Roomba
Snap the brush guard back into place. Turn the Roomba on and run a short cleaning pass.
Listen for smooth movement. If you hear rubbing, rattling, or clicking, stop and check the brush area again. That usually means something is still trapped or seated wrong.

How often should you clean Roomba brushes?
The right schedule depends on your home. A house with pets, long hair, or lots of carpet usually needs more frequent cleaning than a small apartment with hard floors.
A simple rule works well:
- Light use: clean brushes once a week
- Regular use: clean brushes every 3 to 5 days
- Pet homes: check brushes after nearly every few runs
- Heavy debris areas: inspect more often if you have rugs, strings, or seasonal shedding
In my experience, pet owners see the biggest difference from routine cleaning. Even a clean-looking brush can hold a tight ring of hair under the surface, and that hidden wrap can slow the rollers down fast.
Signs your Roomba brushes need cleaning
Sometimes the Roomba tells you it needs attention before it stops working well. Other times, you notice the change in performance first.
Watch for these signs:
- The robot leaves debris behind
- Suction seems weaker than normal
- The brushes make a loud clicking or grinding sound
- Hair is visibly wrapped around the rollers
- The Roomba gets stuck more often
- A brush error or cleaning warning appears
- The robot seems to move more slowly on carpet
If you notice more than one of these signs, do a full brush clean instead of a quick surface wipe. Small problems often stack up.
Common mistakes to avoid
A lot of brush problems come from simple mistakes, not bad parts. I have made a few of these myself over the years, so I can say with confidence that they are easy to avoid.
Here are the biggest ones:
- Using too much water on nonwashable parts
- Cutting too deep and nicking the bristles or rubber fins
- Reinstalling the brushes in the wrong position
- Forgetting to clean the end caps and sockets
- Putting damp parts back into the Roomba
- Ignoring the brush chamber while only cleaning the rollers
The biggest lesson I learned was this: clean every contact point, not just the visible brush surface. A brush can look fine and still drag if the ends are packed with lint.
Best practices for different Roomba brush types
Not all Roomba brushes work the same way. The cleaning method depends on the brush style in your model.
Bristle brushes
Bristle brushes trap more hair than rubber ones. Use scissors to cut hair wraps and a small brush to lift dirt from between the bristles.
Be gentle here. Bristles can bend and wear down over time if you pull too hard.
Rubber extractors
Rubber extractors are easier to clean because hair usually sits on top instead of weaving deep into the brush. Remove the hair, rinse if your model allows it, and wipe the grooves clean.
These are great for homes with pets because they resist tangles better than traditional bristles.
Side brushes
Side brushes sweep dirt from edges and corners, but they pick up hair too. Remove wrapped strands and check the brush arms for bending or cracks.
If a side brush looks warped, replacement is often better than cleaning alone.
How to make Roomba brushes last longer
Good maintenance is not just about cleaning. It is also about reducing the mess before it builds up.
Try these habits:
- Empty the bin often
- Keep cords, ribbon, and loose string off the floor
- Vacuum high-shedding areas more often
- Trim long pet hair around the house if possible
- Check brushes before and after deep-cleaning days
- Replace worn brushes when they stop spinning smoothly
Think of brush care like changing the oil in a car. It is small work that keeps the whole machine running better for longer.
When to replace Roomba brushes instead of cleaning them
Cleaning solves most brush problems, but not all of them. Sometimes the brush is simply worn out.
Replace the brushes if you notice:
- Cracked rubber fins
- Bent or missing bristles
- Brush ends that wobble or feel loose
- Deep cuts or tears in the material
- Persistent poor pickup even after a full clean
Many users wait too long to replace parts. A worn brush cannot clean as well as a fresh one, no matter how well you wash it.
Frequently Asked Questions of How to Clean Roomba Brushes
How do I know if my Roomba brushes are clogged?
If the Roomba starts leaving dirt behind, makes more noise than usual, or shows a brush-related warning, the brushes are likely clogged. A visible wrap of hair or lint around the ends is another clear sign.
Can I wash Roomba brushes with water?
Some Roomba brush parts can be rinsed with water, but not all of them. Always check your model instructions first, and make sure every washable part is fully dry before putting it back.
How long should Roomba brushes dry after washing?
Let them dry completely, which often takes several hours. If the room is humid, giving them overnight is the safest choice.
Why does my Roomba keep getting hair wrapped around the brushes?
Hair wraps around the brushes because of friction and spinning motion, especially in homes with long hair or pets. Regular cleaning and using the correct brush type for your floor can help reduce buildup.
How often should I replace Roomba brushes?
That depends on use, but many owners replace them every 6 to 12 months. If the brushes are cracked, bent, or no longer clean well, replace them sooner.
Conclusion
Keeping Roomba brushes clean is one of the easiest ways to protect performance and avoid unnecessary wear. A few minutes of regular care can improve suction, reduce clogs, and help your robot vacuum last longer.
If you remember one thing, make it this: inspect the brushes often, clean them fully, and replace worn parts when needed. That simple routine can save you time, money, and a lot of frustration later.
If this guide helped, try the steps on your own Roomba today and share your results or questions in the comments.

