If you own a Bissell Proheat 2X Revolution, you know how important it is to keep it in top shape. But when it comes time to remove the brushes, you might feel stuck or unsure.
Don’t worry—removing the brushes is easier than you think. In this guide, you’ll learn simple, step-by-step instructions to get it done quickly and safely. Keep reading to avoid common mistakes and make sure your cleaner stays powerful and effective every time you use it.

Tools Needed
Removing brushes from your Bissell Proheat 2X Revolution requires a few simple tools. These tools help you complete the task quickly and safely. Having the right tools makes the process easier and prevents damage to your machine.
Gather all tools before starting. This avoids interruptions and saves time. Use tools that fit well and are in good condition. Below are the main tools needed for this job.
Phillips Head Screwdriver
A Phillips head screwdriver is essential. It helps remove screws that hold the brush assembly. Choose the right size for a snug fit on the screws. This tool prevents stripping or damaging screws.
Flat Head Screwdriver
A flat head screwdriver is useful for prying parts gently. It helps release clips or covers without breaking them. Use it carefully to avoid scratching the plastic parts.
Clean Cloth
A clean cloth helps wipe dirt and debris from the brushes and surrounding areas. It keeps the work area tidy and prevents dust from entering the machine.
Gloves
Wear gloves to protect your hands from sharp edges and dirt. Gloves also provide a better grip on small parts and tools.
Safety Precautions
Always unplug the Bissell Proheat 2X before removing brushes. Handle parts gently to avoid damage or injury. Clean brushes carefully to keep the machine working well.
Unplug The Machine
Always unplug your Bissell Proheat 2X Revolution before removing brushes. This stops the machine from turning on accidentally. It keeps you safe from electric shocks and moving parts.
Wear Protective Gloves
Wear gloves to protect your hands from sharp brush edges. Gloves also help avoid contact with dirt and cleaning chemicals.
Allow The Brushes To Cool
Let the brushes cool down before handling them. Hot brushes can cause burns or injuries. Wait at least 10 minutes after use.
Handle Brushes Gently
Remove the brushes carefully to avoid damage. Rough handling can break the brushes or the machine parts. Take your time and pull the brushes slowly.
Keep Children Away
Keep children and pets away during brush removal. Small parts can be choking hazards. The process involves sharp and moving parts that can cause harm.
Locating The Brushes
Finding the brushes on your Bissell Proheat 2X Revolution is the first step to cleaning or replacing them. Knowing their exact location helps you maintain your carpet cleaner easily. This section guides you through the process of locating the brushes quickly and safely.
The brushes are essential for deep cleaning carpets. They rotate to lift dirt and stains effectively. Identifying their position allows you to keep them in good condition for better cleaning results.
Check Underneath The Machine
Turn the machine off and unplug it. Lay the cleaner on its back carefully. Look at the bottom part where the brushes are usually placed. You will see two cylindrical brushes side by side. They cover the width of the cleaning path.
Locate The Brush Roll Housing
The brushes sit inside a plastic housing or cover. This part protects the brushes and helps them rotate smoothly. Look for a clear or colored plastic piece near the bottom front of the machine. This is the brush roll housing.
Identify Brush Lock Or Release Mechanism
Some models have a lock or clip to hold the brushes in place. Look for small tabs, buttons, or screws on the housing. These allow you to remove or secure the brushes. Knowing their location is key for safe removal.
Steps To Remove Brushes
Removing the brushes from your Bissell Proheat 2X Revolution is simple. Follow these clear steps to do it safely and correctly. Regular brush cleaning keeps your machine working well.
Power Off And Unplug
Always turn off your Bissell before starting. Unplug it from the power outlet. This step prevents any accidents while handling the brush roll.
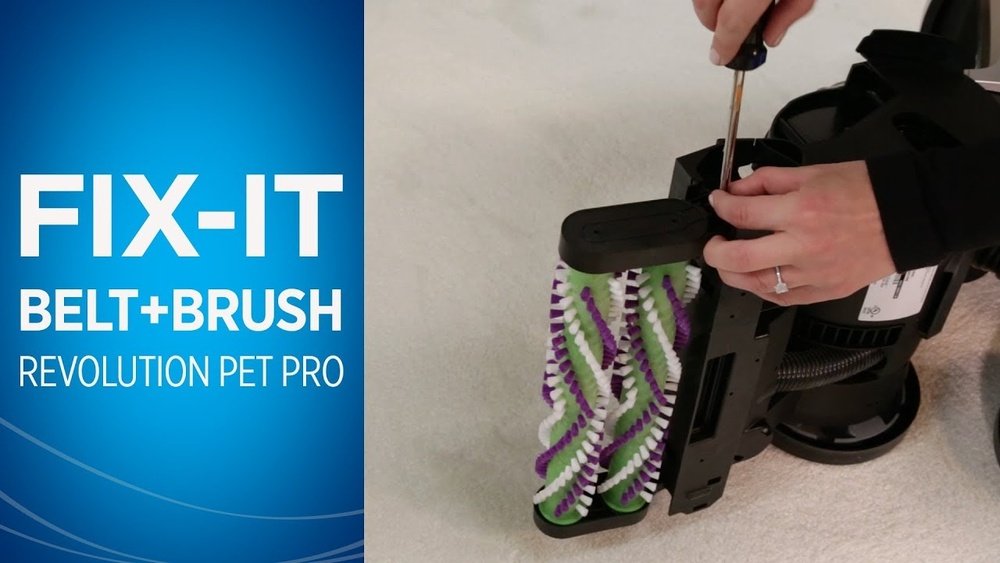
Access The Brush Roll
Lay the machine flat on a clean surface. Find the brush roll cover at the bottom. Remove the screws or clips holding the cover in place. Lift the cover carefully to reveal the brushes.
Release The Brush Roll
Locate the brush roll locking mechanism. Press or slide the release tabs gently. Pull the brush roll out slowly from its slot. Avoid using force to prevent damage.
Remove The Brushes
Take the brush roll fully out of the machine. Separate the brushes from the roll if needed. Clean or replace the brushes based on wear. Reassemble by reversing these steps after maintenance.
Cleaning And Maintenance Tips
Keeping your Bissell Proheat 2X Revolution clean helps it work well longer. Proper care stops dirt build-up and keeps brushes spinning smoothly. Follow these simple tips to maintain your machine.
How To Remove Brushes Safely
First, unplug the machine for safety. Turn it upside down to see the brush area. Press the release tabs gently to remove the brushes. Avoid using force to prevent damage. Clean the brushes after removal.
Cleaning The Brushes Thoroughly
Use warm water and mild soap to wash the brushes. Remove hair or threads wrapped around the bristles. Rinse them well to remove all soap. Let the brushes dry completely before putting them back.
Checking For Brush Wear
Look at the brushes for signs of wear or damage. Bent or worn bristles reduce cleaning power. Replace brushes if they look old or broken. Regular checks keep your machine effective.
Maintaining Brush Rollers
Brush rollers can collect dirt and debris. Wipe them with a damp cloth after every use. Remove any stuck particles carefully. This keeps rollers spinning freely and prevents damage.
Reinstalling Brushes Properly
Align the brushes with their slots before pressing them in. Push gently until they click into place. Make sure both sides are secure. Proper installation avoids brush slipping during use.

Troubleshooting Brush Issues
Brush problems in the Bissell Proheat 2X Revolution can stop cleaning tasks. Fixing these issues quickly keeps your machine working well. This guide helps with common brush troubles and easy fixes.
Tangled Hair And Debris
Hair and dirt wrap around the brushes easily. This can block brush movement and reduce cleaning power. Use scissors or your fingers to cut and pull out the tangles. Regular cleaning prevents build-up and keeps brushes spinning.
Brush Not Spinning
The brush may stop spinning due to a jam or motor issue. First, check for debris stuck in the brush area. Clear any blockages carefully. If the brush still won’t spin, unplug the machine and inspect the belt for damage. Replace the belt if needed.
Brush Wear And Tear
Brush bristles wear down over time. Worn brushes clean less effectively. Check the bristles often and replace brushes when they look thin or frayed. Using fresh brushes improves carpet cleaning results and protects your floors.
Reinstalling The Brushes
Reinstalling the brushes on your Bissell Proheat 2X Revolution is a simple task. It keeps your carpet cleaner and your machine working well. This process helps maintain the vacuum’s performance and extends its life. Follow these steps carefully to put the brushes back properly.
Align The Brushes Correctly
Start by placing the brushes in the right position. The brushes should fit snugly in their slots. Make sure the bristles face the right direction. Align the brush ends with the slots on the brush roll. This step is important for smooth rotation.
Secure The Brushes In Place
Push the brushes gently into the machine. You will hear a click or feel resistance when they lock. Do not force them too hard. The brushes must be firmly secured to avoid slipping during use.
Test Brush Rotation
Turn the brush roll by hand after installing. It should spin freely without sticking. If the brush does not rotate, remove and realign it. Proper rotation ensures effective cleaning and prevents damage.
Reattach The Brush Cover
Once the brushes are in place, put the brush cover back. Align the cover with the machine’s base. Press down until it snaps into place. This step protects the brushes and keeps dirt out.
Frequently Asked Questions
How Do I Safely Remove Brushes From Bissell Proheat 2x?
To remove brushes safely, unplug the machine first. Turn the brush roll counterclockwise to unlock. Pull the brush roll out gently. Avoid forcing to prevent damage. Clean brushes regularly for optimal performance.
What Tools Are Needed To Remove Bissell Proheat 2x Brushes?
No special tools are needed. The brushes can be removed by hand. Simply twist and pull the brush roll to detach it. Use a soft cloth for cleaning after removal.
How Often Should I Remove Brushes For Cleaning?
Remove and clean brushes after every 3-4 uses. Frequent cleaning prevents hair and debris buildup. This maintains suction and brush efficiency. Regular maintenance extends the machine’s lifespan.
Can Removing Brushes Improve Bissell Proheat 2x Performance?
Yes, removing and cleaning brushes improves performance. It clears blockages and removes tangled debris. This ensures better carpet cleaning and suction power. Regular brush maintenance keeps your machine running smoothly.
Conclusion
Removing brushes from your Bissell Proheat 2X Revolution is simple and quick. Regular cleaning keeps your machine working well. Avoid damage by handling parts gently. Clean brushes help your carpet look fresh. Follow these steps often for the best results.
Taking care of your cleaner saves time and money. Keep your home tidy with ease. Small efforts make a big difference. Now, you can maintain your Bissell confidently.