Have you ever wished your robot vacuum would clean only where you want and avoid the spots you don’t? Setting no-go zones is the secret to taking full control of your cleaning routine.
Imagine saving time, protecting delicate items, and keeping your floors spotless without constantly monitoring your vacuum. You’ll learn simple, step-by-step methods to create no-go zones that fit your home perfectly. Keep reading to discover how easy it is to make your robot vacuum work smarter, not harder, just for you.
Choosing The Right Robot Vacuum
Choosing the right robot vacuum is key to setting no-go zones effectively. Not all robot vacuums offer the same features or support for no-go areas. Picking a model that fits your needs makes the setup easier and more reliable.
Some models come with advanced mapping and boundary-setting options. Others may require physical barriers or special accessories. Understanding these differences helps avoid frustration later on.
Features To Look For
Look for robot vacuums with smart mapping technology. They create detailed maps of your home. This helps in setting precise no-go zones. A good vacuum should have easy-to-use boundary setting tools. App control is important for adjusting zones anytime. Sensors that detect obstacles improve navigation. Long battery life ensures full cleaning before recharge.
Compatibility With No-go Zones
Check if the robot vacuum supports virtual no-go zones in its app. Some models allow drawing lines or areas to avoid. Others use magnetic strips or physical barriers. Virtual no-go zones offer more flexibility and control. Make sure the vacuum can update maps regularly. This helps if you change your room layout. Compatibility with no-go features saves time and effort.
Types Of No-go Zones
Setting no-go zones helps keep your robot vacuum away from certain areas. These zones stop the vacuum from entering places with cords, pet bowls, or fragile items. Different types of no-go zones offer various ways to block your vacuum. Each type suits different needs and room layouts.
Virtual Walls
Virtual walls create invisible barriers using signals. The vacuum senses these signals and avoids crossing them. These walls can be set up easily and moved around as needed. They work well for blocking doorways or sections of a room.
Magnetic Strips
Magnetic strips are physical barriers placed on the floor. The vacuum detects these strips and changes direction. Strips are thin and stick to floors without damage. They are good for blocking small areas or protecting cables.
App-based Barriers
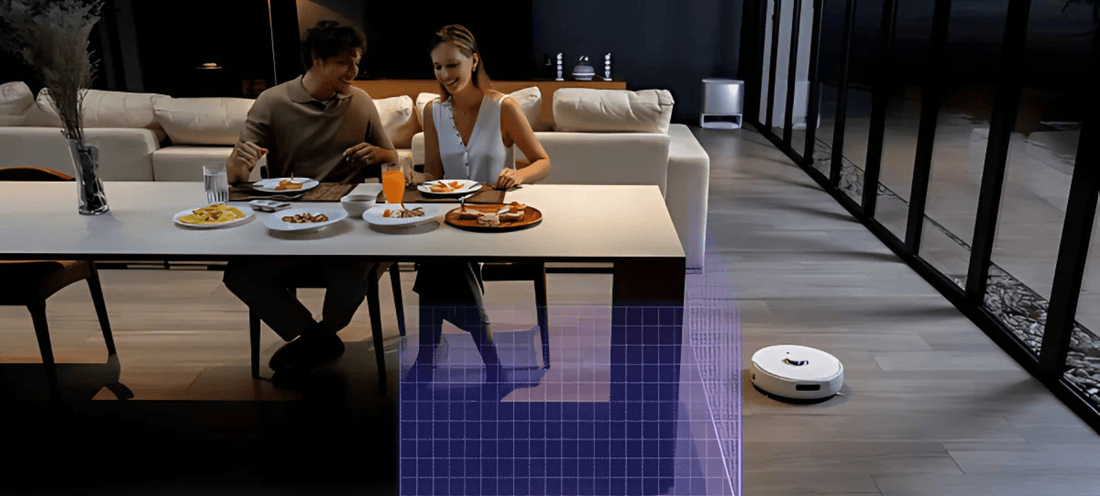
App-based barriers let you draw no-go zones on your phone. The vacuum uses maps to avoid these marked areas. This method offers high flexibility and precise control. It works best with smart vacuums that connect to apps.
Setting Up Virtual Boundaries
Setting up virtual boundaries helps control where your robot vacuum cleans. It keeps the vacuum away from delicate areas or places with many cables. You can create these no-go zones using digital tools or physical objects. These methods prevent the vacuum from entering restricted spots. This guide explains two simple ways to set virtual boundaries for your robot vacuum.
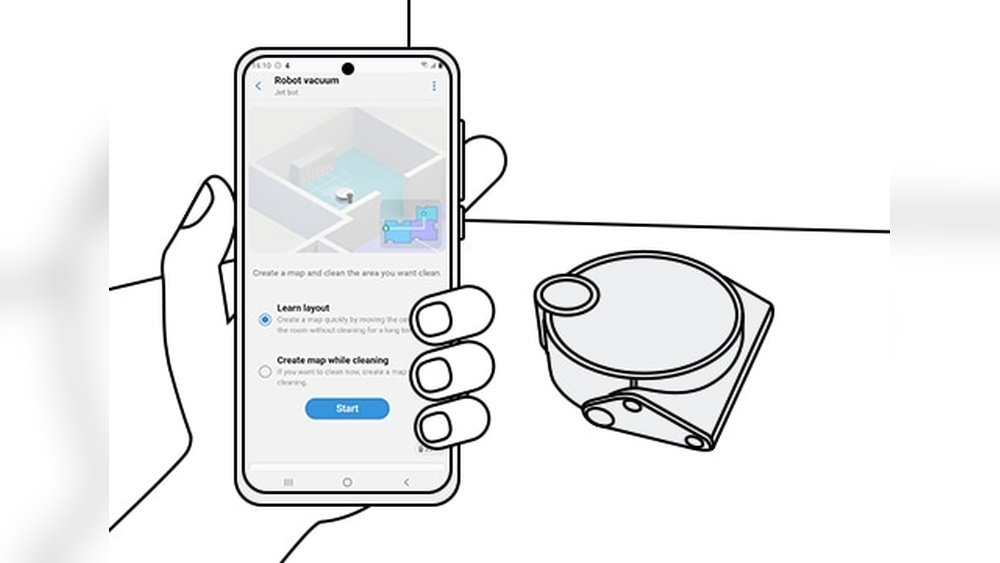
Using The Robot Vacuum App
Most robot vacuums come with an app for easy control. The app lets you draw no-go zones on a map of your home. Open the app and find the map feature. Tap the area where you want to block the vacuum. Draw lines or boxes to mark no-go zones. Save your settings so the vacuum avoids those spots during cleaning. This method is fast and can be changed anytime.
Positioning Physical Barriers
Physical barriers stop the vacuum without using technology. Place small objects like strips or blocks at doorways or near fragile items. These barriers create a clear path the vacuum won’t cross. Use lightweight items that won’t damage floors or furniture. Physical barriers work well for areas where you do not want the vacuum at all. This option is simple and does not require app setup.

Common Mistakes To Avoid
Setting no-go zones for your robot vacuum helps protect delicate areas and keeps cleaning efficient. Avoid common mistakes to ensure your no-go zones work well. These errors can cause the vacuum to miss spots or get stuck. Pay attention to placement and software updates for the best results.
Incorrect Placement
Placing no-go zones too close to walls or furniture can confuse the vacuum. It may try to enter restricted areas or avoid cleaning nearby spots. Make sure to give enough space around the no-go zones. Avoid overlapping boundaries that can cause the vacuum to stop unexpectedly. Clear, precise placement helps the vacuum understand where it should not go.
Ignoring Updates And Firmware
Robot vacuums need regular updates to fix bugs and improve features. Ignoring firmware updates can cause no-go zones to stop working properly. Updates often include better mapping and boundary detection. Check for updates in the app or on the manufacturer’s website. Keeping the software current ensures your no-go zones stay accurate and reliable.
Optimizing Cleaning Efficiency
Optimizing cleaning efficiency means making your robot vacuum work smarter. Setting no-go zones helps the vacuum avoid places it shouldn’t clean. This saves battery and time. It also protects fragile items and keeps the vacuum from getting stuck. Good no-go zone settings make the vacuum cover the right areas well.
Adjusting No-go Zones Over Time
Start with basic no-go zones in areas with cables or fragile objects. Watch how the vacuum cleans for a few days. Notice if it misses spots or tries to enter blocked places. Change the no-go zones based on these observations. Make zones smaller or larger depending on your needs. Adjusting zones regularly keeps cleaning efficient.
Balancing Coverage And Restrictions
Too many no-go zones can limit the vacuum’s reach. It may skip important areas. Too few zones can lead to wasted time in unwanted spots. Find a balance between coverage and restrictions. Keep no-go zones only where necessary. This balance helps the vacuum clean all open spaces well and avoid problem zones.
Troubleshooting No-go Zone Issues
Setting no-go zones helps keep your robot vacuum away from certain areas. Sometimes, these zones do not work as expected. Troubleshooting no-go zone issues can fix these problems quickly. Follow simple steps to make sure your vacuum respects the boundaries.
When Boundaries Don’t Work
Check if your robot vacuum supports no-go zones. Some models may not recognize virtual boundaries. Make sure you draw no-go zones clearly on the app. Small or thin zones might be ignored by the vacuum. Objects blocking the vacuum’s sensors can cause errors. Clean the sensors and remove obstacles near the boundary.
Resetting And Reconfiguring Zones
Delete old no-go zones from the app first. Restart your robot vacuum to clear temporary glitches. Draw new no-go zones carefully on the map. Use the app’s tools to adjust zone size and shape. Save the changes and let the vacuum update. Test the vacuum by observing if it avoids the set areas.

Frequently Asked Questions
How Do Robot Vacuums Recognize No-go Zones?
Robot vacuums use sensors or app-based mapping to identify no-go zones. You can draw boundaries in the app to restrict access.
Can I Set No-go Zones Without An App?
Most modern robot vacuums require apps for precise no-go zones. Some models use physical barriers like magnetic strips instead.
What Are No-go Zones Used For?
No-go zones prevent vacuums from entering sensitive areas like pet beds, cables, or fragile furniture, protecting both your items and the vacuum.
Are No-go Zones Customizable For Different Rooms?
Yes, you can customize no-go zones per room using the vacuum’s app. This allows flexible cleaning based on room-specific needs.
Conclusion
Setting no-go zones helps keep your robot vacuum on track. It protects fragile items and avoids messes. Use the vacuum’s app or physical barriers to mark these areas. Regularly update zones as your room changes. This keeps cleaning efficient and stress-free.
Small steps make a big difference in home care. Enjoy a cleaner space without extra effort.