

Keeping your vacuum cleaner in top shape is easier than most people think. With regular care, your vacuum will pick up dirt better, last longer, and save you money on repairs or replacements. Many beginners only focus on emptying the dustbin or bag, but there are several other maintenance steps that make a big difference. This article will guide you through everything you need to know about vacuum cleaner maintenance, using simple language and clear steps. Whether your vacuum is old or new, these practical tips will help you clean faster and avoid common mistakes.
Why Regular Maintenance Matters
A vacuum cleaner is more than just a tool—it’s the heart of keeping your home clean. If it’s clogged or broken, dust and allergens stay on your floors. According to a study by the American Lung Association, vacuuming with a dirty filter can reduce air quality by up to 30%. Poor maintenance can also lead to expensive repairs or make your vacuum useless in just a few years.
Here are key reasons to maintain your vacuum:
- Better suction power: A clean vacuum picks up more dirt. You might notice carpets and floors look much cleaner after regular maintenance.
- Longer lifespan: Well-maintained machines last up to 50% longer. Many vacuums can work well for years if you follow the basic steps, saving you money in the long run.
- Lower repair costs: Fix small issues before they become big problems. For example, cleaning out a clog early prevents motor damage.
- Healthier home: Cleaner filters mean fewer dust mites and allergens. This is especially important for families with allergies, pets, or young children.
Many people don’t realize that dust, pet hair, and small particles can build up inside your vacuum. Over time, these blockages make the motor work harder, which can lead to overheating or even permanent damage. By keeping your vacuum clean, you help protect not just your machine but your indoor air quality, too.
Step-by-step Guide To Maintaining Your Vacuum Cleaner
Let’s break down the most important maintenance steps, from basic cleaning to deeper checks.
1. Empty The Dustbin Or Bag Regularly
Many vacuums lose power because their dustbin or bag is too full. Ideally, empty it when it’s two-thirds full—don’t wait until it’s packed. For bagless models, open the bin, remove debris, and wipe it with a damp cloth. For bagged vacuums, replace the bag when needed.
Not doing this can reduce suction by up to 40%.
When emptying, look for stuck debris in corners. Wipe the dustbin inside and outside to remove fine dust. For bagged models, avoid shaking the bag to prevent dust clouds. If you notice a lot of dust escaping, try emptying outside or in a well-ventilated space.
2. Clean Or Replace Filters
Most vacuums have at least one filter. Some have HEPA filters, which trap tiny particles. Dirty filters block airflow and make the motor work harder. Check your filter every month. If washable, rinse with water and let it dry completely.
If not, replace it according to the manufacturer’s guide. A fresh filter can improve suction and air quality.
HEPA filters are great for allergies, but they require extra care. Never use soap unless recommended, as residue can block the filter. If you notice dust escaping from the exhaust, it’s a sign your filter needs attention. Some vacuums also have pre-motor filters.
Cleaning these helps protect the motor from fine dust.
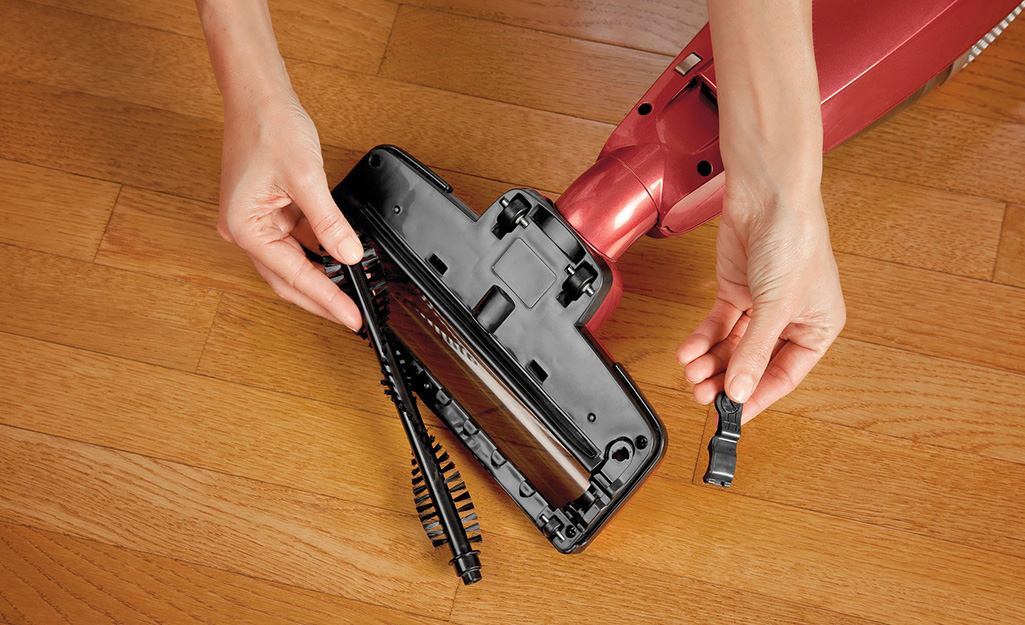
3. Check And Clean The Brush Roll
The brush roll (sometimes called the beater bar) collects hair, string, and large debris. To clean it:
- Unplug the vacuum for safety.
- Remove the brush cover (usually with clips or screws).
- Cut away hair or threads with scissors.
- Wipe the brush clean.
Cleaning the brush roll helps prevent motor strain and keeps the vacuum picking up dirt efficiently.
If you have pets or long hair, check the brush roll more often—once every two weeks is best. Don’t forget to look at the ends of the roll, where hair can wrap tightly. If your brush roll has removable caps, clean inside them for smoother spinning.
4. Inspect And Clear The Hose
Blockages in the hose are a common cause of lost suction. Gently disconnect the hose and look for clogs. Use a broom handle or a flexible wire to push out debris. For stubborn dirt, rinse the hose with water and let it dry fully before reattaching.
Some hoses are transparent, making it easier to see blockages. If your hose has bends or curves, check those areas carefully. After rinsing, hang the hose vertically to drain water—never reconnect a wet hose, as moisture can damage internal parts or lead to mold.
5. Check The Belt
The belt connects the motor to the brush roll. Over time, belts stretch or crack. A loose belt makes the brush spin poorly. To check:
- Look for cracks, fraying, or slack.
- Replace if needed—most belts cost less than $10.
Changing the belt every 6–12 months keeps your vacuum running strong.
If your vacuum smells like burning rubber, it’s often a sign of a slipping belt. Some models have access doors for easy belt changes. Always use the correct belt size—using the wrong one can cause damage or poor performance.
6. Clean The Vacuum’s Exterior
Dust and dirt can build up outside too. Wipe the body, wheels, and controls with a damp cloth. This prevents sticky buttons and keeps the machine looking new.
Don’t forget the power cord. Run a cloth along the cord to remove dust and check for damage. Clean wheels help your vacuum move smoothly, especially on carpets.
7. Maintain Attachments
Don’t forget to clean the vacuum attachments—like crevice tools, upholstery brushes, and pet tools. Wash or wipe them and check for blockages.
If attachments are clogged, they won’t pick up dirt well. For tools with bristles, remove stuck hair and dust. If you use your vacuum for car cleaning, pay extra attention to small tools—they often collect hidden debris.
Comparing Different Vacuum Types And Their Maintenance Needs
Not every vacuum needs the same care. Here’s a quick look at how maintenance differs between upright, canister, and robot vacuums:
| Vacuum Type | Filter Cleaning | Brush Roll Care | Bag/Dustbin Emptying |
|---|---|---|---|
| Upright | Monthly | Monthly | Weekly |
| Canister | Monthly | Every 2 months | Weekly |
| Robot | Every 2 weeks | Every 2 weeks | Every 3 days |
Robot vacuums need more frequent dustbin emptying because their bins are small. Upright vacuums often need more brush roll cleaning, especially if you have pets.
Canister vacuums usually have longer hoses, which means blockages can happen farther inside. Robot vacuums often alert you when bins or brushes need cleaning—don’t ignore these alerts. Some robot models have extra filters, so check the manual for all maintenance points.
Common Maintenance Mistakes To Avoid
Even experienced users make errors. Here are mistakes to watch for:
- Ignoring filter cleaning: This is the main cause of lost suction.
- Using wet filters: Always let filters dry completely before reinstalling.
- Forgetting the hose: Blockages here are easy to miss.
- Not checking the belt: A worn belt means poor cleaning.
- Skipping attachment cleaning: Blocked tools reduce performance.
Many beginners miss the importance of letting parts dry fully. Moisture inside can cause mold and bad smells.
Another mistake is overfilling the dustbin or bag. If you wait until it’s completely full, dirt can spill back into the vacuum’s airways. Also, avoid using harsh chemicals on filters or brush rolls—these can damage materials and make them less effective.
How Often Should You Maintain Your Vacuum?
The right schedule depends on your usage and vacuum type. For most homes:
| Maintenance Task | Recommended Frequency |
|---|---|
| Empty dustbin/bag | Weekly |
| Clean/replace filter | Monthly |
| Clean brush roll | Monthly |
| Check belt | Every 6 months |
| Clean hose | Every 3 months |
If you have pets, children, or allergies, you may need to clean more often.
Heavy use, such as daily vacuuming or cleaning up after pets, means filters and brush rolls need more frequent attention. Robot vacuums used every day may require dustbin emptying every two days. Always adjust your schedule based on your home’s needs.
Practical Tips To Extend Vacuum Life
Here are some actionable ideas to get the most from your vacuum:
- Store in a dry place: Moisture causes rust and electrical issues. Avoid keeping your vacuum in a damp basement or bathroom.
- Don’t vacuum liquids: Most vacuums are not designed for wet messes. Water can cause electric shocks or motor failure.
- Check for strange noises: Squeaks, rattles, or burning smells mean something’s wrong.
- Read the manual: Each model has unique needs—don’t guess.
- Use the right setting: Adjust for carpets, hard floors, or rugs.
Surprisingly, many vacuums break down because people try to pick up coins, glass, or large objects. Avoid this to protect the motor and hose.
If your vacuum has a removable battery (common in stick vacuums), follow charging guidelines to avoid battery damage. Another overlooked tip is to inspect the power cord regularly—frayed cords are dangerous and should be replaced quickly.

Signs Your Vacuum Needs Maintenance Or Repair
Watch for these warning signs:
- Reduced suction: Often means clogged filters or hose.
- Brush not spinning: Likely a belt issue.
- Strange smells: Could be a dirty filter or stuck debris.
- Loud noises: Check for blockages or loose parts.
If simple maintenance doesn’t fix the issue, consult a professional or the manufacturer.
If you notice dust blowing out from the vacuum instead of being picked up, it’s a sign of a filter or air seal problem. Also, if your vacuum leaves dirt behind after several passes, the brush roll or suction is likely compromised.
When To Replace Your Vacuum Cleaner
Even with good maintenance, vacuums don’t last forever. Most quality models last 5–8 years. Replace your vacuum if:
- Repairs cost more than a new unit.
- The motor is burned out.
- Parts are no longer available.
- It’s unsafe or unreliable.
You can check for ratings and reviews at trusted sources like Consumer Reports to find recommended new models.
Some signs of an aging vacuum include frequent breakdowns, difficulty finding replacement parts, or loss of suction even after thorough cleaning. If your vacuum is causing more frustration than help, it’s time to consider a new one.
Frequently Asked Questions
What Is The Most Important Vacuum Maintenance Step?
Cleaning or replacing the filter is the most critical. Dirty filters block airflow and reduce cleaning power.
Can I Wash All Vacuum Filters?
No. Some filters are washable, others are not. Check your vacuum’s manual. Always let washable filters dry completely before reinstalling.
Why Does My Vacuum Smell Bad?
Bad smells often come from dirty filters or stuck debris. Clean the filter, dustbin, and brush roll. If the smell persists, check the hose for hidden blockages.
How Do I Know If The Belt Needs Replacing?
If the brush roll isn’t spinning or you hear squeaking, the belt may be stretched or broken. Inspect and replace if worn.
Should I Use My Vacuum For Wet Messes?
Most vacuums are not designed for liquid cleaning. Only use wet/dry vacuums for spills. Vacuuming liquids can damage the motor and cause electric shocks.
Taking care of your vacuum cleaner doesn’t need to be complicated. With these clear steps, your machine will work better, last longer, and help keep your home healthy. Just a few minutes every month can make a big difference. If you’re unsure about a repair, check the manual or reach out to a professional.
Your vacuum is a simple tool—but with good care, it can be your best ally in keeping your floors spotless.

