

Image source: Bing (Web (fair-use with source credit))
So, you've noticed your above-ground pool is losing water faster than it should. Annoying, right? Don't sweat it too much; finding a leak can feel like a treasure hunt, but with a little know-how and patience, you can usually track it down.
Think of us as your friendly guide on this little detective mission.
Before we dive deep, let's make sure it's actually a leak. Sometimes, water loss can be due to other factors like evaporation, which can account for up to a quarter of an inch of water per day in dry, windy conditions. We'll walk you through how to differentiate between a true leak and normal water loss.
Quick Answer
To find a leak in an above ground pool, first confirm it's not evaporation. Then, use a dye test near fittings and seams. Inspect the equipment for drips and check the liner for tears.
Plug returns and skimmers to isolate plumbing issues.
Is It Really a Leak? Checking for Evaporation and Splash-Out
It's easy to jump to conclusions when your pool water level drops. But before you start ripping things apart, let's confirm that you're actually dealing with a leak and not something more common. Two big culprits are evaporation and simple splash-out.
How to Perform the Bucket Test
This simple test helps you distinguish between true water loss and evaporation.
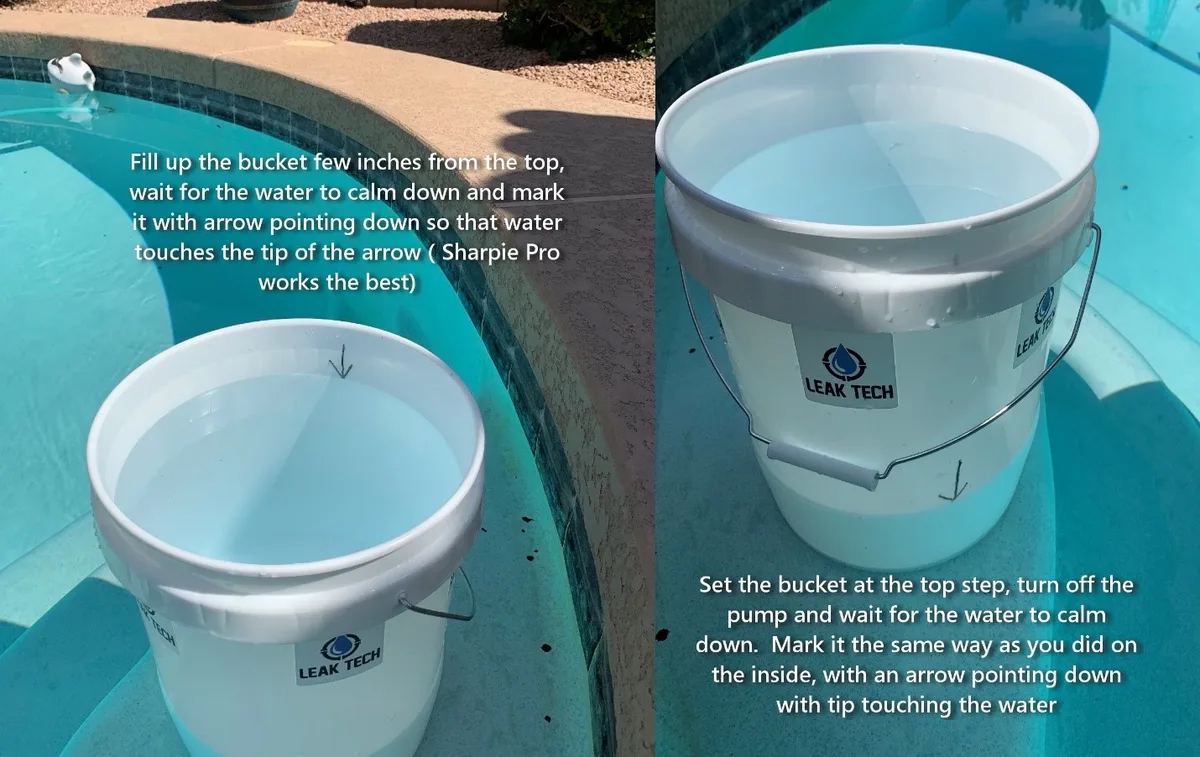
- Grab a bucket: Fill a clean bucket with pool water until the water level inside the bucket is the same as the pool's current water level.
- Mark the levels: Place the bucket on a stable step inside the pool. Use a piece of tape or a marker to mark the water level on the outside of the bucket. Also, mark the pool's water level on the inside of the bucket if it's below the rim.
- Wait 24 hours: Let the bucket sit undisturbed for a full day and night. Make sure no one splashes in the pool during this time.
- Compare: After 24 hours, compare the water level inside the bucket to the water level in your pool.
- If the water level in the pool has dropped more than the water level in the bucket, you likely have a leak.
- If the water levels dropped about the same, or the bucket's water level dropped more, you're probably just losing water to evaporation.
Simple splash-out can also contribute to water loss, especially during active pool use. If you have a lot of activity, this could be your main source of water level changes.
Step-by-Step Leak Detection: The Detective's Guide
Once you've confirmed it's a leak, it's time to get systematic. Think of this as a process of elimination. We'll cover the most common spots and how to test them.
Using Dye to Find Clues
Food coloring or specialized pool leak detection dye is your best friend here. It helps visualize water movement.
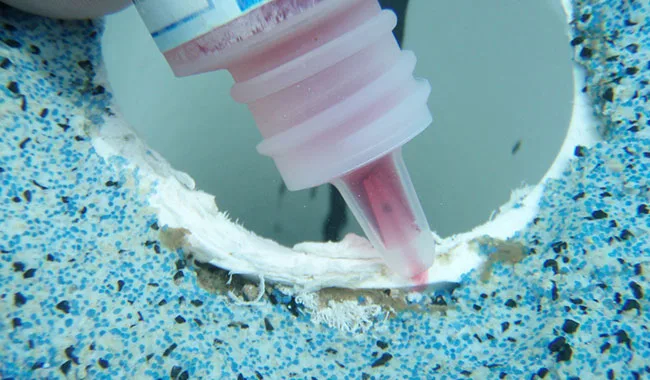
What you need: Dark-colored food coloring or pool leak detection dye.
How to do it: Turn off your pool pump. You want the water to be as still as possible for the dye to show you where it's being pulled. Carefully add a few drops of dye near potential leak spots.
Near the skimmer: If the dye gets sucked into the skimmer opening, you've found a leak in or around the skimmer assembly.
Around return jets: If the dye is drawn towards an outlet jet, the leak is likely in the plumbing connected to that jet.
Along liner seams or walls: Drip dye near any visible wrinkles, seams, or potential punctures. If the dye moves toward a specific spot, that's your prime suspect.
If the dye just disperses slowly without being pulled anywhere, that particular area is probably not leaking.
Inspecting the Equipment Area
Your pump, filter, and any associated plumbing are common leak zones. These components are under constant pressure when the system is running.
- Visual Check: Walk around your entire equipment setup. Look for any damp spots, puddles, or signs of water seeping from pipes, valves, or the pump housing itself. Pay close attention to any connection points.
- Listen Up: Sometimes, you can hear a faint hissing or dripping sound coming from the equipment area, especially when the pump is running.
Leaks in the equipment area can happen at seals, gaskets, or threaded fittings. If you find a wet spot, try to determine if it only appears when the pump is on or if it's a constant drip. This helps diagnose if it's a high-pressure leak or a low-pressure/suction-side leak.
Checking the Pool Liner and Walls
The liner is the waterproof barrier of your pool, and tears or punctures can happen.
- Visual Scan: Slowly walk the inside perimeter of your pool. Look for any obvious rips, tears, or small holes. Sometimes, a leak will cause tiny bubbles to form on the liner surface as water escapes.
- Gentle Touch: If you can't see anything, gently run your hands along the liner, especially near the bottom and where it meets the top edge. You might feel a snag or a small hole that's not immediately visible.
For small liner punctures, repair kits are usually available. These typically involve a patch and adhesive designed for underwater application. Always follow the kit's instructions carefully for a durable fix.
Troubleshooting Plumbing: Testing the System
If you've ruled out the liner and equipment, the leak might be in the hidden plumbing or pipework. This can be a bit more involved to test.
The Fill Line Test Explained
This method helps determine if the leak is located above or below your normal operating water line.
- Mark the Water Level: Use a piece of tape or a marker to clearly indicate the current water level on the pool wall.
- Let it Drop: Allow the pool to lose water naturally without running the pump for a while.
- Observe the Stop Point: Note the exact level where the water stops dropping on its own.
- If the water stops dropping when it's still relatively high, the leak is likely above that level. This could indicate a problem with the skimmer opening, a return jet fitting, or a crack in the pool wall structure just below the waterline.
- If the water continues to drop until it reaches the bottom, or a very low point, the leak is probably in the liner itself, the main drain, or the plumbing buried below the pool floor.
Plugging Returns and Skimmers for Isolation
This test helps isolate leaks specifically within the plumbing system.
What you need: Appropriate plugs for your pool's return jets and skimmer opening.
How to do it:
- Turn off your pool pump and ensure the water is still.
- From inside the pool, insert the plugs firmly into each return jet opening.
- Securely plug the skimmer opening from the outside or inside, depending on your skimmer type.
- Refill the pool to its normal operating level and mark it clearly.
- Turn the pump back on and let it run.
If the water level drops: This indicates a leak in the plumbing lines between the skimmer and the pump, or potentially within the pump itself.
If the water level remains stable: This suggests the leak is not in that section of plumbing. The problem is more likely within the pool shell itself (liner, seams) or the plumbing on the return side.
Common Mistakes to Avoid When Hunting for Pool Leaks
When you're focused on finding a leak, it's easy to overlook critical steps or make assumptions. Avoiding common errors can save you time and prevent further damage.
Rushing the Evaporation Test
Many people skip the bucket test, assuming any water loss is a leak. However, evaporation is a constant factor, especially during warmer months. Manufacturer specifications for water loss due to evaporation can vary, but assuming it's always a leak will lead you down the wrong path.
Give the bucket test its full 24 hours.
Ignoring the Equipment Area
The pump, filter, and heater are complex systems with many potential failure points. Don't just look at the pool walls and liner. A steady drip from a valve or a leak at a pipe connection in the equipment pad can drain your pool quickly.
These leaks often only occur when the system is pressurized and running.
Assuming a Small Tear is Harmless
Even a tiny pinhole in your pool liner can cause significant water loss over time. Don't dismiss it just because it seems minor. Aggregate user reviews report that what starts as a small snag can expand with water pressure and temperature changes.
Address small issues promptly before they become major problems.
Overlooking Liner Seams and Wrinkles
The seams where the liner is joined are natural weak points. Inspect them closely for any signs of separation or damage. Deep wrinkles can also trap debris or create areas where the liner might be stressed and susceptible to tears.
Expert Tips for Pinpointing Stubborn Leaks
Sometimes, a leak is well-hidden. These pro techniques can help you uncover those trickier drips.
Use a Stethoscope or Listening Stick
If you suspect a leak in the plumbing or near the pool structure, a mechanic's stethoscope or a simple listening stick can be invaluable. Place the probe against the pool wall or equipment pipes. You might be able to hear the faint sound of water escaping, which can guide you directly to the source.
Check Around the Base of the Pool
For above-ground pools, leaks can sometimes develop where the liner meets the ground. If you notice a persistently wet area around the outside base of the pool, investigate that spot closely. It could be a liner issue or a problem with the ground support system that's causing stress.
Consider an Underground Pipe Leak
If all visible areas are dry, and the fill-line test indicates a leak below the waterline, the issue could be in the buried plumbing. This is where professional leak detection services, using specialized electronic equipment, become essential. They can often locate leaks in underground pipes without extensive digging.
Monitor Water Level After Repairs
After you've performed a repair, continue to monitor your pool's water level closely. This helps confirm that your fix was successful and that no new leaks have developed. A stable water level for several days is a good indicator that you've solved the problem.
When to Call a Professional Leak Detection Service
You've done your best, but some leaks are beyond a DIY fix. Knowing when to call in the experts saves you time, money, and frustration.
Signs You Need Professional Help
If your pool is losing a significant amount of water daily, and you can't pinpoint the source after using the methods described, it's time to call a pro. Persistent water loss, especially if it's more than 1/4 inch per day after accounting for evaporation, warrants expert attention.
Complex Plumbing Issues
Leaks in underground plumbing or in the main drain system are notoriously difficult for homeowners to find and fix. Professionals have specialized tools like acoustic listening devices, pressure testing equipment, and even cameras that can navigate pipes. These tools allow them to accurately locate the problem without needing to excavate large areas.
Structural or Liner Damage
If you discover a large tear in the liner, damage to the pool's frame, or a leak in a hard-to-reach structural component, professional assessment is crucial. They can advise on the best repair strategy, whether it's patching, replacing a section, or recommending structural reinforcement. Manufacturer specifications for pool warranties often require professional assessment for certain types of damage.
Saving Time and Avoiding Costly Mistakes
While DIY is great, attempting complex repairs without the right knowledge or tools can lead to bigger problems and higher costs down the line. A professional can identify the exact issue quickly, provide an accurate quote, and perform the repair efficiently, often saving you money in the long run by preventing further damage or unnecessary work.
Frequently Asked Questions About Pool Leaks
How long does it take to find a pool leak?
Finding a leak can take anywhere from a few minutes to several hours, depending on the leak's size and location. The bucket test for evaporation takes 24 hours. Dye tests are quicker, but identifying a plumbing leak might require a professional with specialized equipment.
Can a small leak in an above ground pool be fixed?
Yes, small leaks in the pool liner itself can often be fixed with a patch kit designed for underwater application. Larger or more complex leaks, especially those in the plumbing or structure, may require professional repair or replacement of parts.
How much does it cost to fix an above ground pool leak?
The cost varies greatly. A simple liner patch might cost less than $30 for materials. Professional leak detection can range from $100-$300, while plumbing repairs or liner replacements can cost several hundred to over a thousand dollars, depending on the complexity and parts needed.
Should I leave the pool pump running if I suspect a leak?
If you suspect a leak, it's generally best to turn off the pool pump. Running the pump can sometimes make the leak worse by increasing water flow and pressure in the system. It also disturbs the water, making dye tests less effective.
Turn off the pump when performing leak detection tests.

