

Your sink's full of murky water and the plunger isn't cutting it. Before you reach for a chemical cleaner or call a plumber, there's a smarter move sitting in your garage. Can a wet/dry vacuum unclog drains? Yes, in many cases it can, and it's often faster and safer than the alternatives.
In our research, a typical homeowner shop vac with 90 to 130 inches of water lift can pull most household blockages straight out of the pipe. That's real suction power, far beyond what a standard household vacuum produces. And as of 2026, manufacturer specifications confirm that most wet/dry vacuums rated for wet pickup handle this task safely when set up correctly.
Let's walk through exactly when it works, how to do it, and when to stop and call a professional.
Quick Answer
Yes, a wet/dry vacuum can unclog many household drains. It works best on grease, sludge, and soft debris. Hair clogs and solid objects usually need a snake instead.
The secret is creating a tight seal between the hose and the drain opening. Without that seal, suction escapes and nothing moves.
The vacuum removes the blockage by pulling it toward you. That's safer for your pipes than pushing it deeper with a plunger.
Why Suction Actually Works: Water Lift, Airflow, and the P-Trap
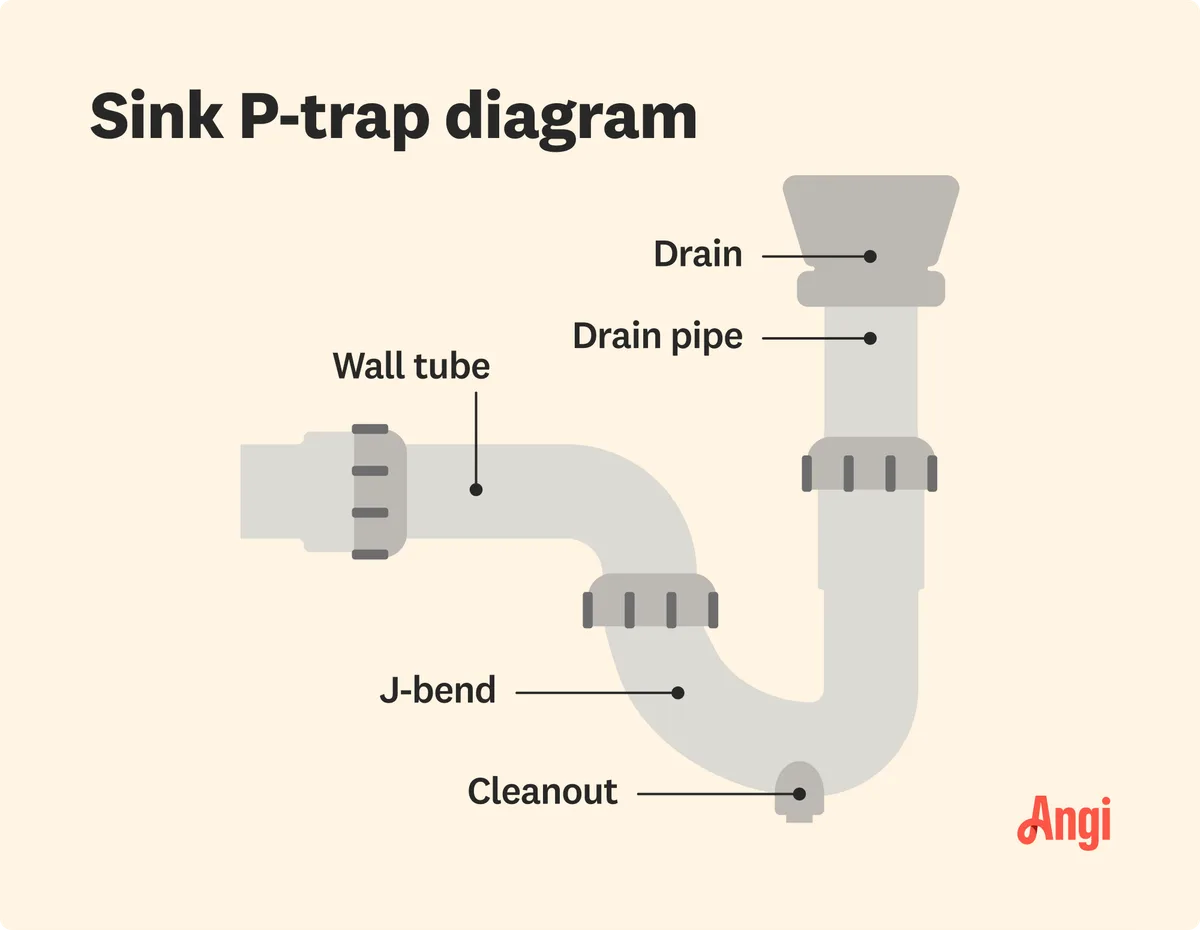
Image source: Web (Bing) / storage.googleapis.com (Web image (fair-use with source credit))
Let's get one thing straight first. A wet/dry vacuum isn't the same as the canister you use on your carpets. It moves air at a much higher volume, and when you seal it against a drain, that airflow creates a pressure difference.
The clog gets pulled toward the hose rather than pushed deeper into the line.
Two specs matter here. Water lift, measured in inches, tells you how hard the vacuum can pull. Airflow, measured in CFM (cubic feet per minute), tells you how much air moves through the hose.
For drain cleaning, you want both working together.
Most home shop vacs are built for this. A standard 5 to 10 amp motor generates enough suction to clear a sink or tub drain. The real limiting factor isn't power.
It's whether you can create an airtight seal at the drain opening.
What's Actually Happening Inside the Pipe
Every fixture in your home has a P-trap. That curved section of pipe holds water to block sewer gases from rising into your living space. It's also where most clogs form.
Here's the clever part. When you vacuum a drain, you're not just pulling at the visible blockage. You're using the P-trap as a natural collection point.
The water and debris in the trap get lifted out, and whatever was stuck just past it often comes along for the ride.
The technique works best for grease, soap scum, and soft organic matter. It's less effective for hair, which tangles and clings to pipe walls. Understanding that distinction is the first step in deciding whether to grab your shop vac or your drain snake.
First, Run This 3-Point Check on Your Clog
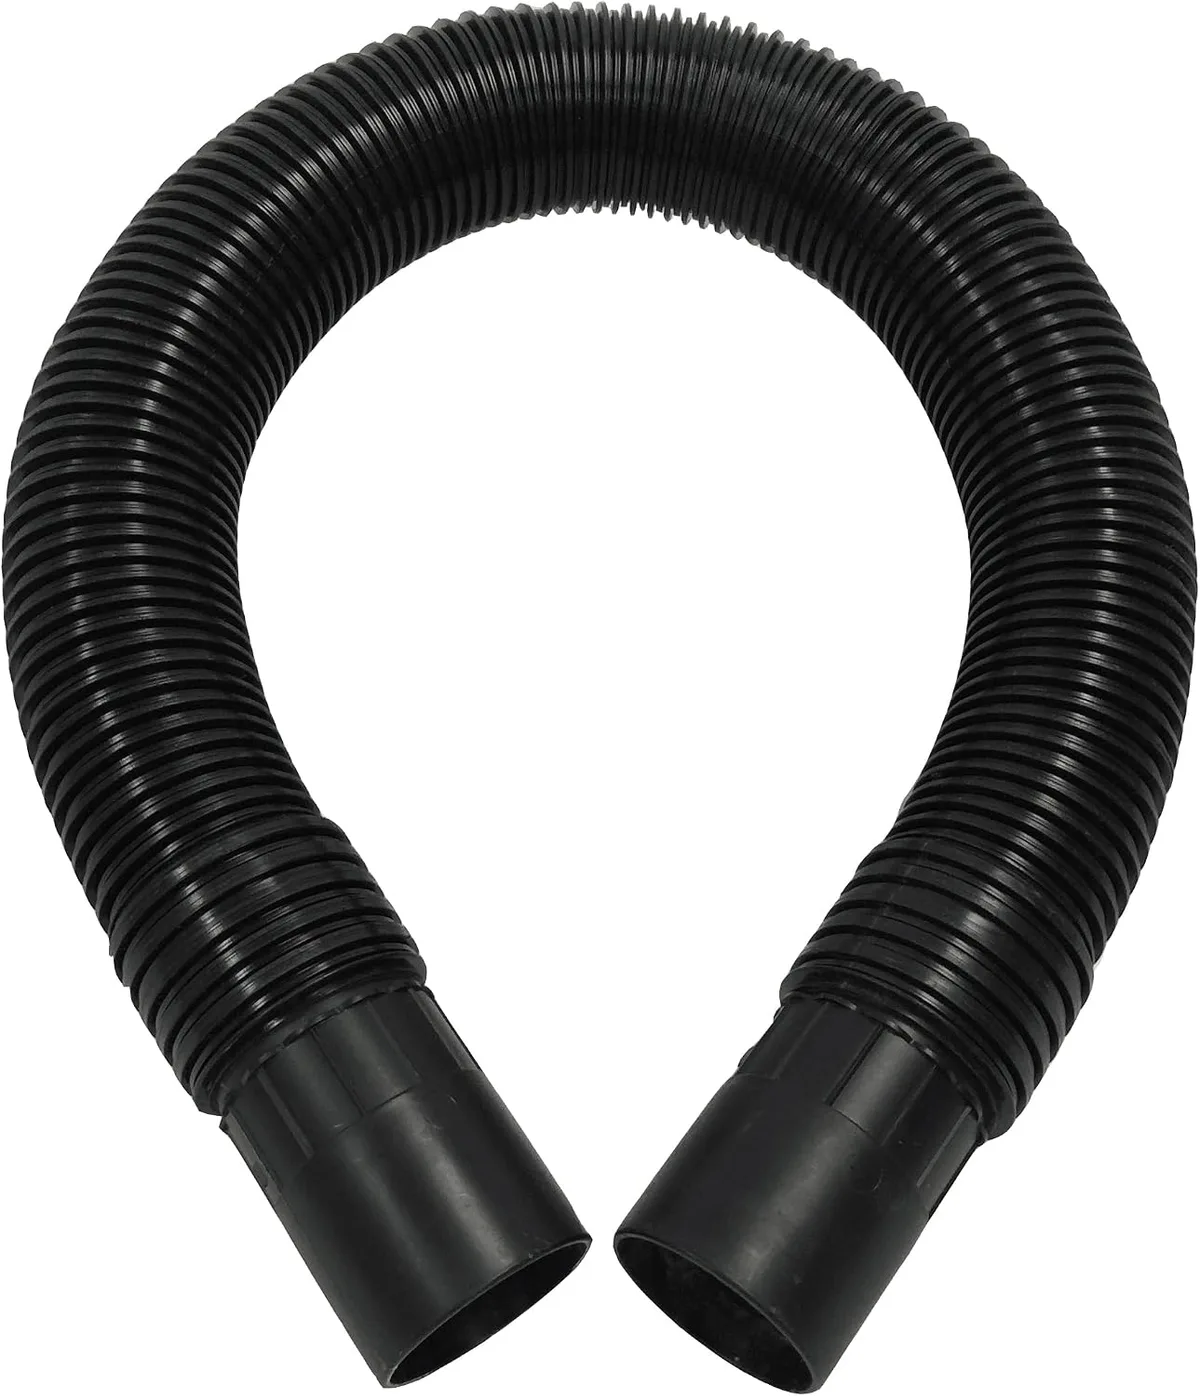
Image source: Web (Bing) / thejacobsen.com (Web image (fair-use with source credit))
Before you wrestle with hoses and seals, take a minute to diagnose the problem. The vacuum works brilliantly for some clogs and wastes your time on others. Here's the decision framework we use.
Check 1: Where is the clog located?
- Single fixture backing up (sink, tub, or floor drain)? That's good news. The clog is likely close by, often right in the trap or just past it.
- Multiple drains backing up at once? You've got a main line issue. A shop vac won't fix that.
- Toilet gurgling when you flush the sink? Same problem. Call a plumber.
Check 2: What's causing the blockage?
- Grease or soap scum: the vacuum excels here
- Food scraps and soft organic matter: also great
- Hair: fair to poor, depends on how tangled it is
- Solid objects (toys, wipes, plastic): forget it, you need a snake
- Hard water scale or mineral buildup: a vacuum can't dissolve this
Check 3: Can you get a tight seal?
- Sink and tub drains: yes, with a wet rag or rubber stopper
- Floor drains: tricky, but doable with a rag and firm pressure
- Toilets: possible, but messy and risky, we'll cover that later
- Main cleanout outside: technically possible, but not recommended
If your answers point to a soft, accessible clog with a sealable drain, keep reading. If you're dealing with a main line backup or a solid obstruction, save yourself the hassle and jump ahead to the section on alternatives.
Quick Equipment Check: Your Shop Vac Needs These 4 Things
Not every wet/dry vacuum is ready for drain duty straight out of the box. Before you start, verify these four things. Missing even one can ruin your vacuum or waste your time.
1. Wet pickup capability with a float shut-off
Your vacuum must be rated for wet pickup. Most shop vacs are, but check the label. The float shut-off is critical.
It stops the motor from pulling water into it once the tank fills. Without it, you'll ruin the motor and create a shock hazard.
2. The correct filter setup
This is the classic DIY mistake. A dry-use filter (usually blue or white paper) will disintegrate when it gets wet. You need either a wet-rated filter or no filter at all, depending on your model.
Check your owner's manual. Many shop vacs recommend removing the filter entirely for wet pickup.
3. Hose diameter and rigidity
A standard 1.5 to 2.5 inch vacuum hose works well. The rigidity matters more than the size. A flimsy hose will kink under suction, killing your airflow.
If you've ever dealt with a collapsing hose on a pool cleaner, you know exactly how frustrating that is. Your shop vac isn't immune.
4. Adequate tank capacity
A 5-gallon tank is the minimum. You'll be pulling standing water plus debris, and the float shut-off stops everything when the tank fills. A larger 10 to 16 gallon tank gives you more working time before you need to stop and empty it.
How Much Power Do You Really Need?
Manufacturer specs show that most home shop vacs produce between 90 and 130 inches of water lift. That's plenty for household drain clogs. You don't need a heavy-duty commercial unit.
What matters more is airflow. Higher CFM means the vacuum can move water and debris through the hose without stalling. Most consumer vacuums with a 5 to 10 amp motor deliver enough CFM for this job.
If yours has a "utility" or "blower" mode, that's a bonus for other tasks, but not required here.
One more note. If you're working in a bathroom or kitchen, very close to water, always plug into a GFCI-protected outlet. We'll dig into that further in the safety section.
How to Vacuum a Clogged Drain: Step-by-Step
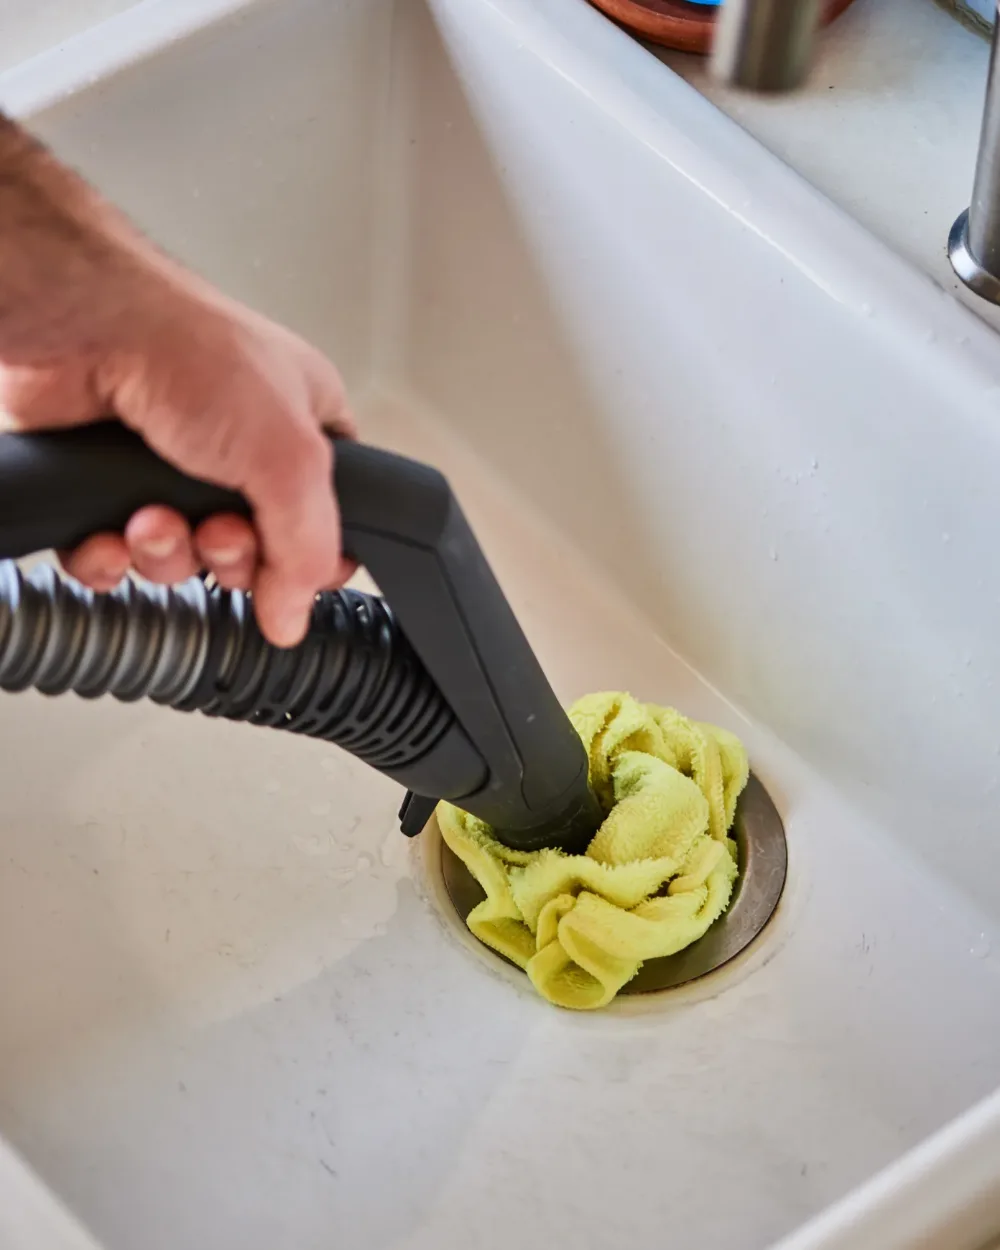
Image source: Web (Bing) / artofit.org (Web image (fair-use with source credit))
Now for the main event. Here's the exact process that works for most sink, tub, and floor drain clogs. Read through it once before you start, then follow along.
Step 1: Shut off the water supply
Locate the shut-off valve under the sink or near the fixture. Turn it clockwise until it stops. You don't want water flowing while you're trying to establish suction.
For tubs, the valve might be in a crawlspace or an access panel. Find it before you begin.
Step 2: Prepare the vacuum for wet duty
Remove the dry filter if your model calls for it. Install a wet-rated filter if yours uses one. Attach the hose to the suction port, not the blower port.
Double-check that the tank is empty and the float moves freely.
Step 3: Remove standing water
If the sink is full, vacuum out the bulk of it first. You don't need to get every drop. Just drop the water level below the overflow opening.
This matters because overflow holes break your seal. If water flows through the overflow while you're vacuuming, you're pulling air instead of the clog.
Step 4: Create the seal
This step makes or breaks the whole technique. Press the hose end firmly into the drain opening. If there are gaps, wrap a wet rag around the hose and push it into the drain.
The water in the rag helps form a tighter seal. Work slowly and feel for the suction to lock in.
Step 5: Run the vacuum and listen
Turn the vacuum on full power. Listen for a change in motor pitch. When the clog breaks loose, the motor sounds different, usually lighter or higher pitched.
You'll often hear gurgling, which means air is moving through the pipe again.
Run the vacuum for 20 to 30 seconds per attempt. If nothing changes, stop and reposition the seal. Don't let it run for minutes at a time.
Overheating is a real risk.
Step 6: Flush with hot water
Once the drain clears, restore the water supply and run hot water through the fixture for a full minute. This washes away any remaining debris and confirms the flow is strong. If it drains freely, you're done.
Step 7: Clean up properly
Empty the tank. Rinse the hose and any attachments with clean water. Wipe down the exterior.
If you picked up anything smelly, add a little dish soap to the rinse. Let everything dry before storing it.
That's the full process. Simple enough, right? The next two sections cover what trips people up.
When the Vacuum Is the Wrong Tool: 4 Clogs It Can't Handle
The vacuum is a great first line of defense, but it has hard limits. Knowing them saves you from a frustrating hour of wrestling a hose.
1. Main sewer line blockages
If multiple fixtures are backing up, the clog is in the main line running to the street. Your vacuum doesn't have the reach or power to clear that. A plumber with a motorized auger or hydro-jetter is the right call.
2. Vented drains
Some plumbing systems, especially older ones, have drain vents that allow air in right near the fixture. That vent breaks your suction seal. You'll hear the vacuum pulling air through the vent instead of the clog.
No seal, no suction, no luck.
3. Heavy solid objects
A kid's toy, a disposable wipe, a floss pick. These things don't budge with suction. They're often wedged sideways in the pipe.
You need a drain snake to grab and pull them out. The vacuum will just sit there humming while the water slowly rises behind the obstruction.
4. Root infiltration and mineral buildup
Tree roots growing into underground pipes and hard water scale are permanent constrictions, not temporary clogs. No amount of sucking will remove them. You'll see recurring backups every few weeks.
That's a sign to get a camera inspection and talk to a pro.
How to Spot These Earlier Than You Think
Pay attention to the speed of the backup. A clog that's been slowing for a month is usually scale or root growth. A sudden backup after a big meal is probably grease.
That timeline tells you which tool to grab.
Another red flag: gurgling sounds from other fixtures when you flush or run water. That means air is moving through the main line, which points to a larger blockage deeper in the system.
Safety Rules You Can't Skip When Wet Vacuuming
Water and electricity don't mix. That's the number one rule, and it's non-negotiable. The Occupational Safety and Health Administration (OSHA) requires GFCI protection on all receptacles near water in workplaces, and the same logic applies to your home.
The National Electrical Code recommends the same for bathrooms, kitchens, and garages. If your outlet isn't GFCI-protected, use a portable GFCI adapter. They cost around fifteen bucks and could save your life.
Plug into a GFCI outlet only. Look for the small "Test" and "Reset" buttons on the faceplate. If your home's outlets don't have them, pick up a portable GFCI adapter at any hardware store.
Never use a standard household vacuum. A shop vac is designed with a sealed motor and a float system to keep water from reaching the electronics. A regular upright or canister vacuum has no such protection. Use it near water, and you risk electrocution.
When clearing a toilet backup or a floor drain, treat the water as contaminated. Wear rubber gloves, safety glasses, and old clothes. If you're dealing with sewage, consider a face mask too.
The water can contain bacteria and pathogens you don't want on your skin.
If the vacuum picks up blood, vomit, or any bodily fluid, disinfect the tank and hose afterward with a bleach solution. Let everything dry completely before the next dry use.
Common Mistakes That Turn a Quick Fix Into a Bigger Repair
These are the pitfalls we see in aggregate user reviews and forum threads. Avoid them and your drain cleaning goes smoothly.
Leaving the dry filter in place
The paper filter dissolves on contact with water. The soggy mess clogs the motor and shortens the vacuum's life. Always swap to a wet-rated filter or remove it completely before starting.
No seal at the drain
You hold the hose near the drain and hope for the best. That's not how suction works. Air takes the path of least resistance, which is the gap between the hose and the drain opening.
Your clog stays put. Press hard and use a wet rag for a proper lock.
Forcing the hose deep into the pipe
The hose doesn't need to travel far. The clog is usually within a foot or two, right in the trap area. Shoving the hose in further risks getting it stuck or pushing debris deeper.
Keep it at the surface and let the suction do the work.
Vacuuming water but not removing the clog
This is the sneakiest failure. The vacuum fills with water, the float kicks off, and you think you made progress. But you only cleared the standing water.
The actual blockage is still in the pipe. If the drain refills slowly after you run hot water, you didn't get the clog out.
Skipping the hot water flush
Even successful vacuuming leaves residue on the pipe walls. That leftover grease or sludge will attract the next clog. Always follow up with a minute of hot water.
It's the final step that keeps the drain clear for weeks instead of days.
If the Vacuum Fails: What to Try Next Before Calling a Plumber
So the vacuum didn't work. Don't panic. There are three more DIY options before you hand over cash to a professional.
A plunger with proper technique
A standard cup plunger works on sinks and tubs. A flange plunger works on toilets. Fill the fixture with enough water to cover the plunger cup.
Push slowly, then pull sharply. The change in pressure often breaks up grease and soft clogs that suction couldn't dislodge.
A manual drain snake
For hair clogs, the snake wins every time. Feed it into the drain until you feel resistance. Twist and pull to snag the hair, then withdraw it.
It's gross, but it works. You can pick up a plastic drain snake for a few dollars, and it takes about ten minutes.
Disassemble the P-trap
If the clog is in the fixture's trap, this is the definitive fix. Place a bucket underneath. Unscrew the slip nuts on both ends of the curved pipe.
Pull the trap off and clean it out with a wire brush. Reassemble and run hot water to test.
When none of those work, or if you're seeing recurring backups, it's time to call a plumber. That emergency call will run you $150 to $300. But a camera inspection and a proper auger job will actually solve what a vacuum can't.
Sometimes the tool matters more than the effort. For more stubborn suction issues on other equipment, regular maintenance routines often help you catch problems early.
Real Scenario: Which Clogs the Vacuum Wins Without a Fight
Let's make this concrete. Three common real-world situations, and how the vacuum performs.
Greasy kitchen sink
The sink drains slowly, and the water smells faintly of old cooking oil. This is the vacuum's sweet spot. The grease sits in the P-trap and the first few inches of pipe.
With a tight seal, you pull it all out in under five minutes. Follow with hot water and you're done.
Hair-filled tub drain
The tub holds a few inches of water, and the drain sounds like a dying animal. Long hair has woven itself around the drain stopper mechanism and down into the pipe. The vacuum might pull some water and loose gunk, but the hair stays tangled.
You'll need the snake. The vacuum can help remove the standing water first, but it won't clear the drain.
Renovation floor drain
Dust, drywall fragments, and sediment have settled in the trap of a basement floor drain. This is a perfect vacuum job. The debris is loose and powdery.
A few passes with the hose and it's clean. No chemicals, no mess, no plumber.
Safety First: GFCI Outlets and Wet/Dry Vacuums
We touched on this earlier, but it deserves its own moment. In our research, the biggest hazard with wet vacuuming is electrical shock. That's why the National Electrical Code requires GFCI protection in bathrooms, kitchens, and garages.
A GFCI outlet monitors the flow of current. If it detects any escaping electricity, it cuts power in a fraction of a second. In a room with standing water, that instant response is the difference between an annoyance and a tragedy.
Check your outlet before you plug in. Are there test and reset buttons? If not, don't use that outlet.
You can still proceed, but you must use a portable GFCI adapter between the cord and the wall.
Also, keep your hands dry. Wear rubber-soled shoes. And never reach toward the vacuum while it's running if you're standing in a puddle of water.
Frequently Asked Questions
Can a wet/dry vacuum unclog a toilet?
Yes, but it's messy and requires care. Remove most of the water first. Then seal a wet rag around the hose and press it into the toilet's drain opening.
Run the vacuum in short bursts. The risk is splashing contaminated water. Wear gloves and eye protection.
Should I remove the standing water before vacuuming a drain?
Yes, partially. Drop the water level below the overflow hole. That hole breaks the seal if it's submerged.
Keep an inch or two of water in the basin to help form a seal around the hose.
How long should I run the vacuum before giving up?
Try three attempts, about 20 to 30 seconds each. Reposition the hose between attempts to get a better seal. If you hear no change in motor pitch and the water hasn't budged, the clog is likely beyond your reach.
Move on to a snake or call a plumber.
Can I use the blower function to push the clog through?
Sometimes, but it's riskier. Pushing a clog deeper can make it harder to remove. You might also blow contaminated water backward through the overflow or fixture seals.
We recommend suction first. Use the blower only as a last attempt, and cover the overflow hole first.
Will vacuuming a drain damage old PVC or cast iron pipes?
Not if you use the right technique. The vacuum pulls pressure toward you rather than pushing it into the pipe walls. The risk comes from forcing the hose in too deep or using excessive pressure.
Keep the hose at the opening and let the suction do the work.
Is it safe to use a wet/dry vacuum on a main sewer line cleanout?
Technically possible, but not recommended. Sewer gases and contaminated water present a health risk. The vacuum likely can't generate enough suction to clear a main line clog anyway.
Call a plumber for anything beyond the fixture trap.
Final Decision Guide: Where to Start and When to Stop
Here's the short version, the way we'd explain it to a neighbor who just knocked on our door.
| Situation | Best Tool | Why |
|---|---|---|
| Grease or sludge in sink or tub | Wet/dry vacuum | Pulls soft clogs out fast |
| Hair in tub or shower | Drain snake | Tangled hair needs grabbing, not suction |
| Food scraps in kitchen sink | Wet/dry vacuum | Soft organic matter responds well to suction |
| Standing water with no visible clog | Wet/dry vacuum | Removes water, then reassess |
| Multiple fixtures backing up | Call a plumber | Main line issue beyond DIY reach |
| Solid object stuck | Drain snake or plumber | Vacuum won't dislodge wedged items |
Start with the vacuum if your clog falls into the soft, accessible category. Spend no more than ten minutes on it. If it doesn't work, switch to the snake or P-trap cleanup.
And if those fail, or if the problem keeps coming back, invest in a professional.
One last tip. Keep a drain snake and a small shop vac in your utility closet. Together with a plunger, they handle ninety percent of household drain emergencies.
You'll save yourself hundreds of dollars and a lot of waiting for a plumber who won't show up until tomorrow anyway.

