

Let's be honest: a wet/dry vacuum tank is one of the dirtiest things you own, and most people only clean it when it starts smelling like a swamp or losing suction. If you've ever asked yourself "How do you clean a wet/dry vacuum tank?" after a messy garage cleanup or a flooded basement, the process is simpler than you think. But it's not a one-size-fits-all job.
What's inside the tank, how long it sat there, and what kind of filter you use change the steps.
In our research, most manufacturer manuals agree that the tank and filter should be rinsed after every heavy wet pickup and checked monthly for dry use. The EPA's mold cleanup guidance also recommends drying wet materials completely within 24 to 48 hours to prevent mold growth. That same timeline applies to your vacuum tank.
Left damp, a vacuum can become a mildew machine that blows musty air on your next use. So let's walk through the right way to clean it, based on what you actually vacuumed up.
Quick Answer
Unplug the vacuum and remove the lid and filter. Dump loose debris.
Rinse the tank with warm water and mild detergent, scrubbing stubborn residue. Rinse until clear, then dry completely before reuse.
Clean the filter separately and air dry everything for 12 to 24 hours.
Start Here: What's Actually in Your Tank?
Before you even touch the latches, look at what you're dealing with. The cleaning method changes depending on the debris type. Doing it wrong can damage the filter, spread dust, or create a biohazard situation.
Dry Dust and Sawdust
If you've been sanding wood, cleaning drywall dust, or vacuuming dirt, you're dealing with fine particulate. This is the easiest scenario. The risk is dust kicking back into the air when you remove the lid and empty the tank.
You should remove the filter and tap it out outside. Hold it by the clean end and give it a few firm taps against a trash can. For heavy dust loads, take the tank outside, tip it toward a trash bag, and dump slowly to avoid creating a dust cloud.
Wet Sludge and Liquid
Wet pickups like car detailing overspray, appliance leaks, or a soaked garage floor leave behind a different beast. The liquid drains quickly, but the tank walls stay coated in a thin film of dirt and moisture. It's almost like a humid layer you can't see.
The float shut-off valve prevents overfilling, but it won't stop residue from clinging to the tank. Wet debris also cakes into a sludge at the bottom if it dries. That hard layer is the hardest thing to clean, and scrubbing it wrong can scratch plastic tanks.
Mixed Mess or Unknown Filth
This is the tricky one. Maybe you vacuumed up cat litter that got wet, or something that smells like it's been fermenting for a week. If the material is unknown or potentially hazardous, skip the normal rinse process and jump to the safety section below.
The EPA's flood cleanup guidelines suggest that water from sewage or chemical spills requires careful handling. The same applies to your vacuum tank. Don't just rinse it into your driveway.
You might be pushing contaminated water directly into storm drains.
Dry Debris Cleaning Workflow
Let's start with the most common scenario. Dry dust and sawdust is what half of us use a wet/dry vacuum for, and the cleaning workflow is quick.
First, unplug the machine. This isn't optional. You're going to handle the filter and lid, and the motor sits right above both.
A stray switch bump could be dangerous.
Next, remove the lid assembly. You'll need to release the latches on each side of the drum. Lift straight up and set the lid on a clean surface.
The filter is usually attached to the underside of the lid with a threaded collar or a retaining rod.
Here's where the process branches. If you used a filter bag, empty it by pulling it off its inlet ring and tossing it. Never try to wash a paper filter bag.
Once they're torn or caked, they're done.
Without a bag, tap out the cartridge filter outside. Finish by holding the tank and tipping it into a trash bag. Do this slowly in a well-ventilated area, and wear a dust mask if the stuff is really fine.
That's it. For dry debris, you don't need water, soap, or any real elbow grease. The goal is to remove bulk dust and prevent it from embedding into the tank walls while it sits.
Wet Waste Cleaning Workflow
Wet pickups need more hands-on care, and the longer the mess sits, the harder the job gets. The good news is that the workflow is mostly the same whether you cleaned up rainwater or a leaky water heater.
Start by removing the lid and filter, just like the dry process. But now, the filter matters more. A cartridge filter used for wet pickup should be rinsed in clean water immediately.
Wet dust and dirt can turn into a paste that clogs the filter pores, reducing suction power on your next job.
Now for the tank. If your vacuum has a drain port, open it first. The drain port is that small cap near the base of the drum.
Opening it releases the bulk of the liquid so you don't have to tip a heavy, sloshing tank. Just aim it at a bucket or drain.
With the big liquid gone, take the tank outside. Spray the interior walls with a garden hose to remove the thin film of dirt. For heavier residue, add a few drops of mild dish soap and scrub with a long-handled brush or a sponge.
Then rinse thoroughly until the water runs clear.
Here's the most important step: dry it. The EPA's mold guidance emphasizes that moisture is the trigger for mold growth. A damp tank stored in a dark garage is a mold factory.
Let the tank air dry upside down on a clean surface for 12 to 24 hours. And open the drain port to let any trapped water escape while it dries.
Handling Hazardous or Contaminated Water
This is the one situation where the normal workflow isn't enough. Flood water, sewage backups, chemical spills, and accidental vacuuming of toxic liquids require a different approach entirely.
The CDC is very clear about flood water: assume it's contaminated unless you know otherwise. If you vacuumed water from a basement flood, especially in a sewer-adjacent area, treat the tank like the contaminated object it is.
You have two options. The first is disposal. If the debris is hazardous, the safest move is to wear gloves and a mask, bag the filter and contents in a sealed trash bag, and remove the tank to a wash station away from storm drains.
Some localities require hazardous waste pickup for chemical spills.
The second option is a disinfection wash. Mix a solution of warm water and white vinegar at roughly a 1:3 ratio, or use a mild bleach solution at the concentration your manufacturer recommends. Never combine bleach and vinegar, because the mix creates chlorine gas.
Scrub the interior thoroughly with this solution, rinse twice with clean water, and dry completely. If you vacuumed anything flammable like gasoline, stop immediately. Wet/dry vacuums are not rated for flammable liquid pickup, and the motor can ignite vapors.
Check your owner's manual if you're unsure what your machine can handle. This is a genuine safety issue, not a maintenance tip.
Cleaning the Filter: Cartridge vs. Foam Sleeve
The filter is the part people ruin most often. It's also the easiest to get wrong. Most wet/dry vacuums use one of two filter types, and each one has a different cleaning rule.
As of 2026, most consumer machines still use either a pleated cartridge or a foam sleeve. Cartridge filters are the paper or polyester cylinders seen on most shop vacs. They work for both dry and wet pickup, but they clog fast with fine dust.
Foam sleeves are the cylindrical sponges that slide over a plastic cage. They're best for wet pickup and offer less filtration for dry dust.
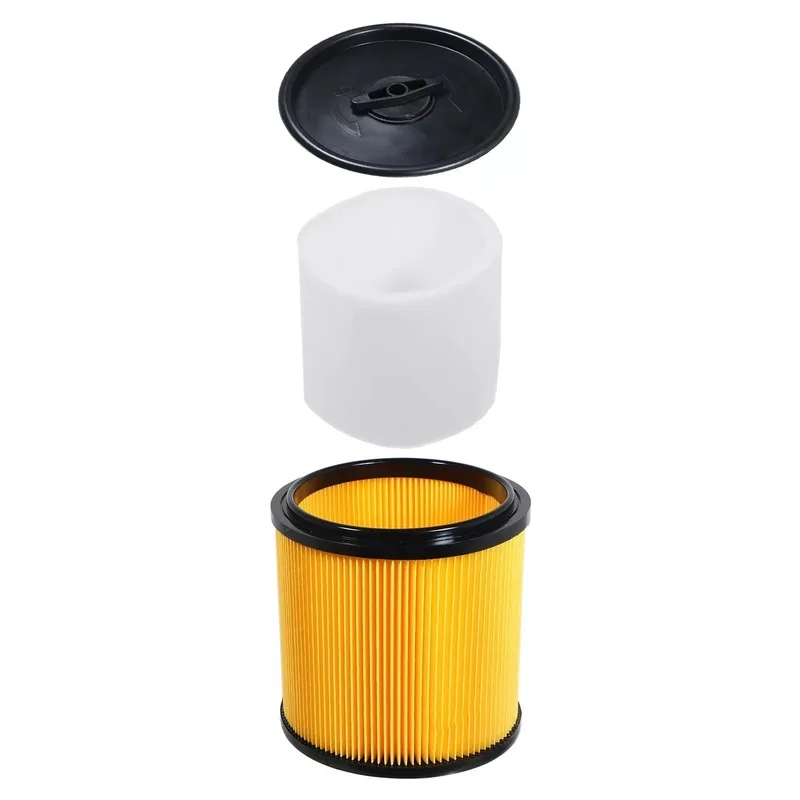
Image source: Web (Bing) / diy.com (Web image (fair-use with source credit))
| Filter Type | Best For | Cleaning Method | Lifespan |
|---|---|---|---|
| Cartridge | Dry dust, general use | Tap off dust, rinse for wet use, air dry | 6 to 12 months |
| Foam sleeve | Wet pickup only | Rinse with soapy water, squeeze dry | 3 to 6 months |
| Cloth bag | Dry debris | Dispose and replace | Single use |
How do you clean a cartridge filter?
Tap it gently against a trash can to dislodge dust. For wet residue, rinse it under a hose or tap water from the clean side outward. Squeeze it, don't twist it.
Twisting tears the pleats and ruins the filter.
Then let it air dry completely before snapping it back onto the lid. A wet cartridge left installed will grow mold and clog the motor's airflow.
What about the foam sleeve?
Foam sleeves are easier. Remove the sleeve, rinse it with warm water, and add a drop of dish soap if it's greasy. Rinse until the water runs clear, then squeeze out the excess.
Never wring it. That stretches the foam and creates gaps where debris passes through.
A spare sleeve costs roughly $10 to $20, so it's worth treating it gently. The same principles apply to keeping any vacuum filter in good shape, including the ones on robotic pool cleaners. If you want to extend the life of those too, filter care for pool vacuums works along the same lines.
Step-by-Step Full Tank Deep Clean
This is the complete reset for any wet/dry vacuum that's been neglected for months. Set aside about 20 minutes and gather a garden hose, mild detergent, a scrub brush, and a clean rag. Do this outside or over a floor drain.
Image source: Web (Bing) / indiamart.com (Web image (fair-use with source credit))
Follow these steps in order:
- Unplug the vacuum completely. Never skip this step.
- Release the lid latches and lift off the lid assembly. Set it aside on a clean surface.
- Remove the filter and set it aside for separate cleaning as described above.
- If your tank has a drain port, open it and let any remaining liquid flow into a bucket.
- Tip the tank to remove loose debris. If it's dry, dump it into a trash bag outside.
- Rinse the interior with a hose. Start with the top rim and work down to the bottom.
- Apply mild dish soap or a degreaser. Scrub the walls and bottom with a long-handled brush.
- Pay extra attention to the bottom corners where sludge accumulates. A plastic putty knife works well for caked-on mud.
- Rinse again until the water runs completely clear. Inspect the tank walls for sticky residue.
- Wipe the exterior and the rim with a clean rag. Then turn the tank upside down to dry.
Image source: Web (Bing) / spillrite.com (Web image (fair-use with source credit))
The lid assembly also needs attention. Check the float shut-off valve for debris that could stick and block it. Make sure the gasket or rubber seal is still flexible.
A cracked gasket causes suction loss. If the seal looks brittle, replacement parts are cheap and your manual or manufacturer's website lists the exact part number.
Let everything dry for at least 12 hours before reassembly. If you're in a hurry, let it dry near a fan or in direct sunlight. Just don't use a heat gun or hair dryer on plastic, since that can warp the tank.
Common Mistakes That Ruin Your Vacuum
Most vacuum failures aren't caused by the motor. They're caused by cleaning mistakes that seem harmless at the time.
Leaving water in the tank after use. This is the number one cause of mold and odor. Even a small puddle left in the bottom creates a damp environment that bacteria love.
Washing the cartridge filter in a dishwasher. The heat and detergent degrade the paper pleats. The filter loses its shape and lets dust blow into the motor. Hand washing is always safer.
Using bleach on a plastic tank without diluting it. Full-strength bleach can discolor and weaken plastic. If you need to disinfect, follow your manufacturer's dilution instructions or use the vinegar approach.
Forgetting to clean the float shut-off valve. A stuck float is why some vacuums suddenly spray water out of the motor vent. Debris builds up around the float over time. Check it during every deep clean.
Reassembling the vacuum before the filter is dry. A damp filter clogs fast and creates a musty smell on the next use. The suction also drops noticeably because water blocks the pores. For any vacuum type, a blocked pickup path causes the same symptom.
Storing the vacuum with the lid sealed tightly. If you've just cleaned it, even dried residual moisture has nowhere to escape. Leave the lid slightly ajar with a gap, or unlatch one clip to allow airflow.
Vacuuming up flammable liquids. Gasoline, mineral spirits, or any solvent vapor can ignite when they hit the motor's commutator brushes. This isn't just a maintenance mistake. It's a safety hazard that could cause a fire.
Routine Maintenance and Smart Storage
A wet/dry vacuum doesn't need a full deep clean every week. It needs a quick maintenance rinse after wet jobs and a proper dry-brush-out when the tank gets dusty.
After each wet pickup, open the drain port and let the liquid drain. Just that small step prevents sludge from forming at the bottom. Once a month, do a full rinse with warm soapy water.
Storage matters more than people realize. Keep the vacuum out of direct sunlight, since UV rays make plastic brittle over time. If it lives in a shed or garage, don't leave the tank sitting directly on a cold concrete floor.
That's how condensation forms inside the tank.
The hose is part of the system too. Rinse it out after wet pickups to prevent mold from growing in the corrugated interior. Hang it in a dry place.
A coiled hose with water trapped inside becomes a breeding ground for mildew. Hose collapse and kinking cause similar frustration with other vacuums you might own.
If you notice a musty smell even after cleaning the tank, check the hose and any attachments. Odor can hide in the hose for weeks without you noticing. The upkeep principles that keep robotic cleaners running smoothly apply here too.
Check filters and seals first, then move to the hoses.
For seasonal storage, empty the tank completely, clean the filter, and leave the lid unlatched. That airflow prevents any lingering moisture from turning into mold over the winter. Keep the tank in a dry area, and check it before you use it after a long break.
Frequently Asked Questions
How often should I clean my wet/dry vacuum tank?
For wet pickups, rinse the tank after every use. For dry debris, empty the tank when it's half full or after heavy jobs. A full deep clean with soap and water is needed once a month.
If you use the vacuum for car detailing or construction dust, clean it more often since fine particles cling to surfaces.
Can I clean a wet/dry vacuum tank with vinegar?
Yes. White vinegar mixed with warm water at a 1:3 ratio dissolves hard water scale and neutralizes odors. It's safe for plastic tanks and is a good alternative to harsh chemical cleaners.
Rinse thoroughly afterward so no vinegar smell remains. A foaming spray bottle helps you reach the tank's bottom corners.
What's the best way to get rid of a smell in a wet/dry vacuum?
Start by cleaning the tank with a vinegar solution. Then check the filter and hose for trapped moisture. Leave the tank and filter to air dry completely for 24 hours.
If the smell persists, the filter may need replacement. Wash the hose separately, since odors hide in corrugated interiors.
Can I wash a wet/dry vacuum filter with soap and water?
Only if the filter is designed for wet pickup. Cartridge filters can be rinsed with plain water, but soap can leave a residue that clogs the pleats. Foam sleeves clean best with warm water and mild dish soap.
Always check your owner's manual first, since filter materials vary by brand.
Is it safe to vacuum water in a wet/dry vacuum?
Yes, as long as you remove the dust bag and use the correct wet-rated filter. Never vacuum water without the float shut-off valve working properly. And never vacuum water that contains flammable liquids or sewage.
Check the tank's rated wet capacity before starting a big job.
Why is my wet/dry vacuum making a sputtering noise?
That usually means the float shut-off valve has triggered because the tank is full. It can also mean there's a clog in the hose or the filter is saturated. Empty the tank, check the hose, and let the filter dry before continuing.
If the noise continues, inspect the seal and gasket for damage.
Final Decision Guide: Pick Your Cleaning Path
Match the workflow to the mess and you'll never waste time scrubbing a tank that just needs a quick dump. Dry dust and sawdust only require a tap-out and a tip into the trash bag. Wet sludge needs the drain port opened, a warm rinse, and a full drying cycle.
Hazardous or unknown contamination demands gloves, a disinfecting rinse, and proper disposal of the contents. Don't skip the drying time either. A damp tank stored with the lid latched is how mold gains a foothold.
| Debris Type | Quick Path | Drying Time |
|---|---|---|
| Dry dust or sawdust | Tap out filter, dump tank outside | 10 minutes |
| Wet sludge or liquid | Drain, rinse, scrub with mild soap | 12 to 24 hours |
| Contaminated or unknown | Gloves, disinfect, rinse twice | 24 to 48 hours |
The right path takes five minutes when the mess is dry and about twenty minutes when it's wet. Your reward is strong suction, no weird smells, and a vacuum that's ready for whatever you throw at it next. Check your owner's manual for any model-specific steps, and you're set.

