If your Bissell carpet cleaner isn’t working like it used to, taking it apart might be the key to fixing the problem. But where do you start?
You might feel unsure or worried about making things worse. Don’t worry—this guide will walk you through each step clearly and simply. By the end, you’ll know exactly how to open up your Bissell cleaner safely and find the issue.
Keep reading, and you’ll save time, money, and frustration by handling it yourself.

Tools Needed
Taking apart a Bissell carpet cleaner requires the right tools. Using proper tools makes the job easier and safer. It helps avoid damage to the cleaner parts. Preparation is key for a smooth disassembly process.
Screwdrivers
Screwdrivers are essential for removing screws and panels. A Phillips head screwdriver works for most screws. A flathead screwdriver helps pry open clips or tight spots. Having both types ready saves time and effort.
Pliers
Pliers help grip and pull small parts or connectors. Needle-nose pliers are useful for tight spaces. They provide better control and precision. Pliers also assist in removing stubborn clips or wires.
Wrench Or Socket Set
A wrench or socket set is needed for bolts. Different Bissell models may use various bolt sizes. Having a small adjustable wrench covers most needs. It allows loosening or tightening bolts without damage.
Plastic Pry Tools
Plastic pry tools help open plastic panels without scratching. They are gentle and prevent breakage. Using metal tools may damage the cleaner’s surface. Pry tools are safe for delicate parts and clips.
Cleaning Cloth And Container
A clean cloth wipes dust and debris from parts. A container keeps screws and small parts organized. This prevents losing important components. Staying organized speeds up reassembly later.
Prepare The Cleaner
Preparing your Bissell carpet cleaner is the first step before taking it apart. It ensures safety and makes the process smooth. Proper preparation avoids damage to the machine and protects you from accidents.
Unplug And Empty
Always unplug the carpet cleaner from the power source. This stops any chance of electric shock. Next, empty the water tanks. Remove both the clean and dirty water tanks carefully. Dispose of the dirty water in a sink or drain. Rinse the tanks to remove leftover dirt and detergent.
Remove Attachments
Detach all accessories and attachments from the cleaner. This includes hoses, brushes, and nozzles. Removing these parts makes the cleaner easier to handle. It also gives better access to screws and clips. Keep the attachments in a safe place to avoid losing them.
Detach The Water Tanks
Detaching the water tanks is the first step to take apart your Bissell carpet cleaner. These tanks hold clean and dirty water during cleaning. Removing them carefully prevents spills and damage. This step also makes cleaning the machine easier and keeps it working well.
Remove Clean Water Tank
Locate the clean water tank on the Bissell cleaner. It usually sits at the top or back of the machine. Hold the handle firmly. Lift the tank straight up or press a release button, depending on your model. Take it off gently to avoid spilling clean water inside the machine. Empty the tank if needed before storing.
Remove Dirty Water Tank
The dirty water tank collects used water from cleaning. Find it near the base or side of the carpet cleaner. Grip the handle and pull it out slowly. Some models have a latch to unlock first. Be careful not to tip the tank to avoid leaks. Empty the dirty water into a sink or bucket. Rinse the tank with fresh water for better hygiene.
Access The Brush Roll
Accessing the brush roll in your Bissell carpet cleaner is an important step. It helps with cleaning, maintenance, or replacing worn parts. This part spins and cleans your carpet deeply. Knowing how to reach it saves time and avoids damage.
Follow these simple steps to get to the brush roll. Prepare a screwdriver and a clean workspace. Keep all small parts safe to avoid losing them.
Locate The Brush Cover
Turn the carpet cleaner upside down. Look for the brush cover on the bottom. It is usually a rectangular or oval panel. This cover protects the brush roll inside. Check for clips or screws holding it in place. The cover may have a small label or icon showing the brush roll location.
Unscrew And Remove Cover
Use a screwdriver to remove the screws on the cover. Place the screws in a small container to keep them safe. Gently lift or slide the cover off. If it sticks, wiggle it carefully to avoid breaking clips. Once removed, you will see the brush roll ready for cleaning or removal.
Remove The Brush Roll
Removing the brush roll is a key step in taking apart a Bissell carpet cleaner. The brush roll cleans carpet fibers by spinning and scrubbing dirt. Over time, hair and debris get tangled around it. This can reduce cleaning power and cause the machine to work harder. Taking out the brush roll helps you clean it or replace it for better results.
Disengage Brush Roll
First, unplug the carpet cleaner for safety. Turn the machine upside down to access the brush roll. Look for clips or screws holding the brush cover. Use a screwdriver to remove screws if needed. Gently lift off the cover to expose the brush roll. Slide the brush roll out carefully. Note the direction it spins for reassembly.
Clean Or Replace Brush
Check the brush roll for hair, threads, and dirt. Use scissors to cut away tangled hair. Remove all debris wrapped around the bristles. Clean the ends where the brush fits into the machine. If the brush roll is worn or damaged, replace it with a new one. Proper maintenance keeps your carpet cleaner working well.
Open The Base Plate
Opening the base plate of your Bissell carpet cleaner is the first step to access its inner parts. This step helps you clean or fix any issues inside the machine. It requires a few simple tools and careful handling.
Take your time to open the base plate carefully. This prevents damage to the cleaner and makes reassembly easier. Always work on a flat surface and keep all screws safe.
Unscrew Base Plate
Start by turning the cleaner off and unplugging it. Find the screws holding the base plate in place. Use a screwdriver that fits the screw heads well.
Remove each screw slowly and place them in a small container. This keeps them from getting lost. Gently lift the base plate away once all screws are out.
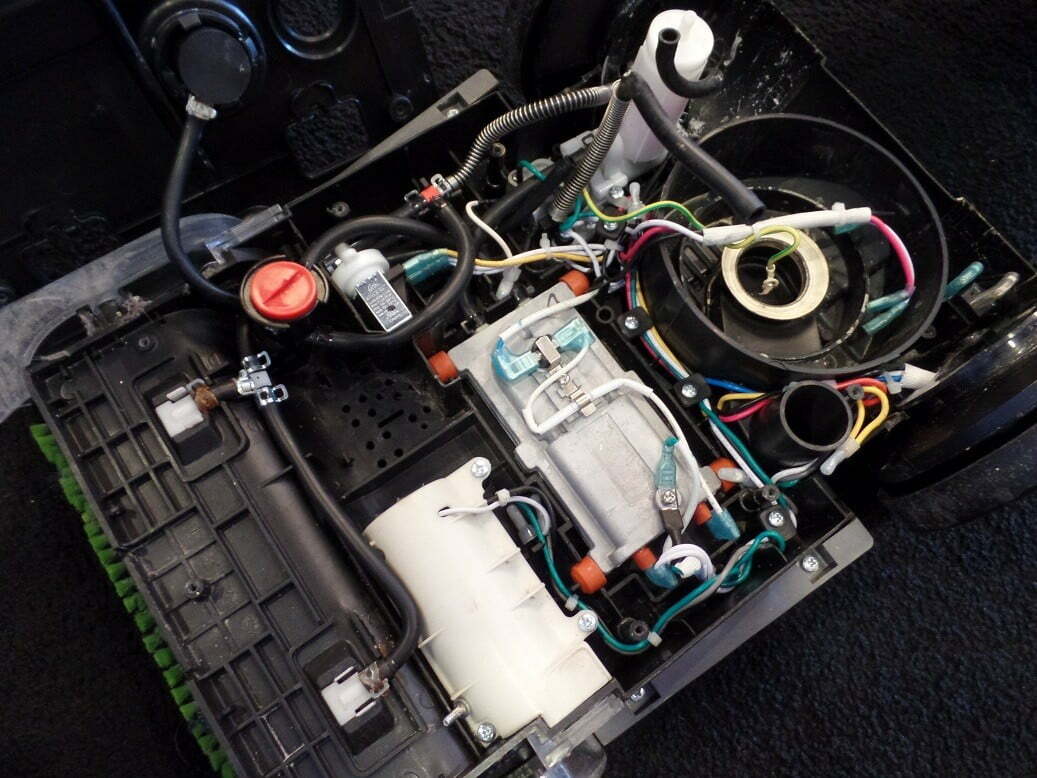
Inspect Internal Components
Look inside the cleaner to check the parts. Notice if any parts are dirty, broken, or stuck. Pay attention to the brush roll, belts, and hoses.
Clean dirt or debris with a soft cloth or brush. If any parts look damaged, note them for repair or replacement. This step helps keep your cleaner working well.
Remove The Motor And Pump
Removing the motor and pump from a Bissell carpet cleaner is key to deep repairs. This step allows you to access parts that often need cleaning or replacement. Taking out these components carefully helps keep your machine working well longer.
Focus on disconnecting wiring safely and unscrewing the motor. These tasks require attention but are simple with the right steps. Follow the guide to avoid damage and ensure easy reassembly.
Disconnect Wiring
Start by unplugging the carpet cleaner. This stops any power flow and prevents shocks.
Locate the wires connected to the motor and pump. They usually have clips or small plugs.
Gently pull the connectors apart. Do not yank the wires to avoid breakage.
Note the wire positions or take a photo. This helps when reconnecting later.
Unscrew And Extract Motor
Find the screws holding the motor and pump in place. They are often around the base or sides.
Use a screwdriver that fits the screws well. Turn counterclockwise to loosen.
Keep the screws safe for reassembly. Place them in a container or magnetic tray.
Carefully lift the motor and pump out. They may feel a bit heavy or stuck.
Check for any clips or wires still attached. Disconnect these before removing fully.
Reassemble The Cleaner
After taking apart your Bissell carpet cleaner, putting it back together is the next step. This process needs care to avoid damage and ensure the cleaner works well. Follow each step slowly and carefully. The cleaner should look the same as before you started.
Reattach Components
Start by placing each part in its right place. Check all screws and clips to secure them tightly. Use the manual or photos taken before disassembly. This helps to remember where each piece goes. Avoid forcing parts. They should fit easily if aligned correctly.
Test Functionality
Plug in the cleaner and turn it on. Listen for unusual sounds or vibrations. Check if the brushes and water system work properly. Test the cleaner on a small carpet area. Watch for leaks or weak suction. Fix any issues before full use to keep your carpet safe.
Frequently Asked Questions
How Do I Safely Disassemble A Bissell Carpet Cleaner?
First, unplug the cleaner and empty all water tanks. Remove screws and clips carefully. Follow the user manual to avoid damage. Keep parts organized for easy reassembly.
What Tools Are Needed To Take Apart A Bissell Carpet Cleaner?
You typically need a Phillips screwdriver, flathead screwdriver, and pliers. Some models may require hex keys or Torx drivers. Check your cleaner’s manual for specific tool requirements.
Can I Clean Internal Parts After Disassembling The Cleaner?
Yes, you can clean internal parts like brushes and tanks. Use mild soap and water, avoiding electrical components. Dry parts thoroughly before reassembling the cleaner to prevent damage.
How To Troubleshoot A Bissell Carpet Cleaner After Reassembly?
Check all connections and ensure parts fit securely. Test the cleaner on a small area. If it doesn’t work, recheck wiring and seals. Refer to the manual for specific troubleshooting tips.
Conclusion
Taking apart a Bissell carpet cleaner is easier than it seems. Follow each step carefully and use the right tools. Keep parts organized to avoid confusion later. Clean or replace any damaged pieces before reassembling. This helps your cleaner work better and last longer.
Remember, patience and care make the process smooth. Now, you can maintain your carpet cleaner with confidence. Simple steps lead to big results.